Music Community App
About
Thank you for buying! My name is Crysfel Villa, I'm a professional Software Developer, if you have any questions or run into troubles while installing the app feel free to reach out through the contact form on my codecanyon profile.
This app is build with Laravel 5.6. Laravel is responsible to store data, deal with privilages and authentication as well as serving all the clients. It doesn't return any HTML page because is a REST API. Any client can connect to the server and send/request data in a JSON format.
In this case, the client is a ReactJS app, but the client might be a native mobile app, another laravel app, a node client or anything else.
Requirements
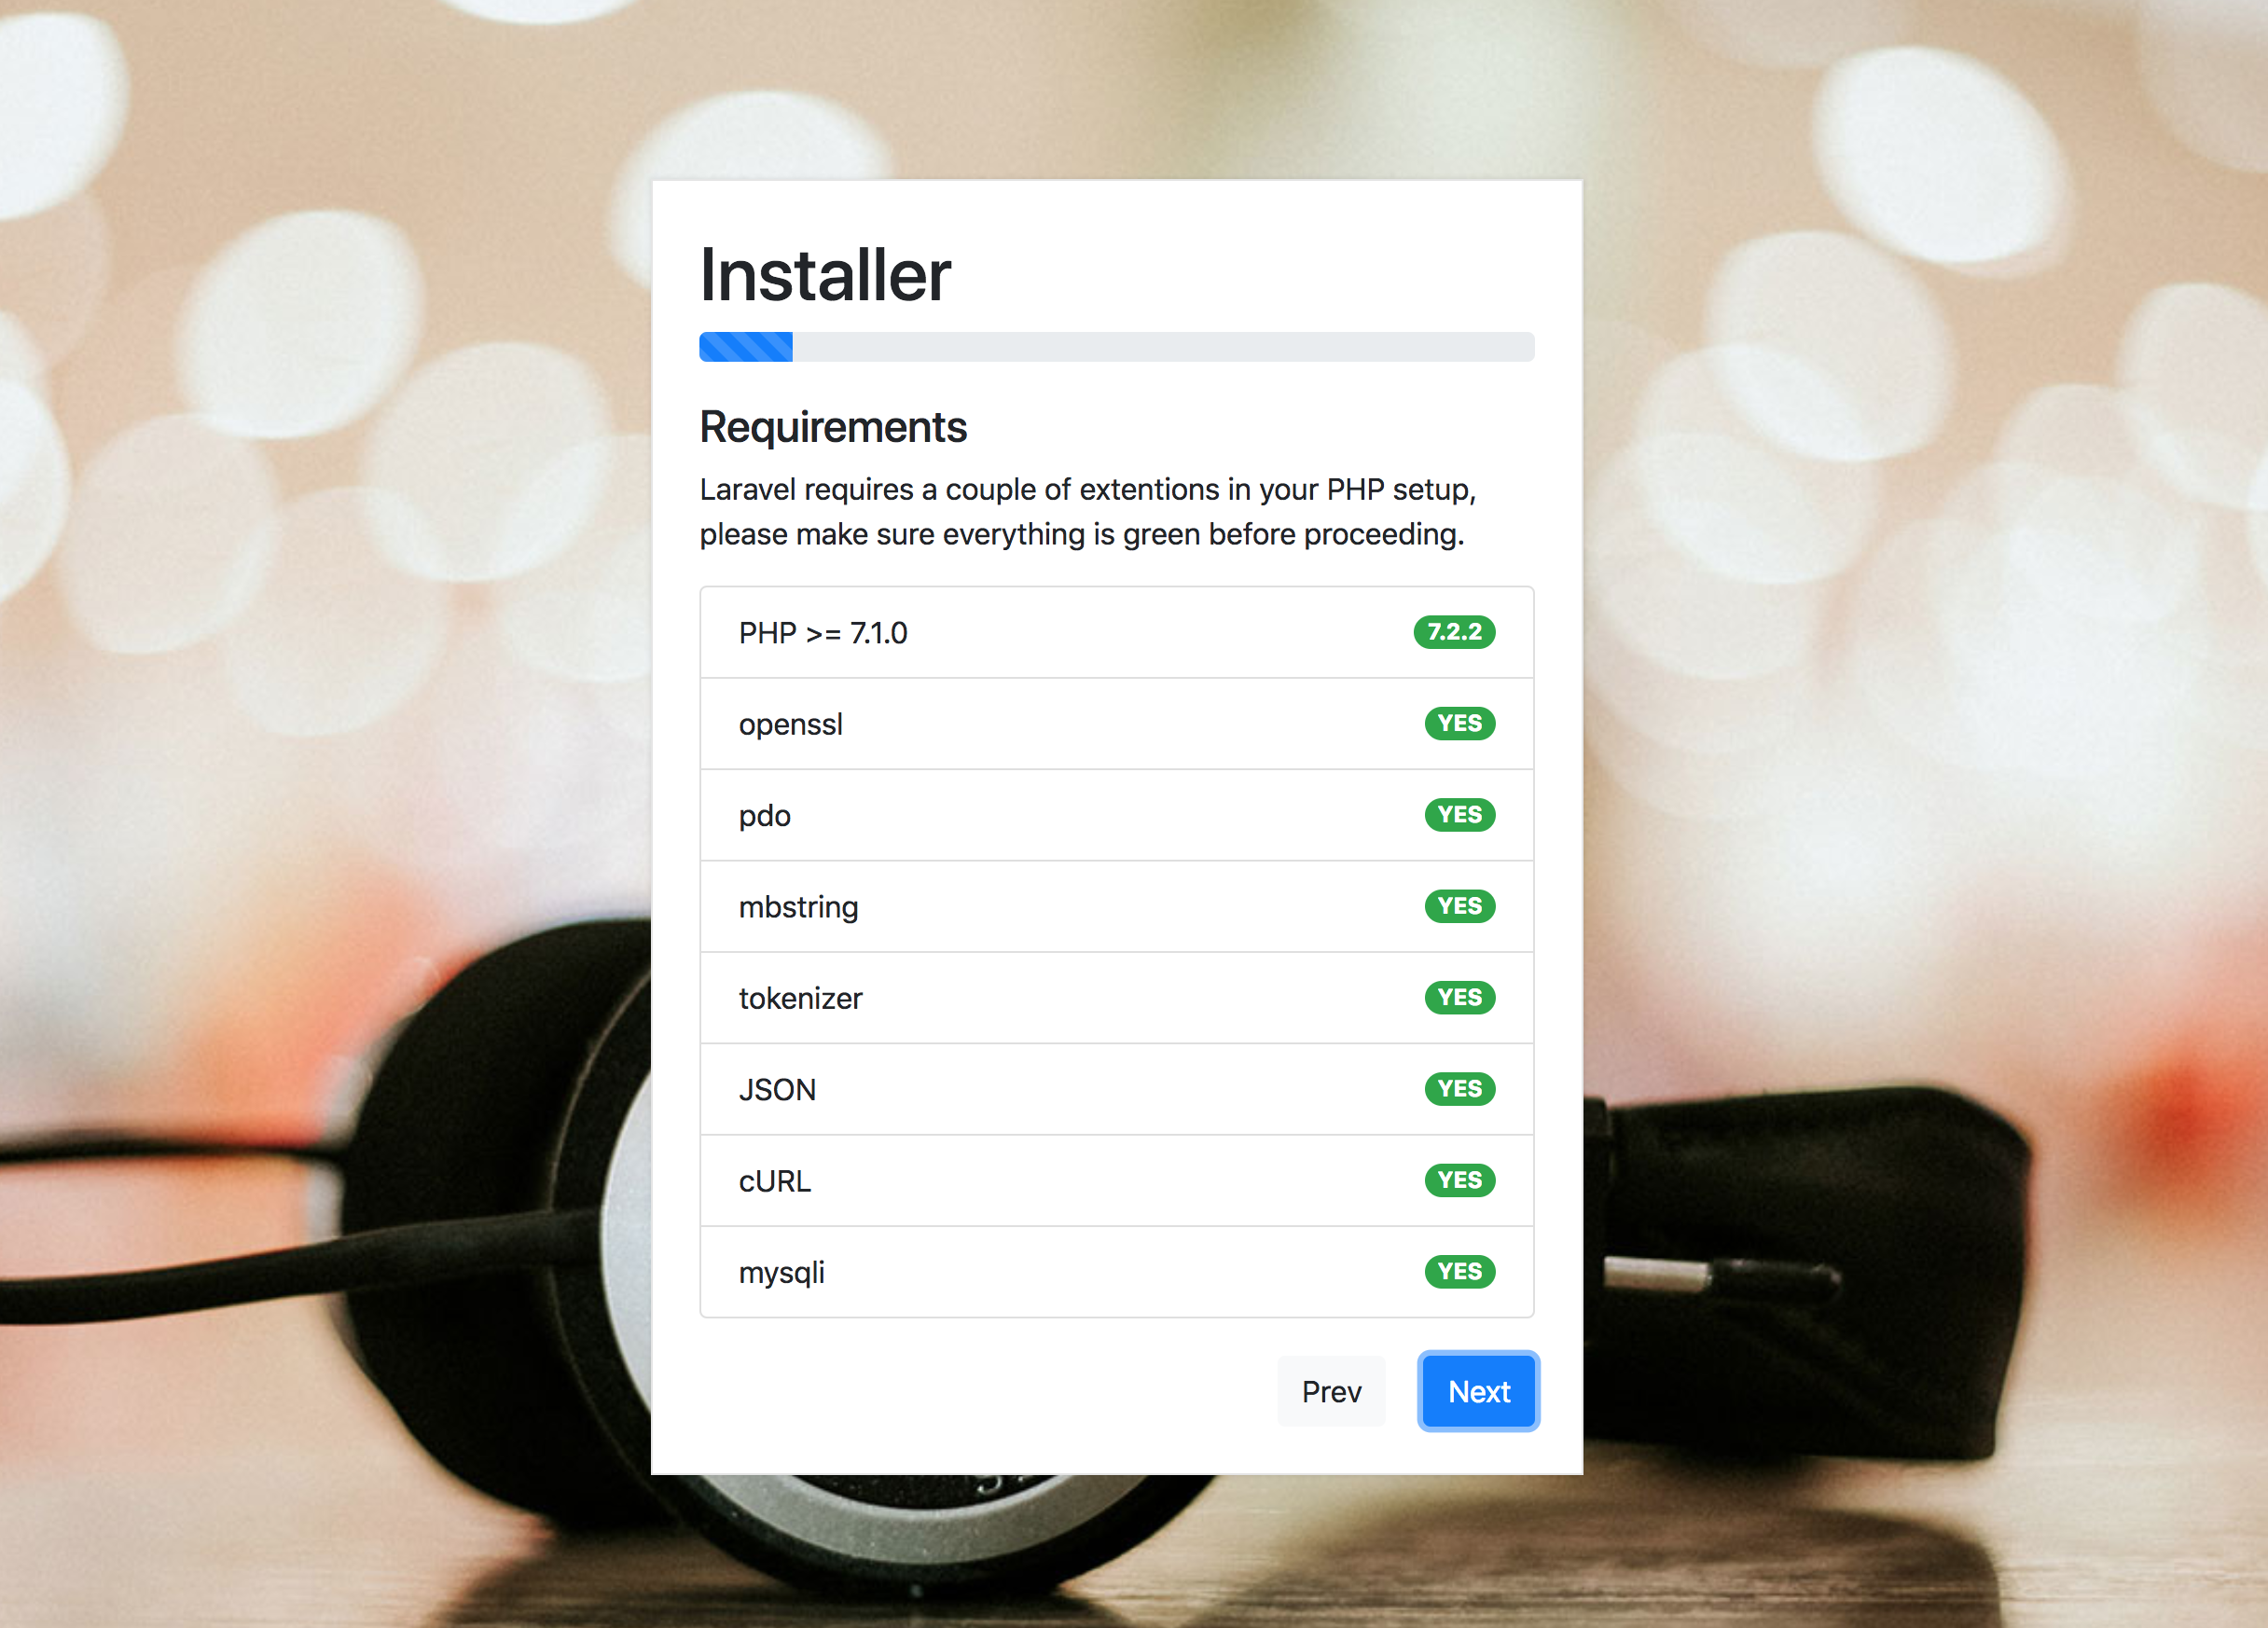
Laravel 5.6 requires the following dependencies installed in your system.
- PHP >= 7.1.3
- OpenSSL PHP Extension
- PDO PHP Extension
- Mbstring PHP Extension
- Tokenizer PHP Extension
- XML PHP Extension
- Ctype PHP Extension
- JSON PHP Extension
- MySQL 5.7.21
- Composer 1.5.2
In order to install the client you need node and npm installed in your system
- Node 8.x
- NPM 5.x
Installation
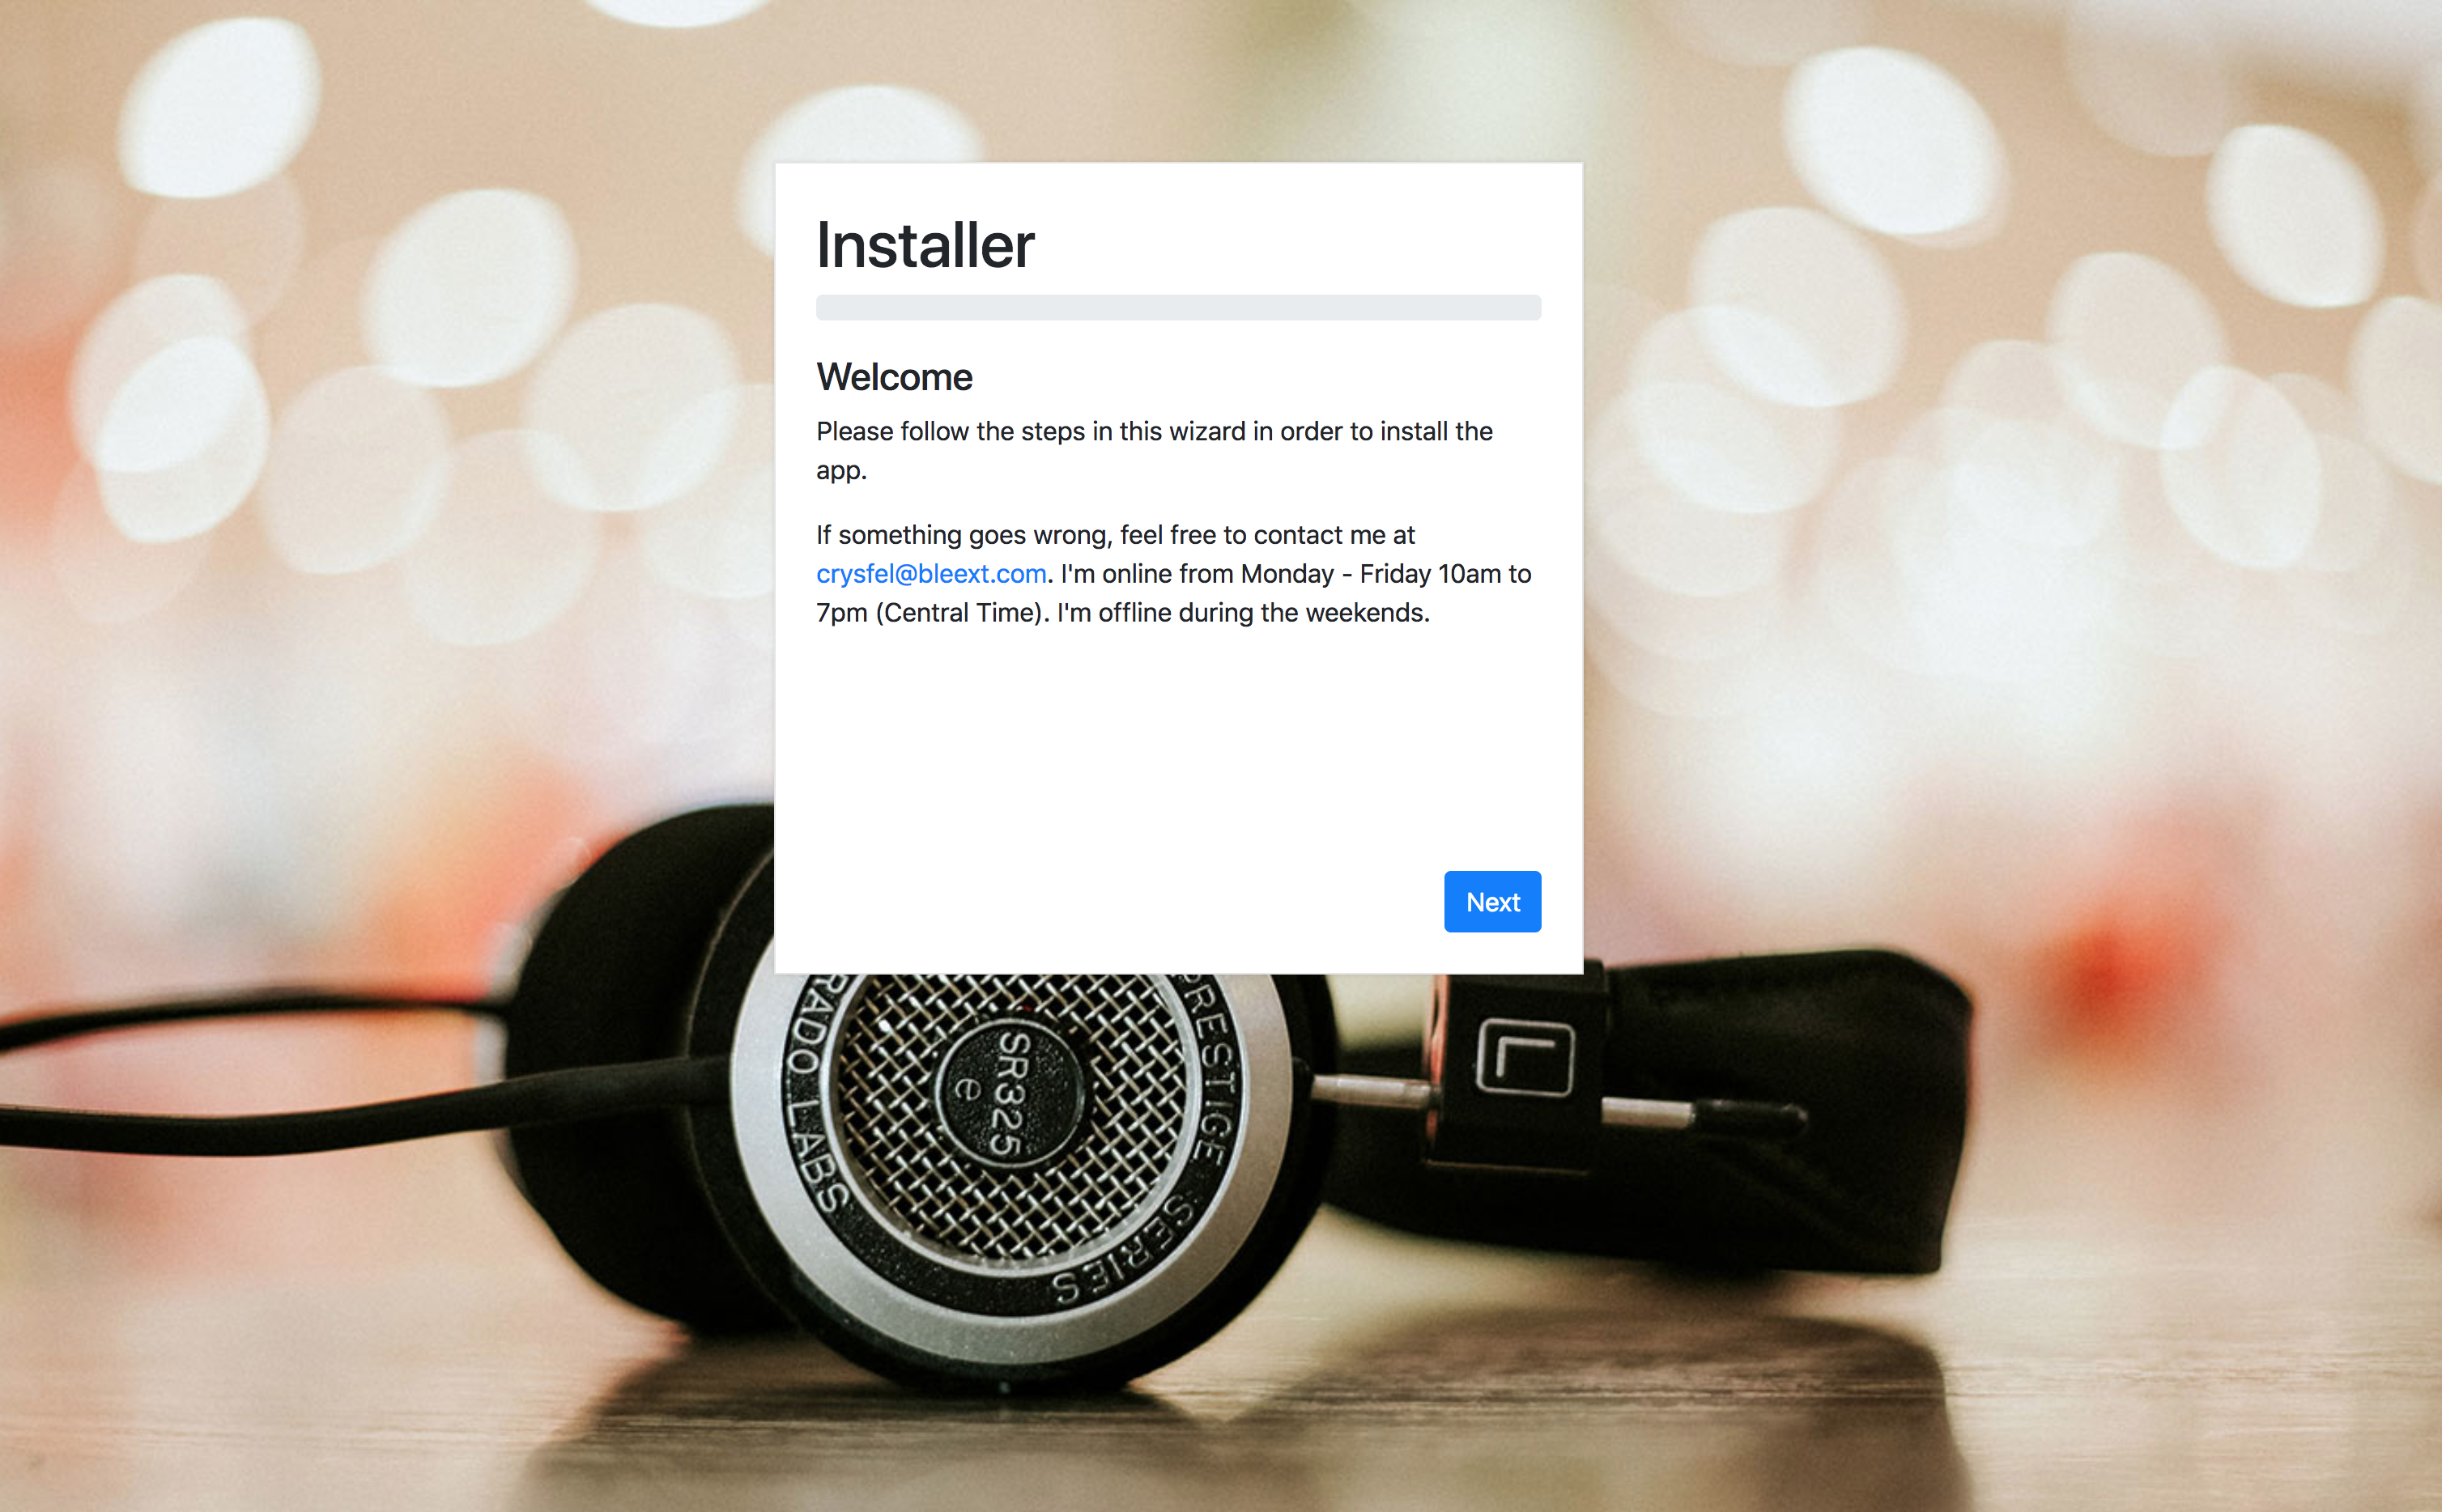
For your convenience, I've included an installer that will help you setup everything you need to run this app. The installer will check your php version and the required extensions, make sure you have all those ready before proceeding to the next steps.
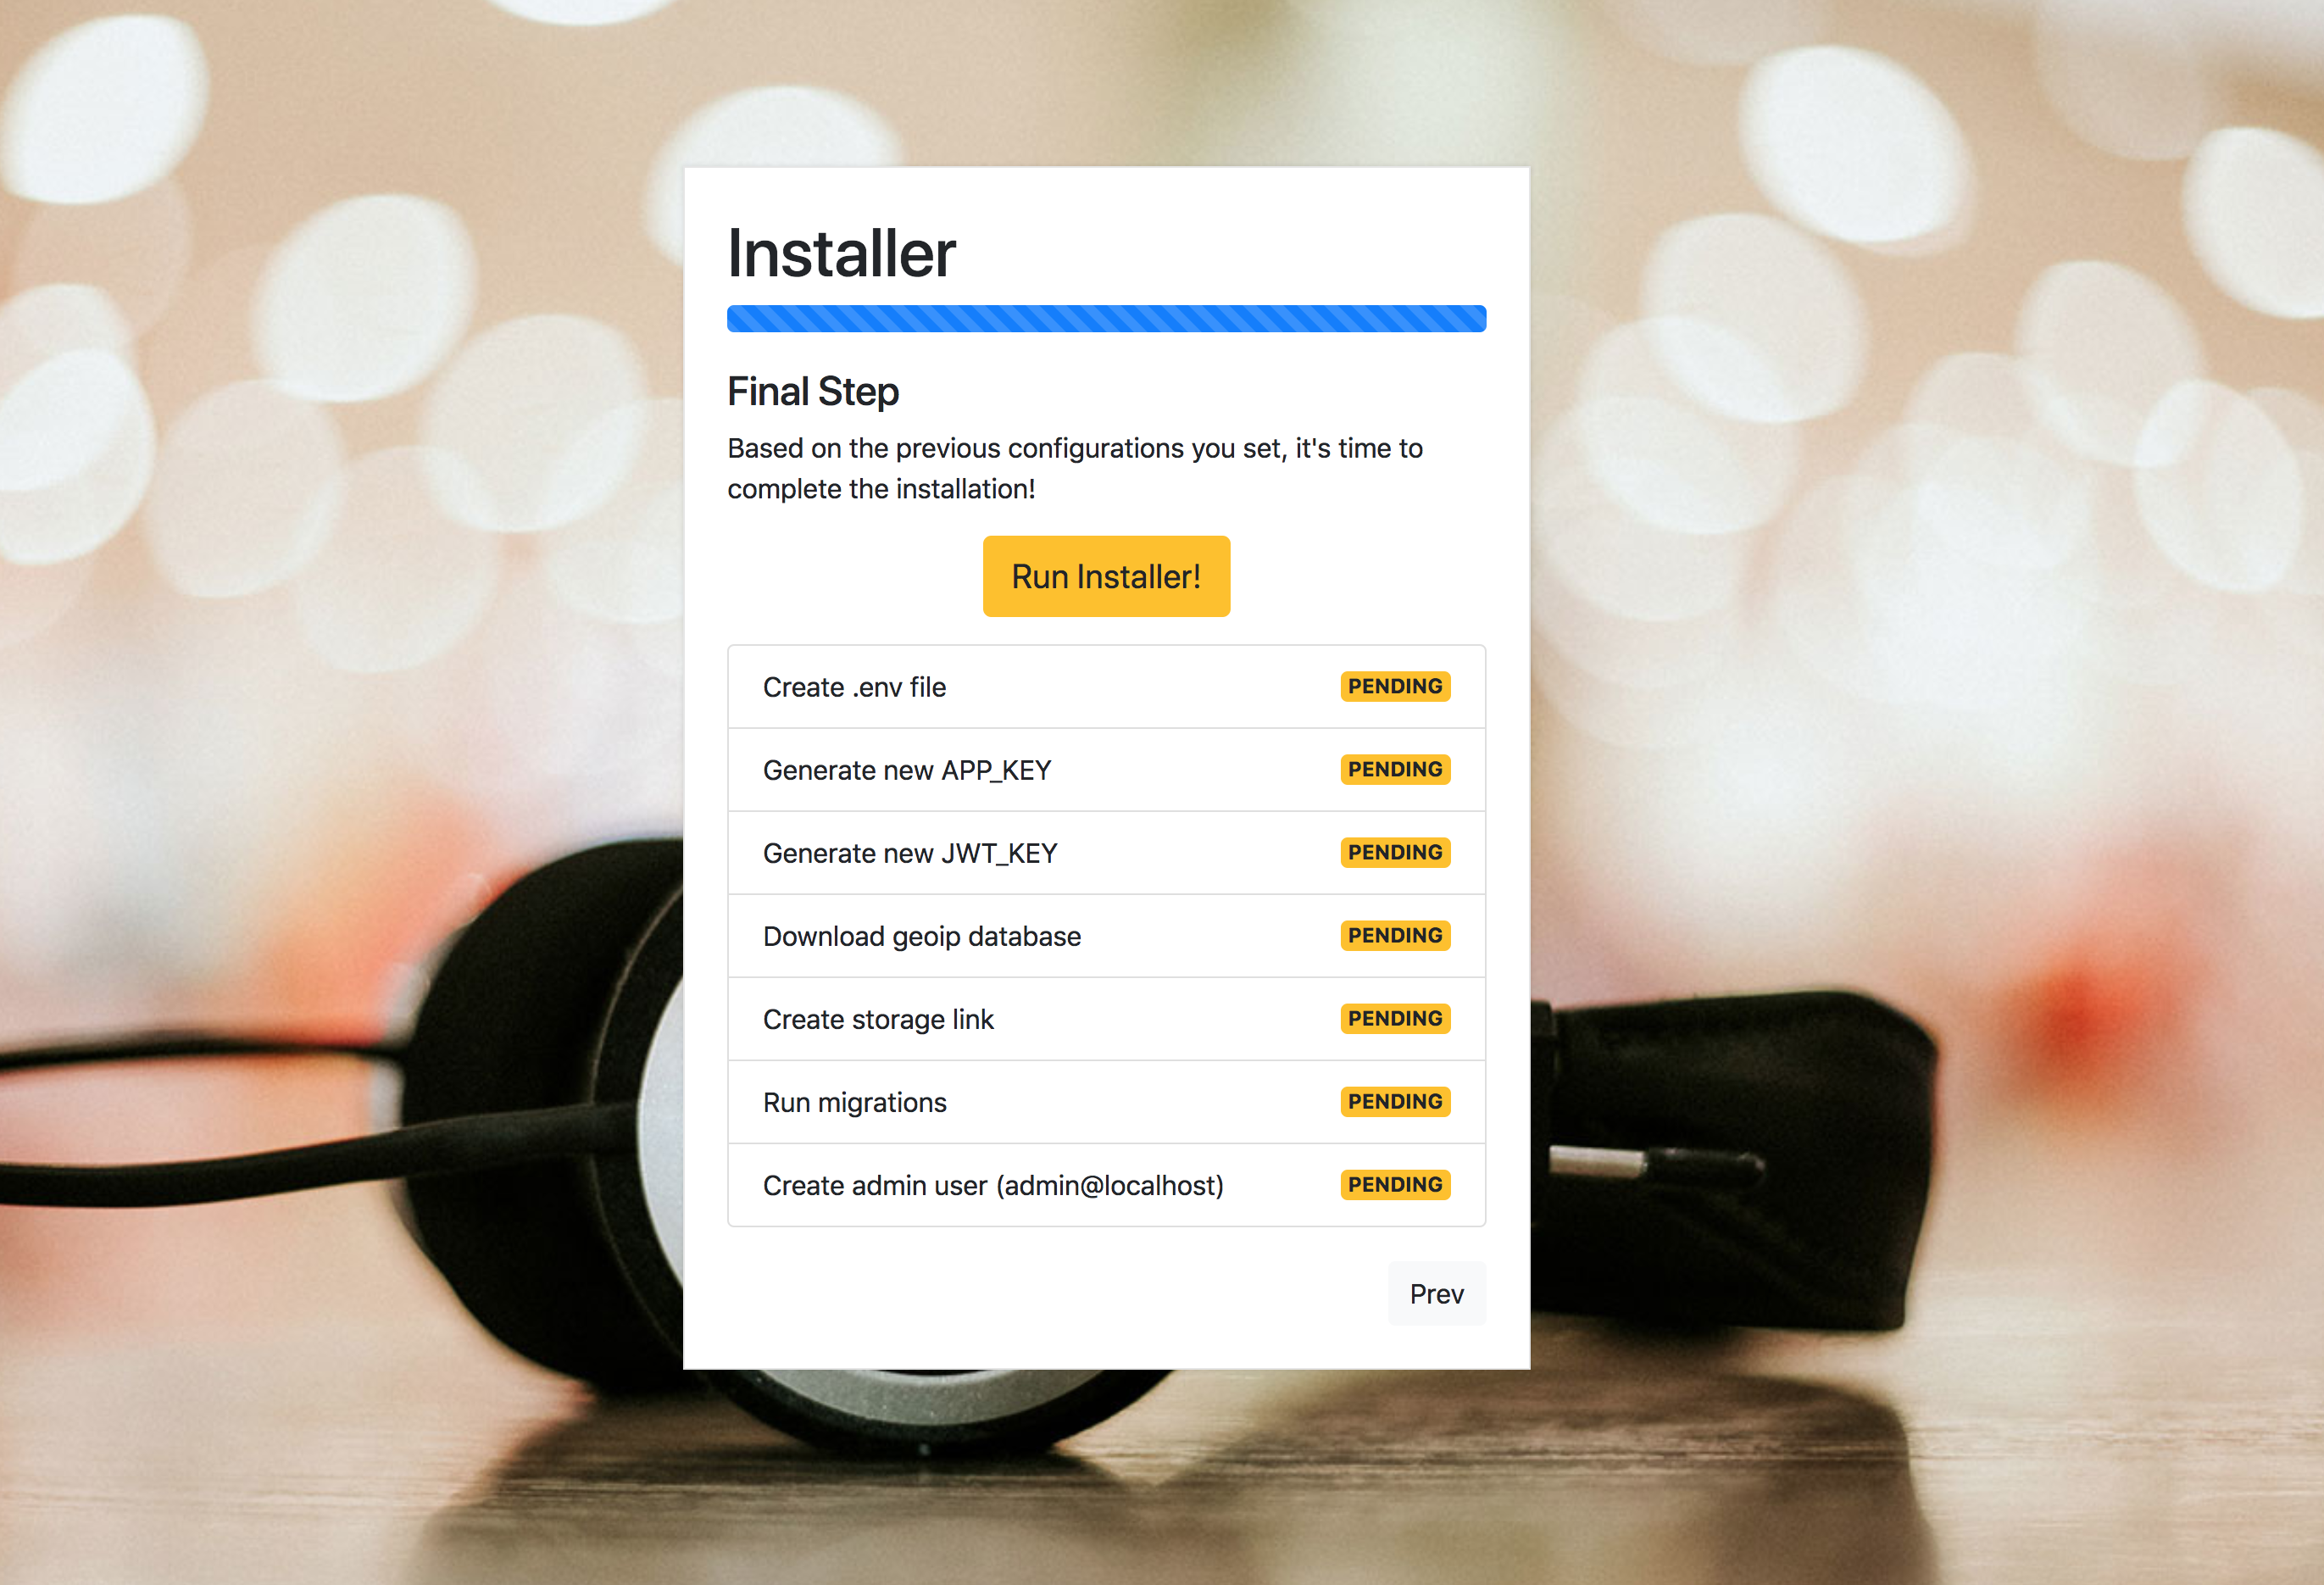
Before running the installer, you will need a couple things. First and most importantly the mysql database created, you need the credentials and the name of the database you will be using. You will also need to have the details for the SMTP server, this information is required to send emails to your users, the installer will allows you to use other services such as Mailgun or Amazon SES, but make sure you have this information at hand.
Upload the musicapp-1.2.0.zip file to your server, I'd recommend uploading it to `/var/www/yourdomain.com`, but thats completly up to you. Unzip the file and make sure the content is not accessible through the internet yet.
Finally, your HTTP server must be resolving the root to `/var/www/yourdomain.com/musicapp/public`, this is very important because the way Laravel works, if you don't set the root correctly, the app won't work. If you are using cpanel or pdesk, it should be quite easy, if you are using the terminal just update your http server configurations accordingly. Also make sure your http server can write into the file system, otherwise the installer won't be able to setup the needed configurations for you.
Manually Installing the REST API
Before proceeding to manually installating the REST API, make sure you have all the system requirements installed, such as php, mysql, composer, node, npm.
Creating the database
First thing we need to do is to create a database to store the data. This application is using MySQL 5.7 or above. Go ahead and create an empty database with your favorite mysql client, or if you are like me open your terminal and run the following commands.
The first command is opening a connection to the MySQL server, it will ask you for your password. In this case I'm using root as the user, but you can use any user that is able to create dabases.
The second command is executed inside the mysql server, and is creating an empty database called music, feel free to use any name here, just keep in mind that value because we are going to use it later.
The third command is craeting a new user to access the `music` database from `localhost`, if you are using a dedicated server for your database, make sure to set the right IP in here.
The fourth command is just closing the connection with the database.
If you are installing in production, I'd recommend you to create a different user to connect from Laravel, also you might want to use a dedicated server for your database.
$ mysql -u root -p
> create database music;
> GRANT ALL ON music.* TO 'your_new_user_here'@'localhost' IDENTIFIED BY 'your-password-here!' WITH GRANT OPTION;
> exit;
Installing dependencies
Now that our database is created, let's proceed to install the Laravel App. Unzip the musicapp-1.1.0.zip file into your workspace or anywhere else. Open your terminal, navigate to the unziped folder and run the following commands.
The first command is just opening the app folder. If you are installing in production, I'd recommend you to extract the project under /var/www/yoursite.com/current. If installing for development, make sure to remove the flags --no-dev --optimize-autoloader, these flags are only for production.
The second command installs all the dependencies for this project. It will automatically download all packages for you.
$ cd the/path/to/music
$ composer install --no-dev --optimize-autoloader
Setting up storage link
Laravel keeps all uploaded files in the storage/app/public folder, in order to access these file through the HTTP Server, we need to create a symbolic link in the public folder. We can easily do this by running the following artisan task:
$ php artisan storage:link
Setting the writing permissions
Laravel requires write access to certain folders, if we are deploying to a linux environment, we can set this by running the following commands.
If you are running your application in local, in most cases this is not required.
$ sudo chgrp -R www-data storage bootstrap/cache
$ sudo chmod -R ug+rwx storage bootstrap/cache
Configurations
In order to connect to the database, send emails, use facebook login, etc. We need to setup the configuration, this project contains an example you can use to define all configurations. Just run the following commans in the terminal:
The first command duplicates the environment example and create a .env file. In this file we will define all configurations that we need.
The second command opens the file in the vim editor. Feel free to use your favorite editor to update the value of the current configurations. We will see each config in detail.
$ cp .env.example .env
$ vim .env
General configurations
Inside the .env file you will find a couple groups of configuration, the ones at the top are general configuration.
APP_NAME Set the name of the app.
APP_ENV Set the environment we are running the app, if in development set the value to ` local`, for production set it to ` production`.
APP_KEY The app key to generate passwords, in order to generate a new key run: `php artisan key:generate` in your terminal and it will set a new one for you.
APP_DEBUG When running in production set this to ` false` in development set it to ` true`.
APP_URL The API url, if you are running in a different subdomain, make sure to set the correct value here. If runing in development set it to ` http://localhost`
APP_FRONTEND_URL The front end URL, this is used for the emails. If running in develop set it to ` http://localhost:8080`
APP_IS_NEW_USER_AUTHOR Whether or not new user will be able to create albums and upload images. If set it to ` false`, the admin needs to grant access to the author role manually for every user.
APP_NAME=MusicApp
APP_ENV=production
APP_KEY=someSecureKeyHereGeneratedByArtisan
APP_DEBUG=false
APP_URL=https://api.example.com
APP_FRONTEND_URL=https://example.com
APP_IS_NEW_USER_AUTHOR=true
Error Reporting
When going to production is always a good idea to track for errors in the code, this products comes with Sentry integrated, all we need to do is to define the keys we get from Sentry, and you will start getting error reports for both, the backend (php) and the frontend (JavaScript).
SENTRY_LARAVEL_DSN Set the key to track errors in the PHP code base usign Sentry. Once you register in Sentry crete a new Laravel project in the platform and get the KEY.
SENTRY_REACT_DSN Set the key to track the JavaScript code using Sentry.
## Sentry error reporting
SENTRY_LARAVEL_DSN=
SENTRY_REACT_DSN=
File system configurations
Laravel allows to upload files to the local file system of our server or to a cloud server such as amazon s3. The following configurations set where we are going to keep our uploaded files.
FILESYSTEM_DRIVER Set the driver to store the uploaded files. We can use amazon s3 by setting the value `s3`, but we are using the local file system for this setup.
FILESYSTEM_CLOUD The default cloud system, we can use `rackspace` or `s3`.
FILESYSTEM_DRIVER=local
FILESYSTEM_CLOUD=s3
Database configuration
This project uses MySQL as a database server, make sure to set the credentials and specific configurations here.
DB_CONNECTION The database driver.
DB_PORT The port of our database server.
DB_HOST The host, if you are running a different server, make sure to set the corrent IP here.
DB_DATABASE The database name, the one we created at the begining of the tutorial.
DB_DATABASE_TEST Additionally we can define a test database, make sure to create it.
DB_USERNAME The user to get connected to the mysel server
DB_PASSWORD The password to use, make sure to set the correct password for your user
DB_CONNECTION=mysql
DB_PORT=3306
DB_HOST=127.0.0.1
DB_DATABASE=music
DB_DATABASE_TEST=music_test
DB_USERNAME=root
DB_PASSWORD=
Email configurations
In order to send email, we need to setup the smtp credentials. I'd recommend using mailgun, but feel free to use any other service or even your own smtp server.
For development I'd recommend using MailCatcher, a ruby smtp server that catch all outgoing emails and gives you a web interface to view every email. Ideal for development!
MAIL_DEFAULT_DOMAIN When login with facebook, some users don't have email address, for that case we create a fake email, in here you need to define the domain.
MAIL_FROM_ADDRESS All outgoing email will be send by this address
MAIL_FROM_NAME The name who's sending the email
MAIL_DRIVER, MAIL_HOST, MAIL_PORT, MAIL_USERNAME, MAIL_PASSWORD, MAIL_ENCRYPTION SMTP configurations, if using mailgun you can get those values there. Make sure the values are correct otherwise sending emails will fail.
MAIL_DEFAULT_DOMAIN=example.com
MAIL_FROM_ADDRESS="contact@example.com"
MAIL_FROM_NAME="Crysfel Villa"
MAIL_DRIVER=smtp
MAIL_HOST=127.0.0.1
MAIL_PORT=1025
MAIL_USERNAME=null
MAIL_PASSWORD=null
MAIL_ENCRYPTION=null
Login with email and facebook
In order to generate JWT tokens, we need to setup the secret key. To login with facebook we need to set the private key.
JWT_SECRET Generate a new key using a tool such as this one.
JWT_FACEBOOK_SECRET You can get this value from the facebook developer portal.
JWT_SECRET=secretKeyHere
JWT_FACEBOOK_SECRET=appIdHere
Amazon S3
If you want to integrate your installation with Amazon S3, you need to set your credentials here.
# Get these values from Amazon S3
S3_KEY=
S3_SECRET=
S3_BUCKET=
S3_REGION=us-east-1
Setting up the database
With all dependencies ready, and the configurations in place, we can now run the migrations! This will create all the tables in the database.
$ php artisan migrate
Seeding production
In order to start using the application, you need to create the admin user. To do that we can run the production seed as follow.
This script will only create an admin user, it doesn't remove any data. It only adds a new record to the users table and to the activities table. Once you run this script you will be able to login into the app using the following credentials: user: admin@admin.com pass: admin123.
We can only run this seed once, if we try again it will fail because the user already exist. Make sure to change the email/password from the users module on the administration section.
$ php artisan db:seed --class=ProductionSeeder
Seeding development
When running the app in development it's useful to have some data preloaded into the database, this way we can use it to develop new features. To run the seeds just execute the following command in the terminal.
You should only run this command in development, because it drop all tables and files and create everything again.
$ php artisan db:seed
Setting up the development server
We are now ready to run the app in development mode. With Laravel, that's very easy, all we have to do is run the following artisan task.
We will have our app running on port 8000. Open http://localhost:8000 and you will see the app running.
When deploying to production you need to build the SPA again with your own configurations, such as different title, api endpoing, etc. We will cover the steps to build the client in the next section.
$ php artisan serve
Setting up the production server
You can use apache2 or nginx as a webserver to deploy this project. The only thing you need to make sure when deploying the project is to point the root of the server to the public directory in the laravel project.
NGINX
For example, if we want to install our project under /var/www/musicapp.example.com, the Nginx configuration file will look something like this
server {
  # Listening on port 80
  listen 80;
  listen [::]:80;

  # Root folder pointing to the `public`
  # folder in the project
  root /var/www/musicapp.example.com/public;

  # Make sure to add index.php to the list
  index index.php index.html index.htm;

  server_name musicapp.example.com;
  client_max_body_size 200M;

  location / {
    # First attempt to serve request as file, then
    # as directory, then laravel entry point.
    try_files $uri $uri/ /index.php?$query_string;
  }

  # pass PHP scripts to FastCGI server
  #
  location ~ \.php$ {
    include snippets/fastcgi-php.conf;

    # With php-fpm (or other unix sockets):
    fastcgi_pass unix:/var/run/php/php7.1-fpm.sock;
  }
}
Apache2
If we want to install our project under /var/www/musicapp.example.com, the Apache2 configuration file will look something like this.
When using Apache, make sure to install the rewrite module.
<VirtualHost *:80>
  ServerName musicapp.example.com
  DocumentRoot "/var/www/musicapp.example.com/public"
  <Directory "/var/www/musicapp.example.com/public">
    AllowOverride all
  </Directory>
</VirtualHost>
Installing the client
This project already comes with a production build for the client SPA, these files are located under public/dist. If you want to make any change (You should), you will need to create the build using webpack.
In order to install the client for development, you need node and npm installed in your system, make sure to have it before proceeding to the following instructions.
The project runs with webpack, a JavaScript bundler to automate the build process for deployment. The source code is inside the resources/spa. Everything related to the UI is here.
To run the client in development, we use webpack dev server. The client will run in the port 8080 while the laravel server runs by default on port 8000.
Configurations
All available configurations for the client are inside the file .env.example, At this point you should have ranamed this file to .env, but if not go ahead and rename it. The build script will look for this file to get some values such as the title to display, the API url to request data, etc. Open your terminal an run the following command.
In this case we are using vim, but feel free to use your favorite editor.
All frontend configurations are at the bottom of the file.
$ vim .env
Environment
APP_TITLE set the title of the app, there are several places where the name of the app is being rendered. Set your very unique name in here.
SERVER_API_URL set the URL for the REST API, For production just set the value to /api, for development set the value to http://localhost:8000.
API_VERSION The version of the API to request. Leave it as v1, or the version of the API you want to request, it's unlikely you will need to change this value.
DEFAULT_LOCALE This application supports different locales, however for now only english is being translated. In next releases I will include more translations.
DEFAULT_ROUTE This is the route the user will see when entering the app for the first time. Chances are you don't need to update this value.
FACEBOOK_APP_ID Get the app id from the Facebook developer platform, this is needed to login with Facebook.
APP_TITLE=Music App
SERVER_API_URL=/api
API_VERSION=v1
DEFAULT_LOCALE=en
DEFAULT_ROUTE=/public/discover
FACEBOOK_APP_ID=YOUR_FACEBOOK_APP_ID
Installing npm packages
To install all dependencies all you need to do is run the following command.
This will download from the internet all dependencies, including webpack, the bundler tool this project uses to automate builds.
$ yarn install
Running development
To run the client in development all you have to do is run the following command.
This is going to compile all the source files and create the develpoment bundle. Then it will start an http server on port 8080, you can acccess http://localhost:8080.
Webpack includes the Hot Reloading module, this means that you can update any of the source code files and the browser will automatically refresh to update the changes. This improves the development experience.
$ yarn dev
Building for production
In order to prepare our client app for production, all we have to do is run the following command in the terminal.
This script will compile all the javascript and sass code, then it will compress the resulting files for faster downloading on production environments.
Finally it will create a public/dist folder. This is the folder we need to deploy to production, in here there's an HTML, JS and CSS files, along with the source maps.
Once everything is completed you need to upload your project again to your production server.
$ yarn build
Features
This application allows users to create albums and upload mp3 files to the platform. The administrator can either allow new users to be authors by default or manually set each user.
Guests
A guest is a visitor, they are not registered in the platform. They still can look around and play songs, but some features are disabled. In addition the admin can require all users to login in order to play the songs, this will redirect to the login page every visitor that is not registered into the system.
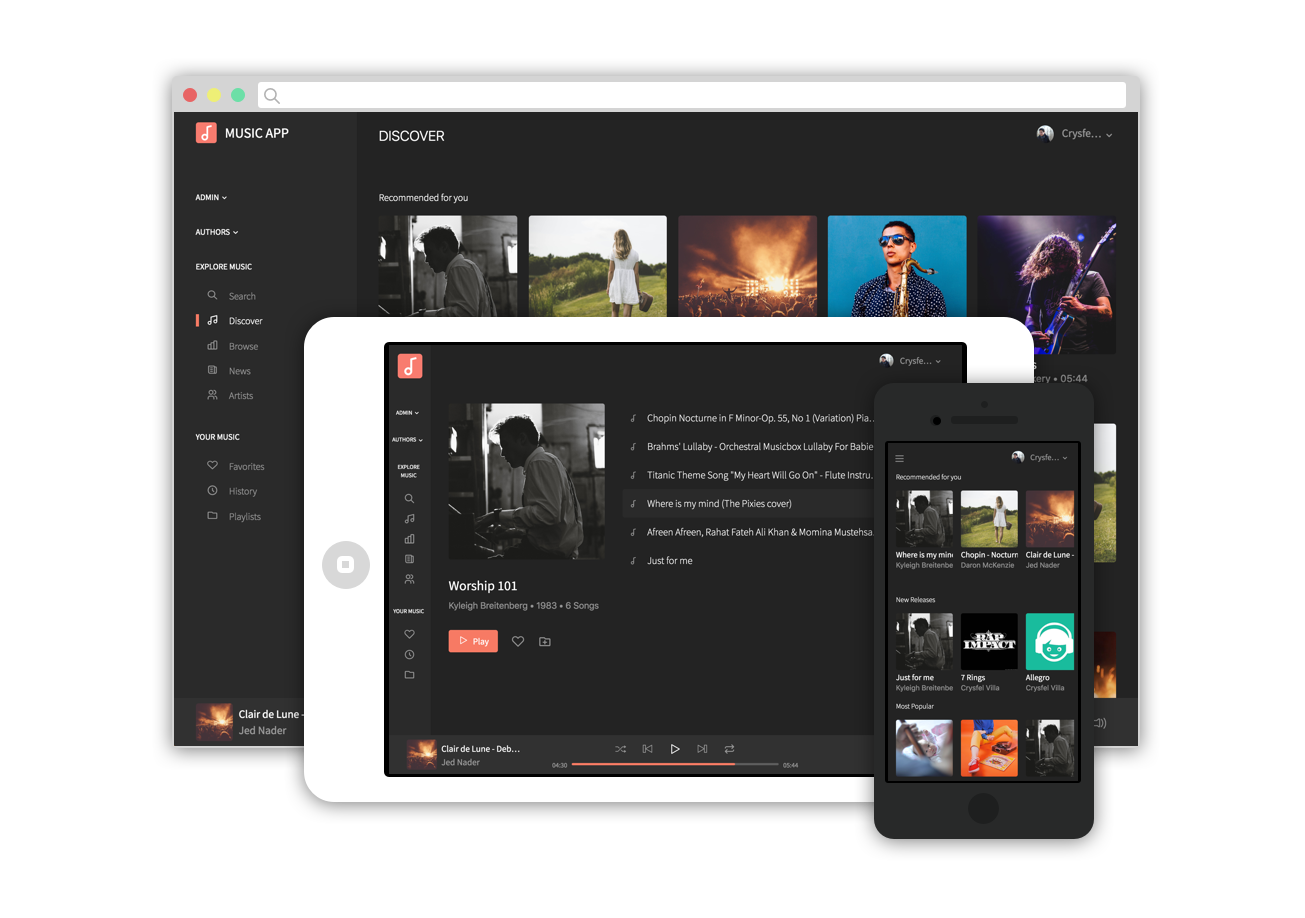
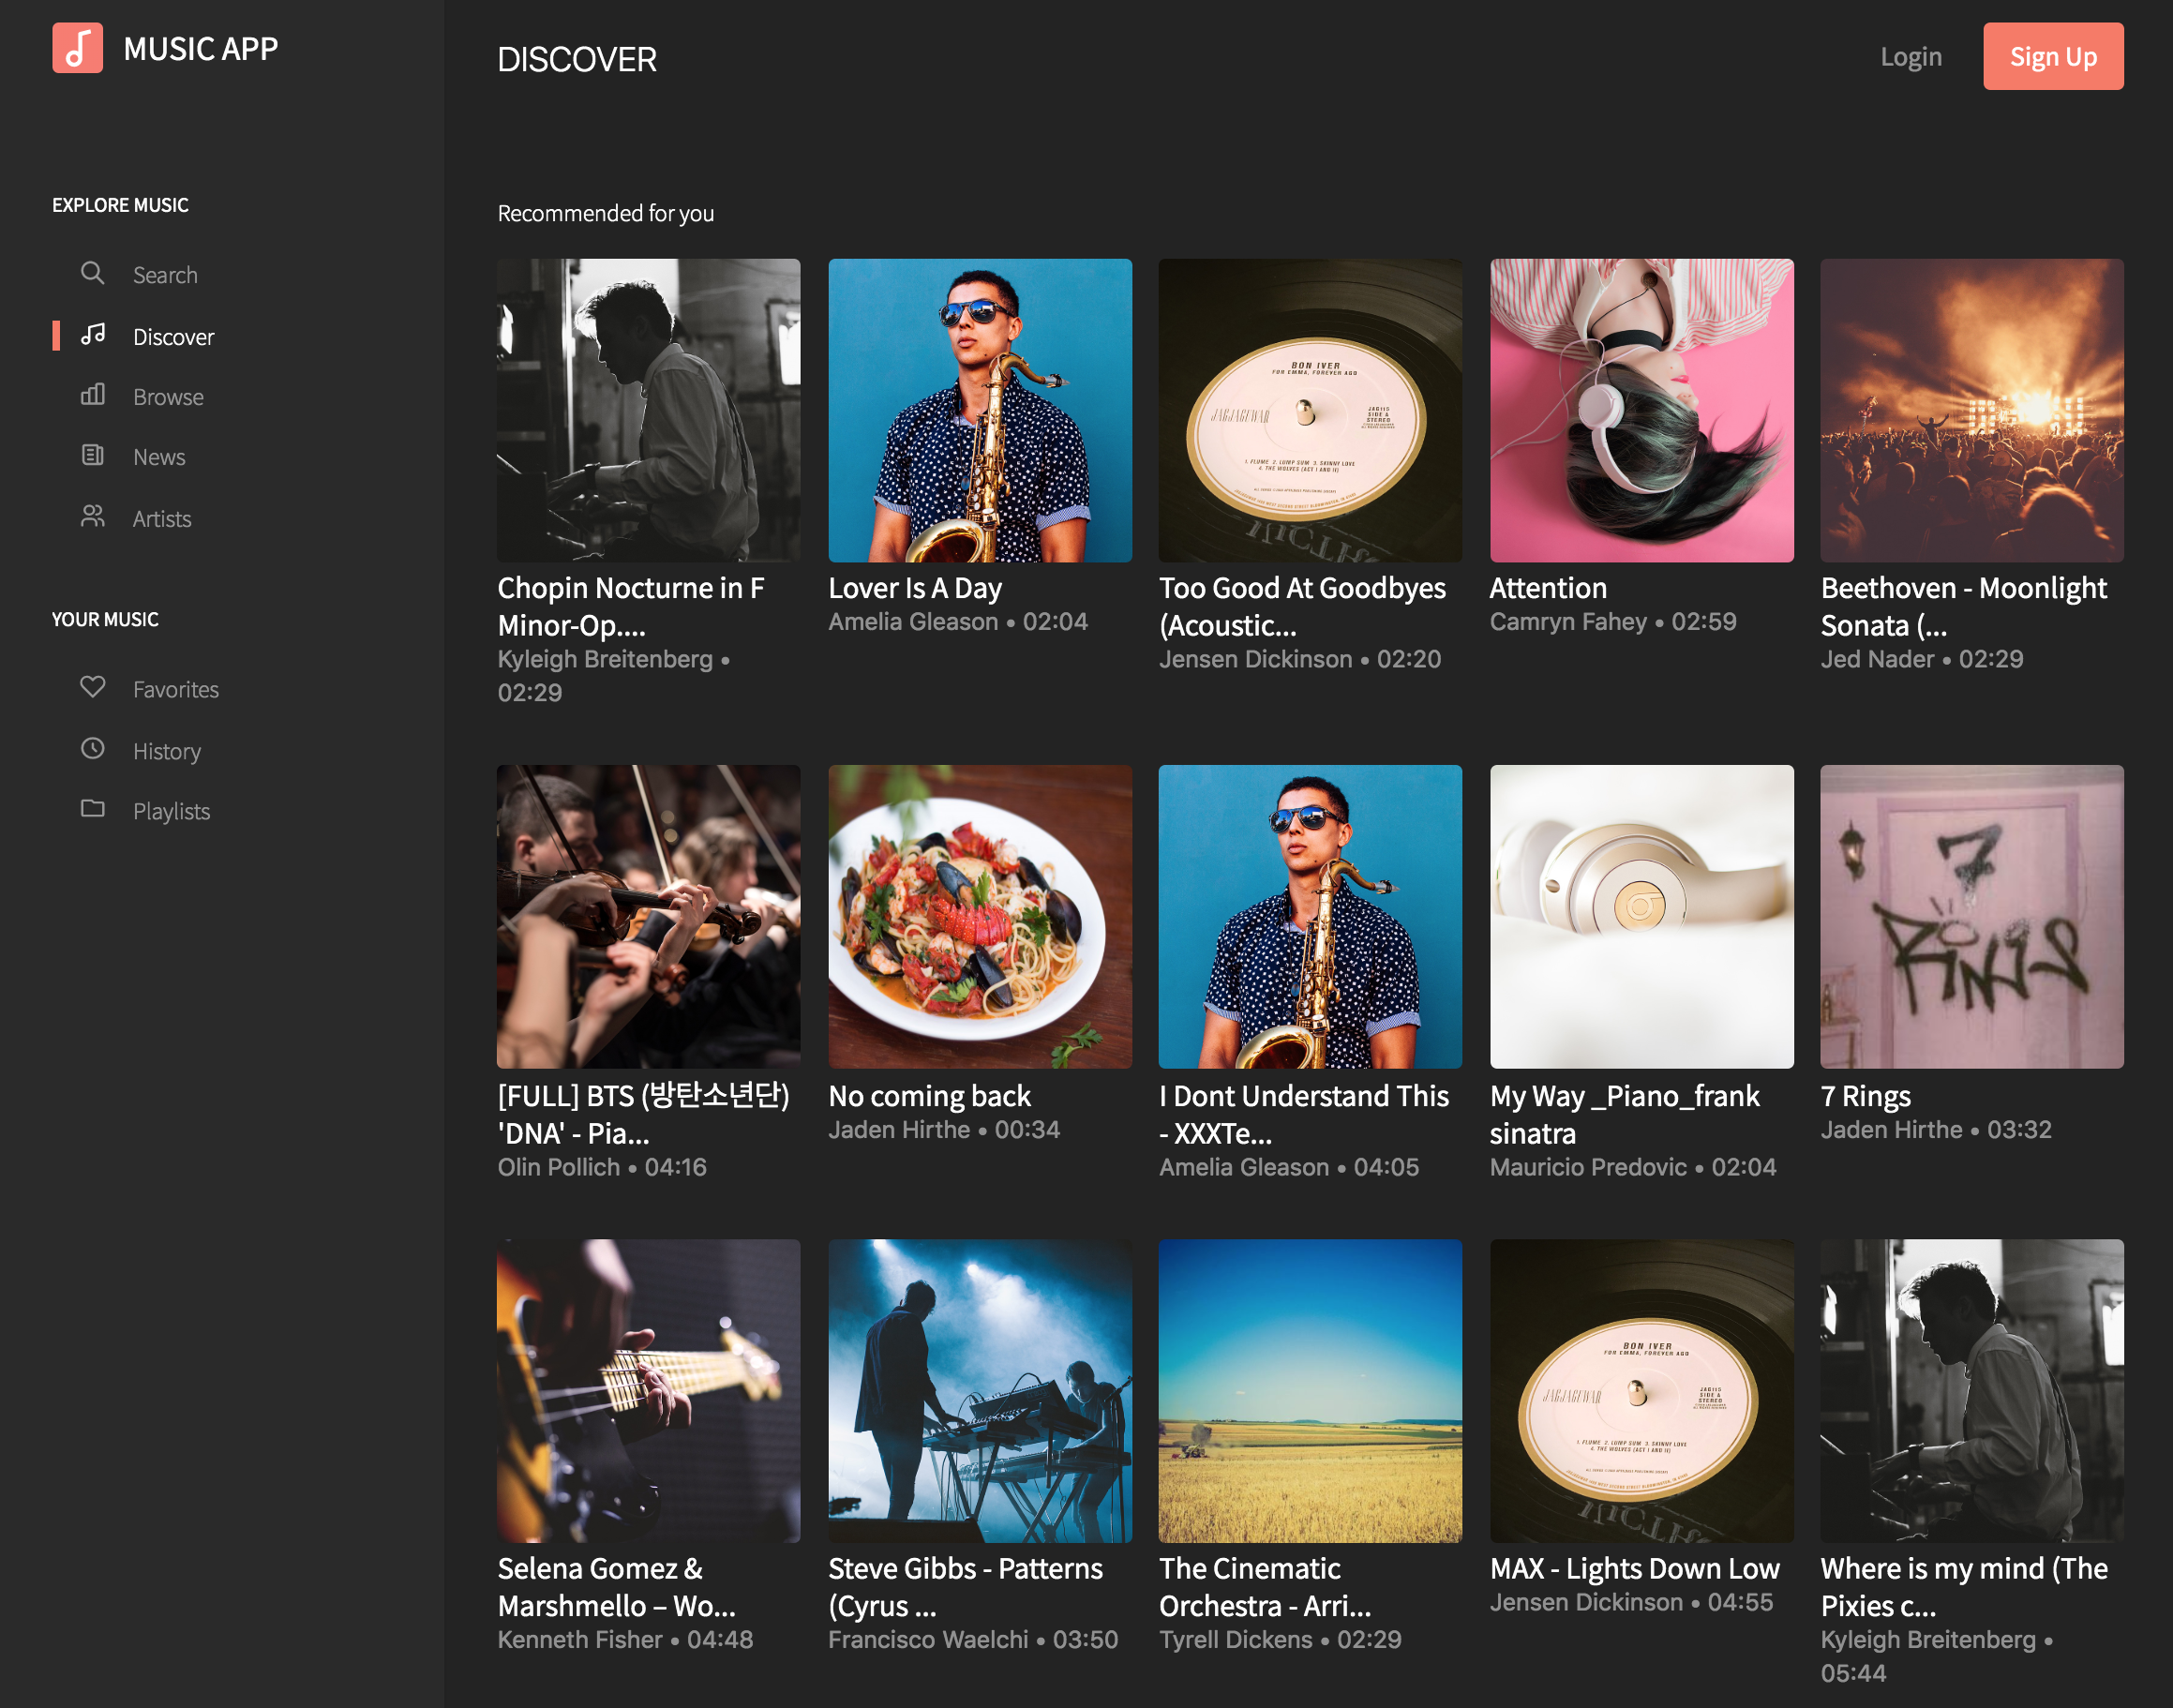
Discover
In this page guests can see recommendations, top ten song, latest uploads and popular artist.
This is a great place to discover popular songs.
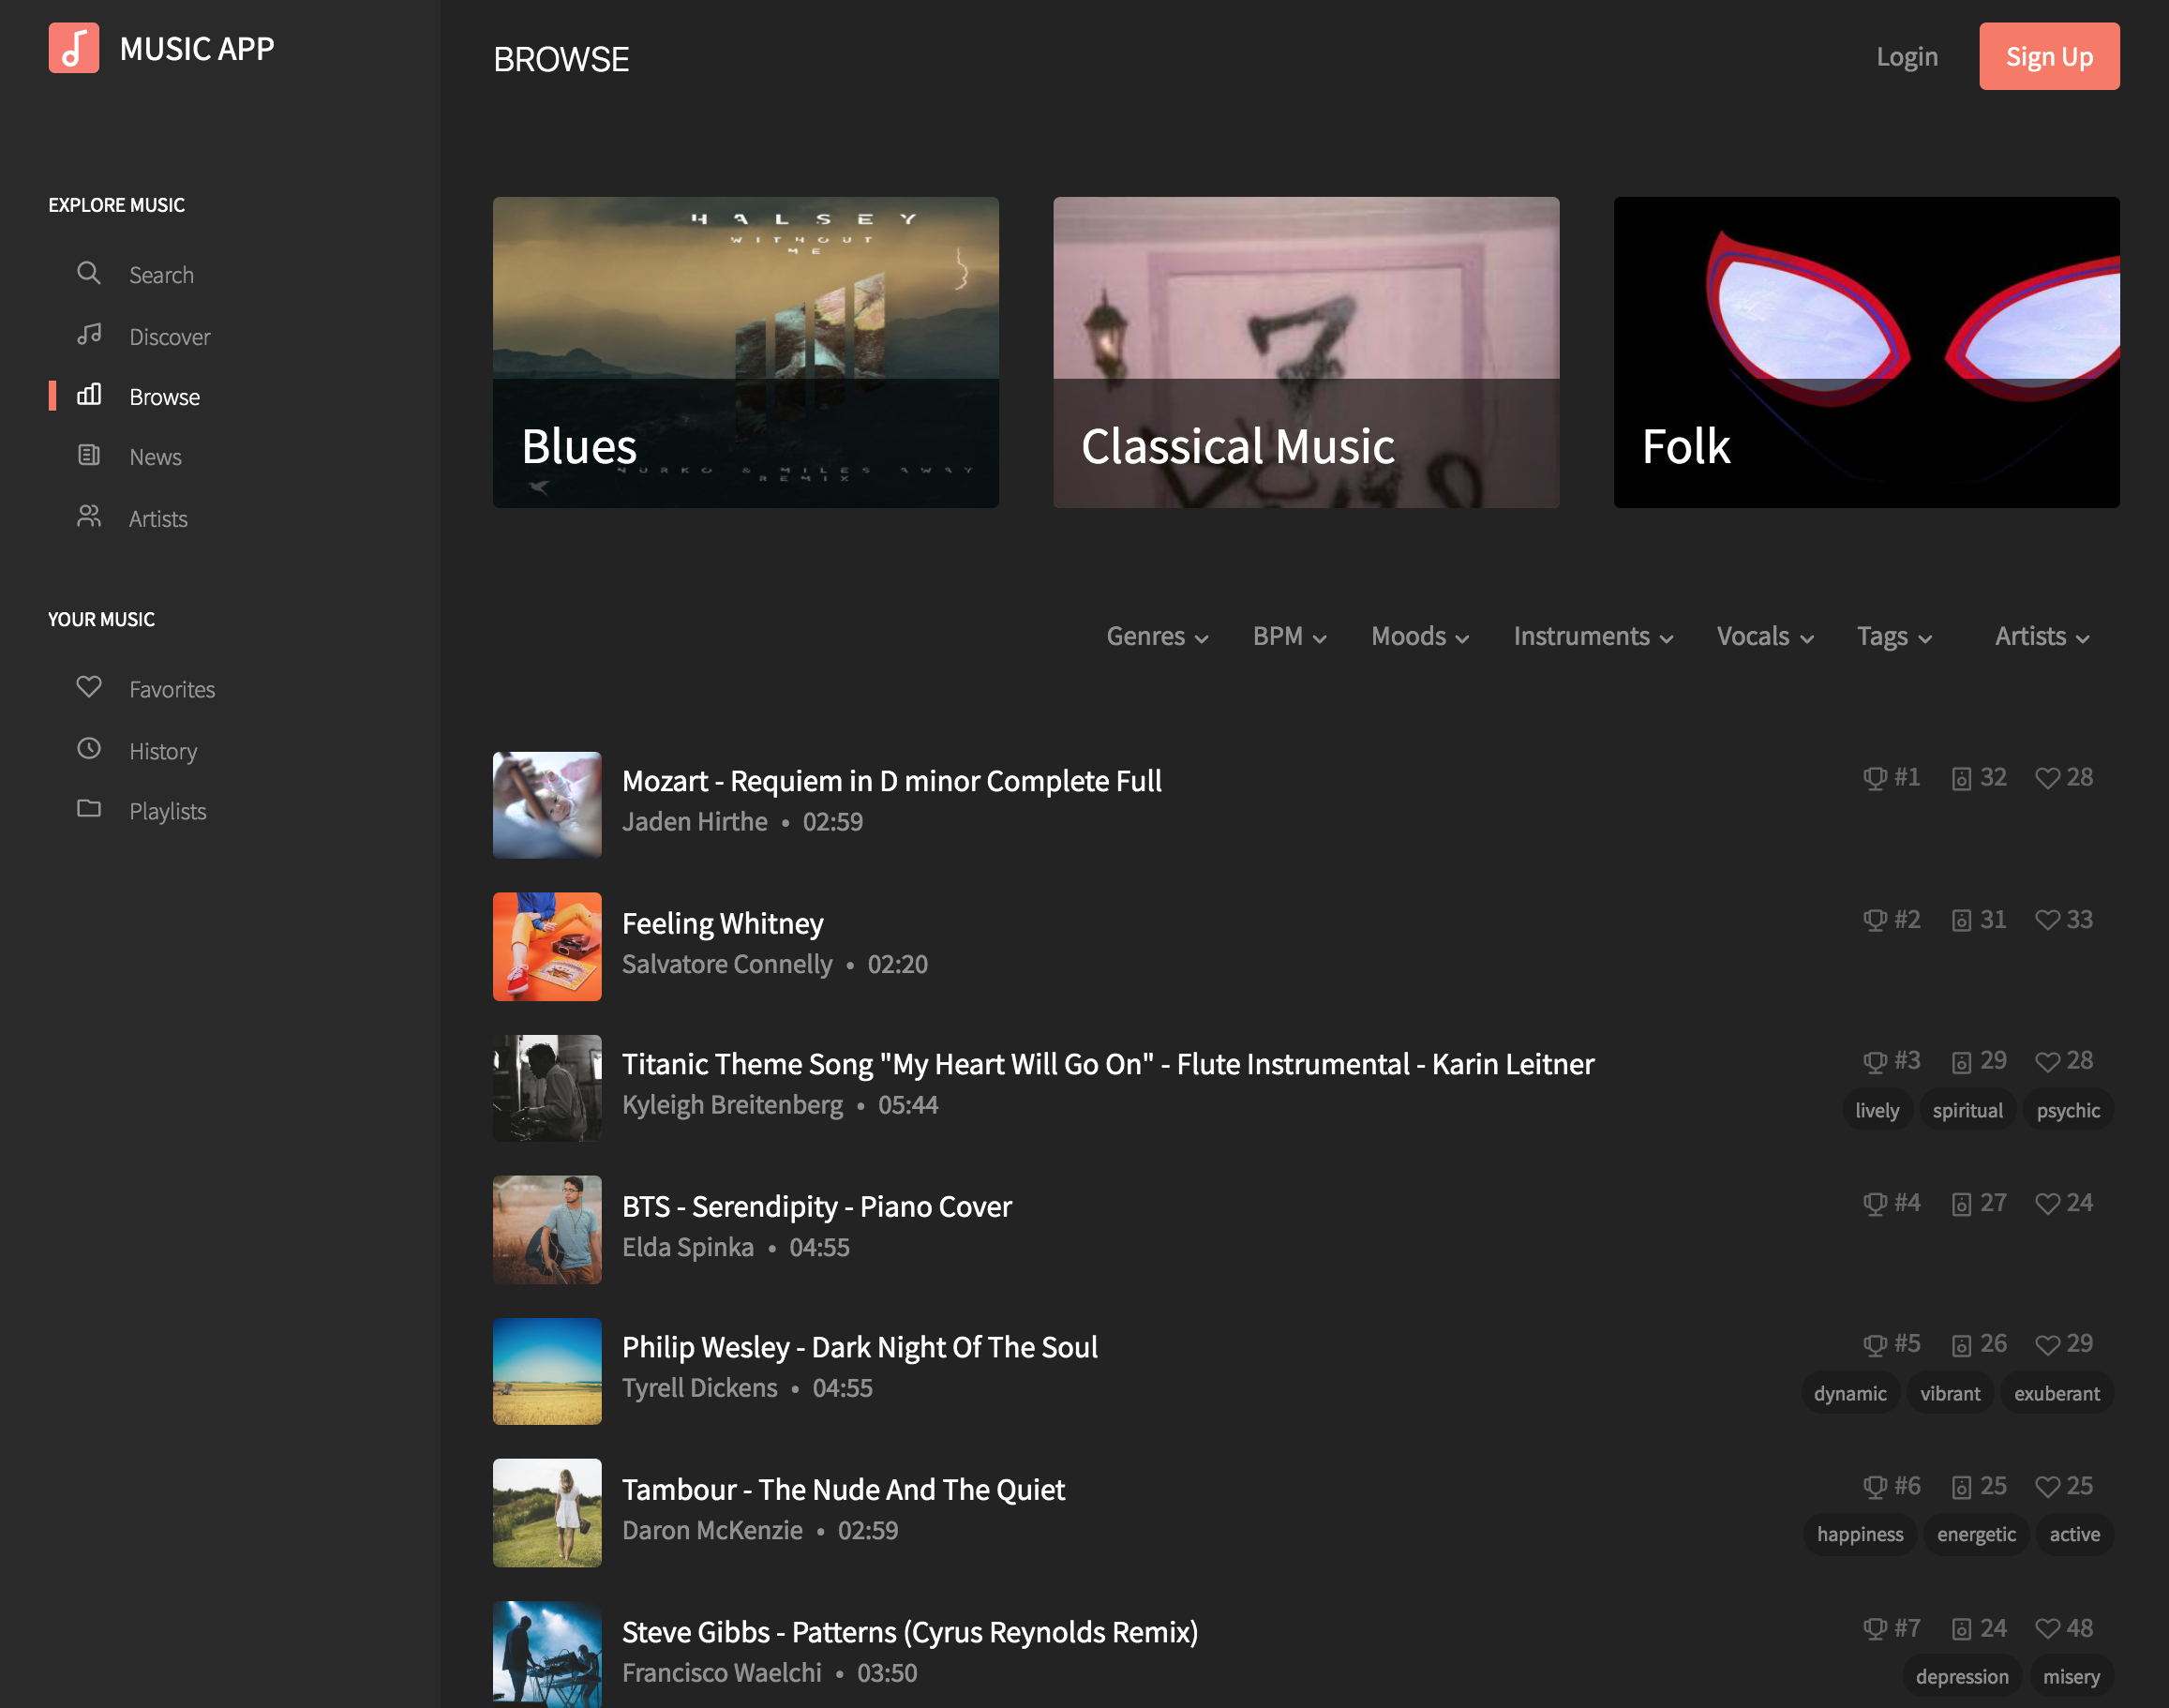
Browse
In this page users can explore music filtering by genre, bpm, moods, instruments, vocals, tags and artists.
Admin can set featured genres to show at the top of this page.
From here users can play each song, go to the detail or author profile.
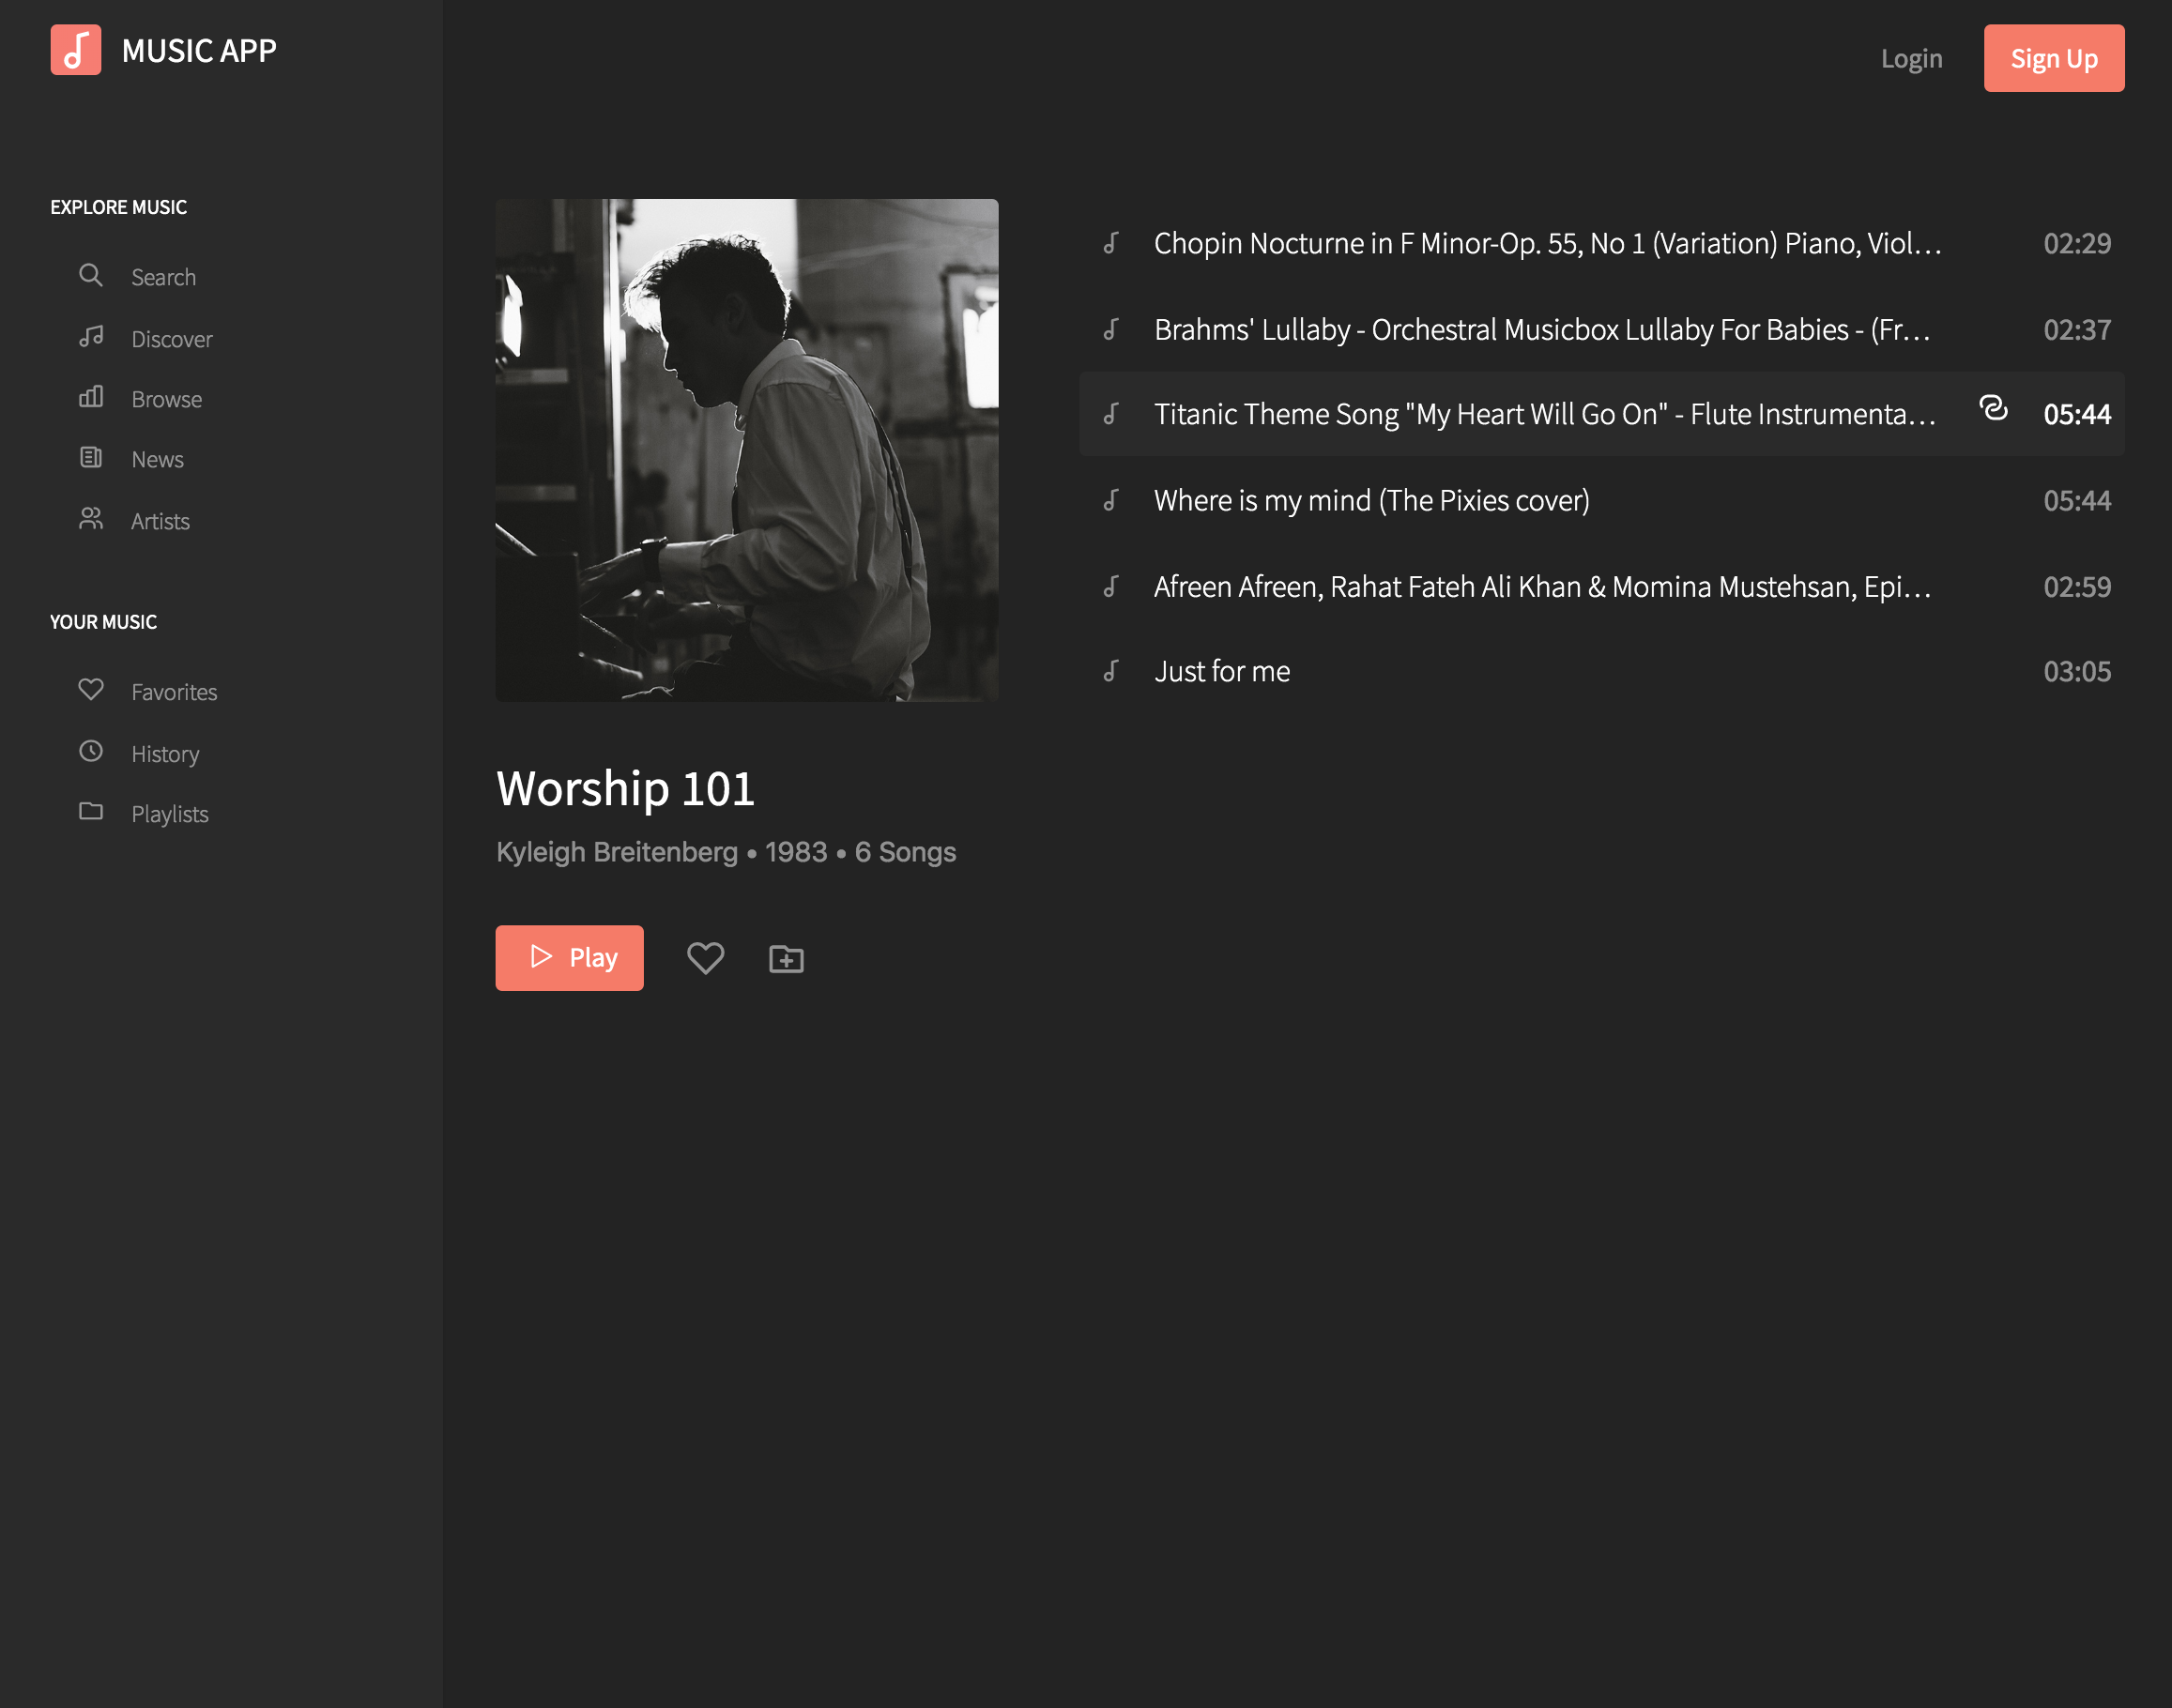
Album detail
In this page users can see all the songs in the given album, the selected song will be highlighted.
Users can play all the songs in the album, add the album to favorites or add all songs to a playlist.
For visitors, many of the features are disabled and can't be used until they login.
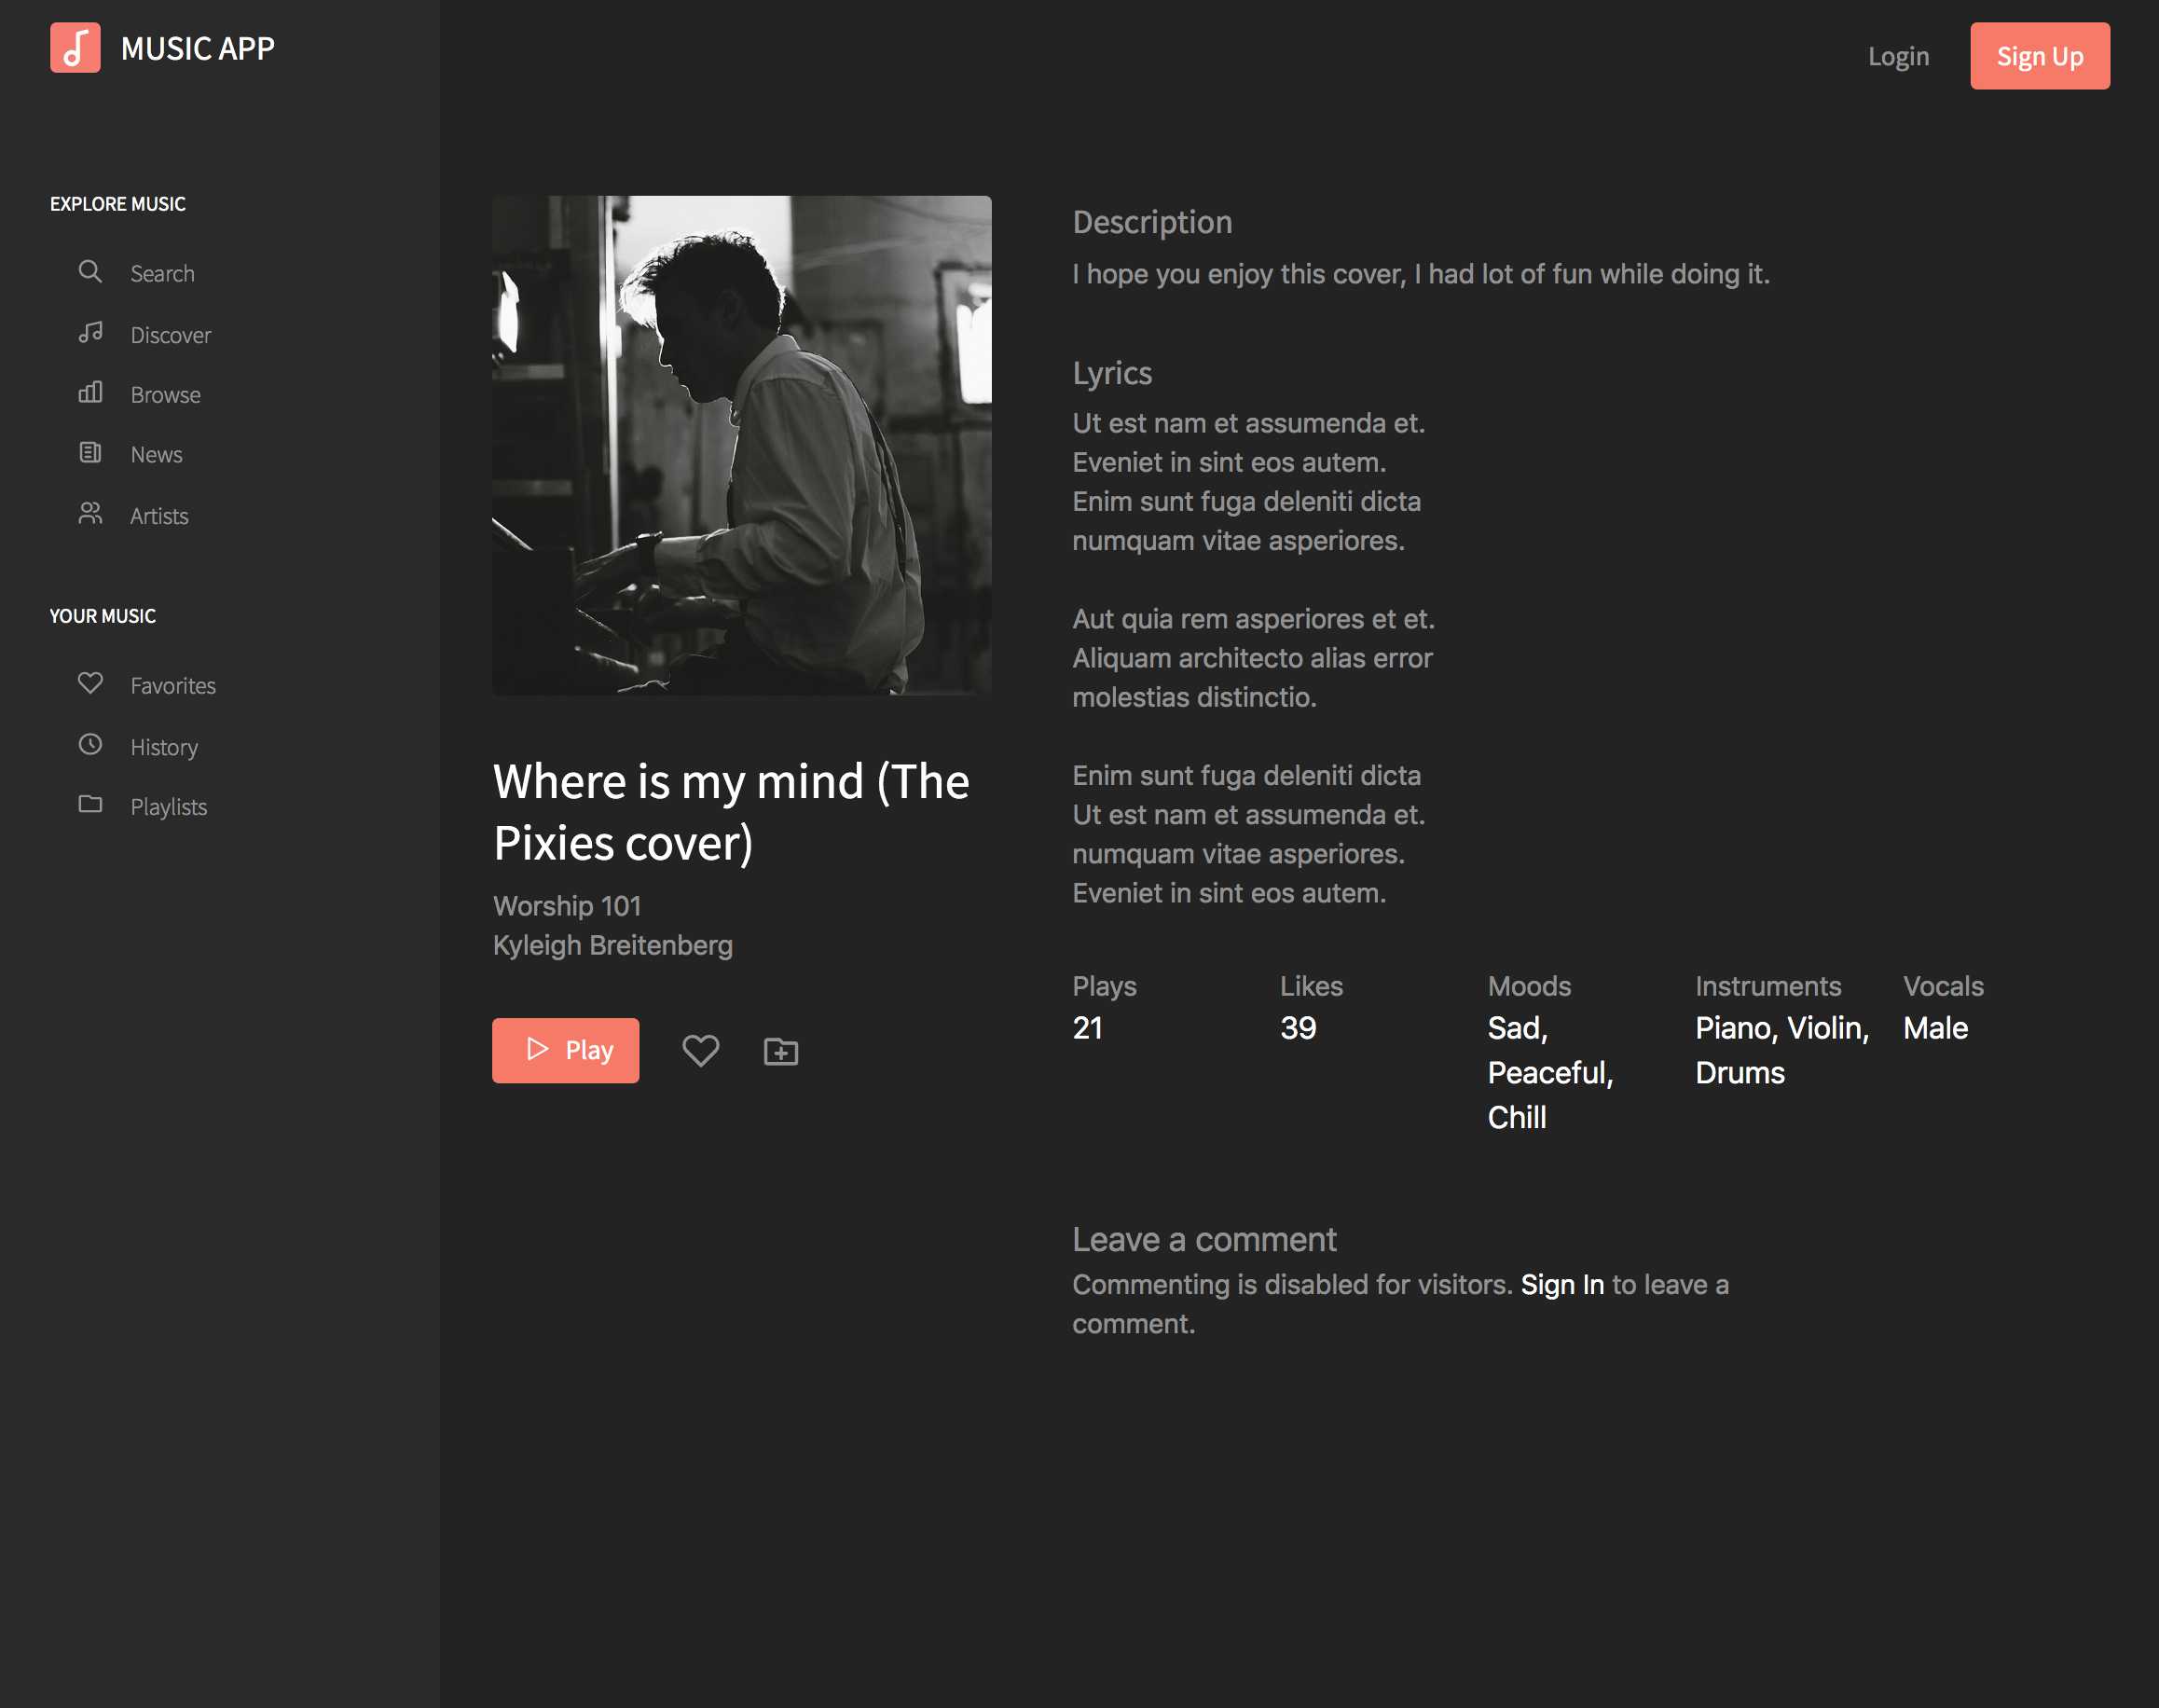
Song detail
In this page users can read the description or the lyric of the song as well as other details such as instruments, vocals, tags, etc.
Users can play the song, add to favorites or to a playlist. Users can also leave a comment at the bottom.
For visitors, many of the features are disabled and can't be used until they login.
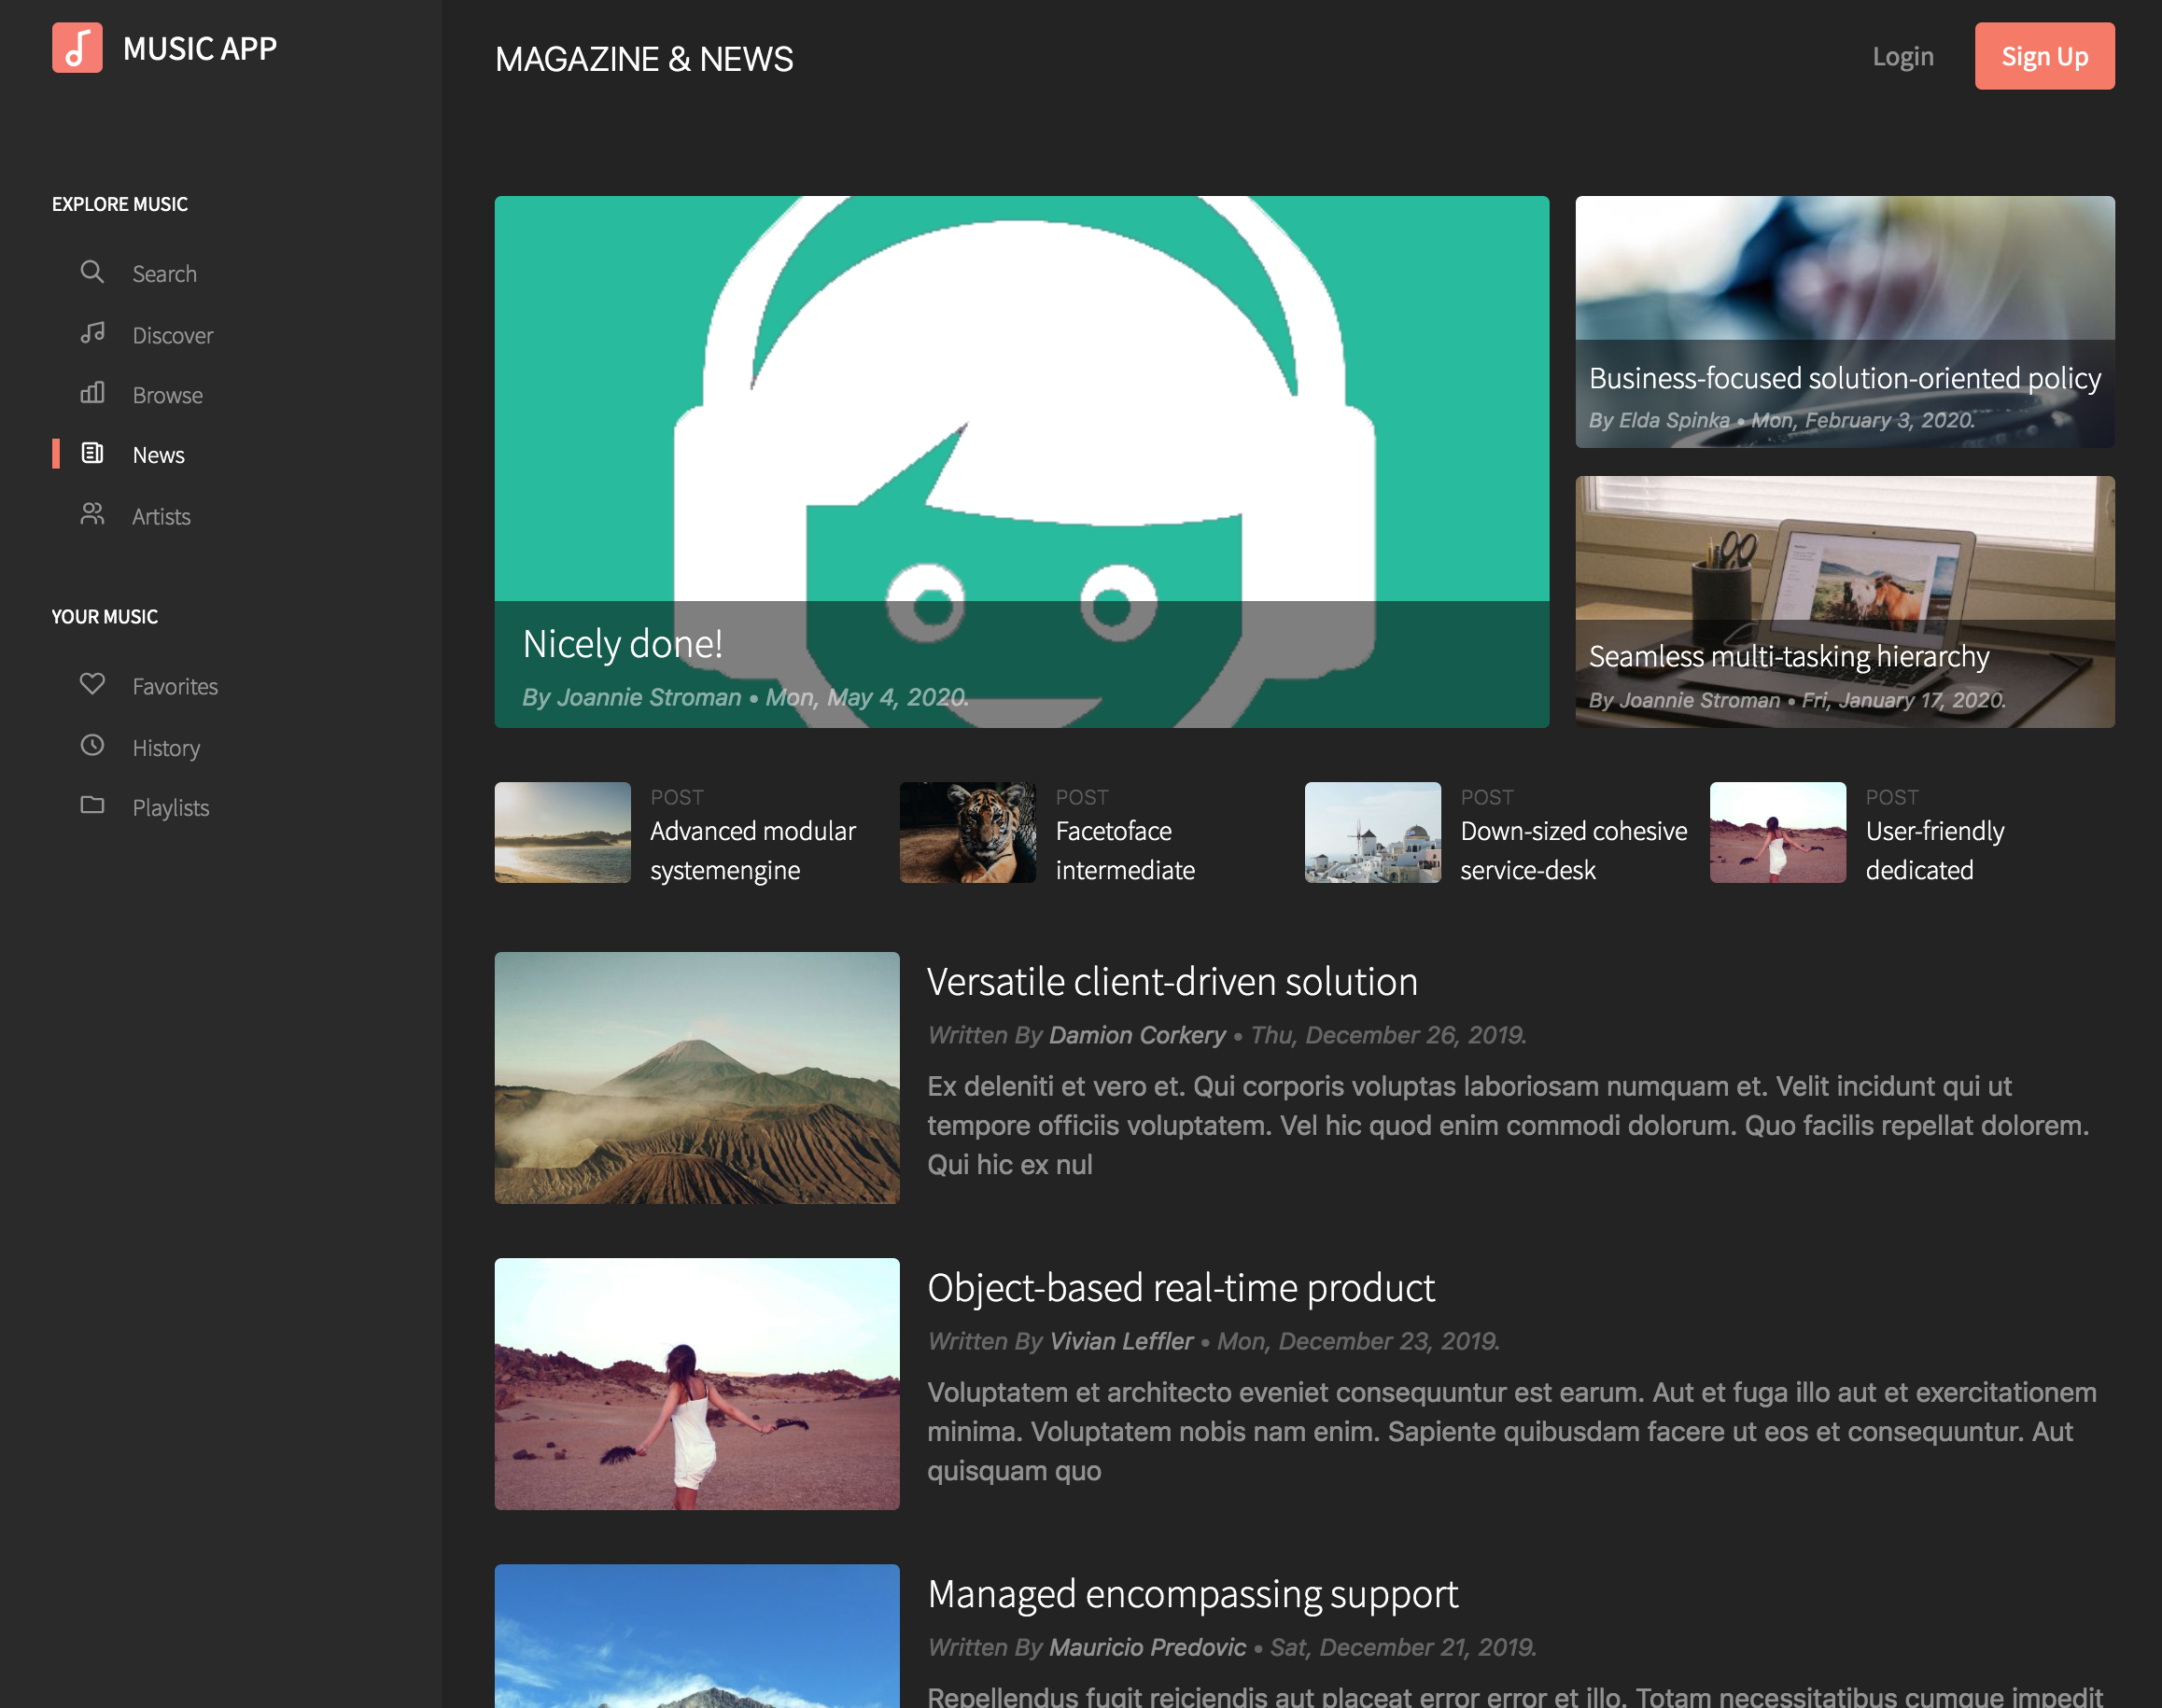
Blog list
Guests users can read the blog with the published posts.
Admin can set featured content to show up at the top of the blog.
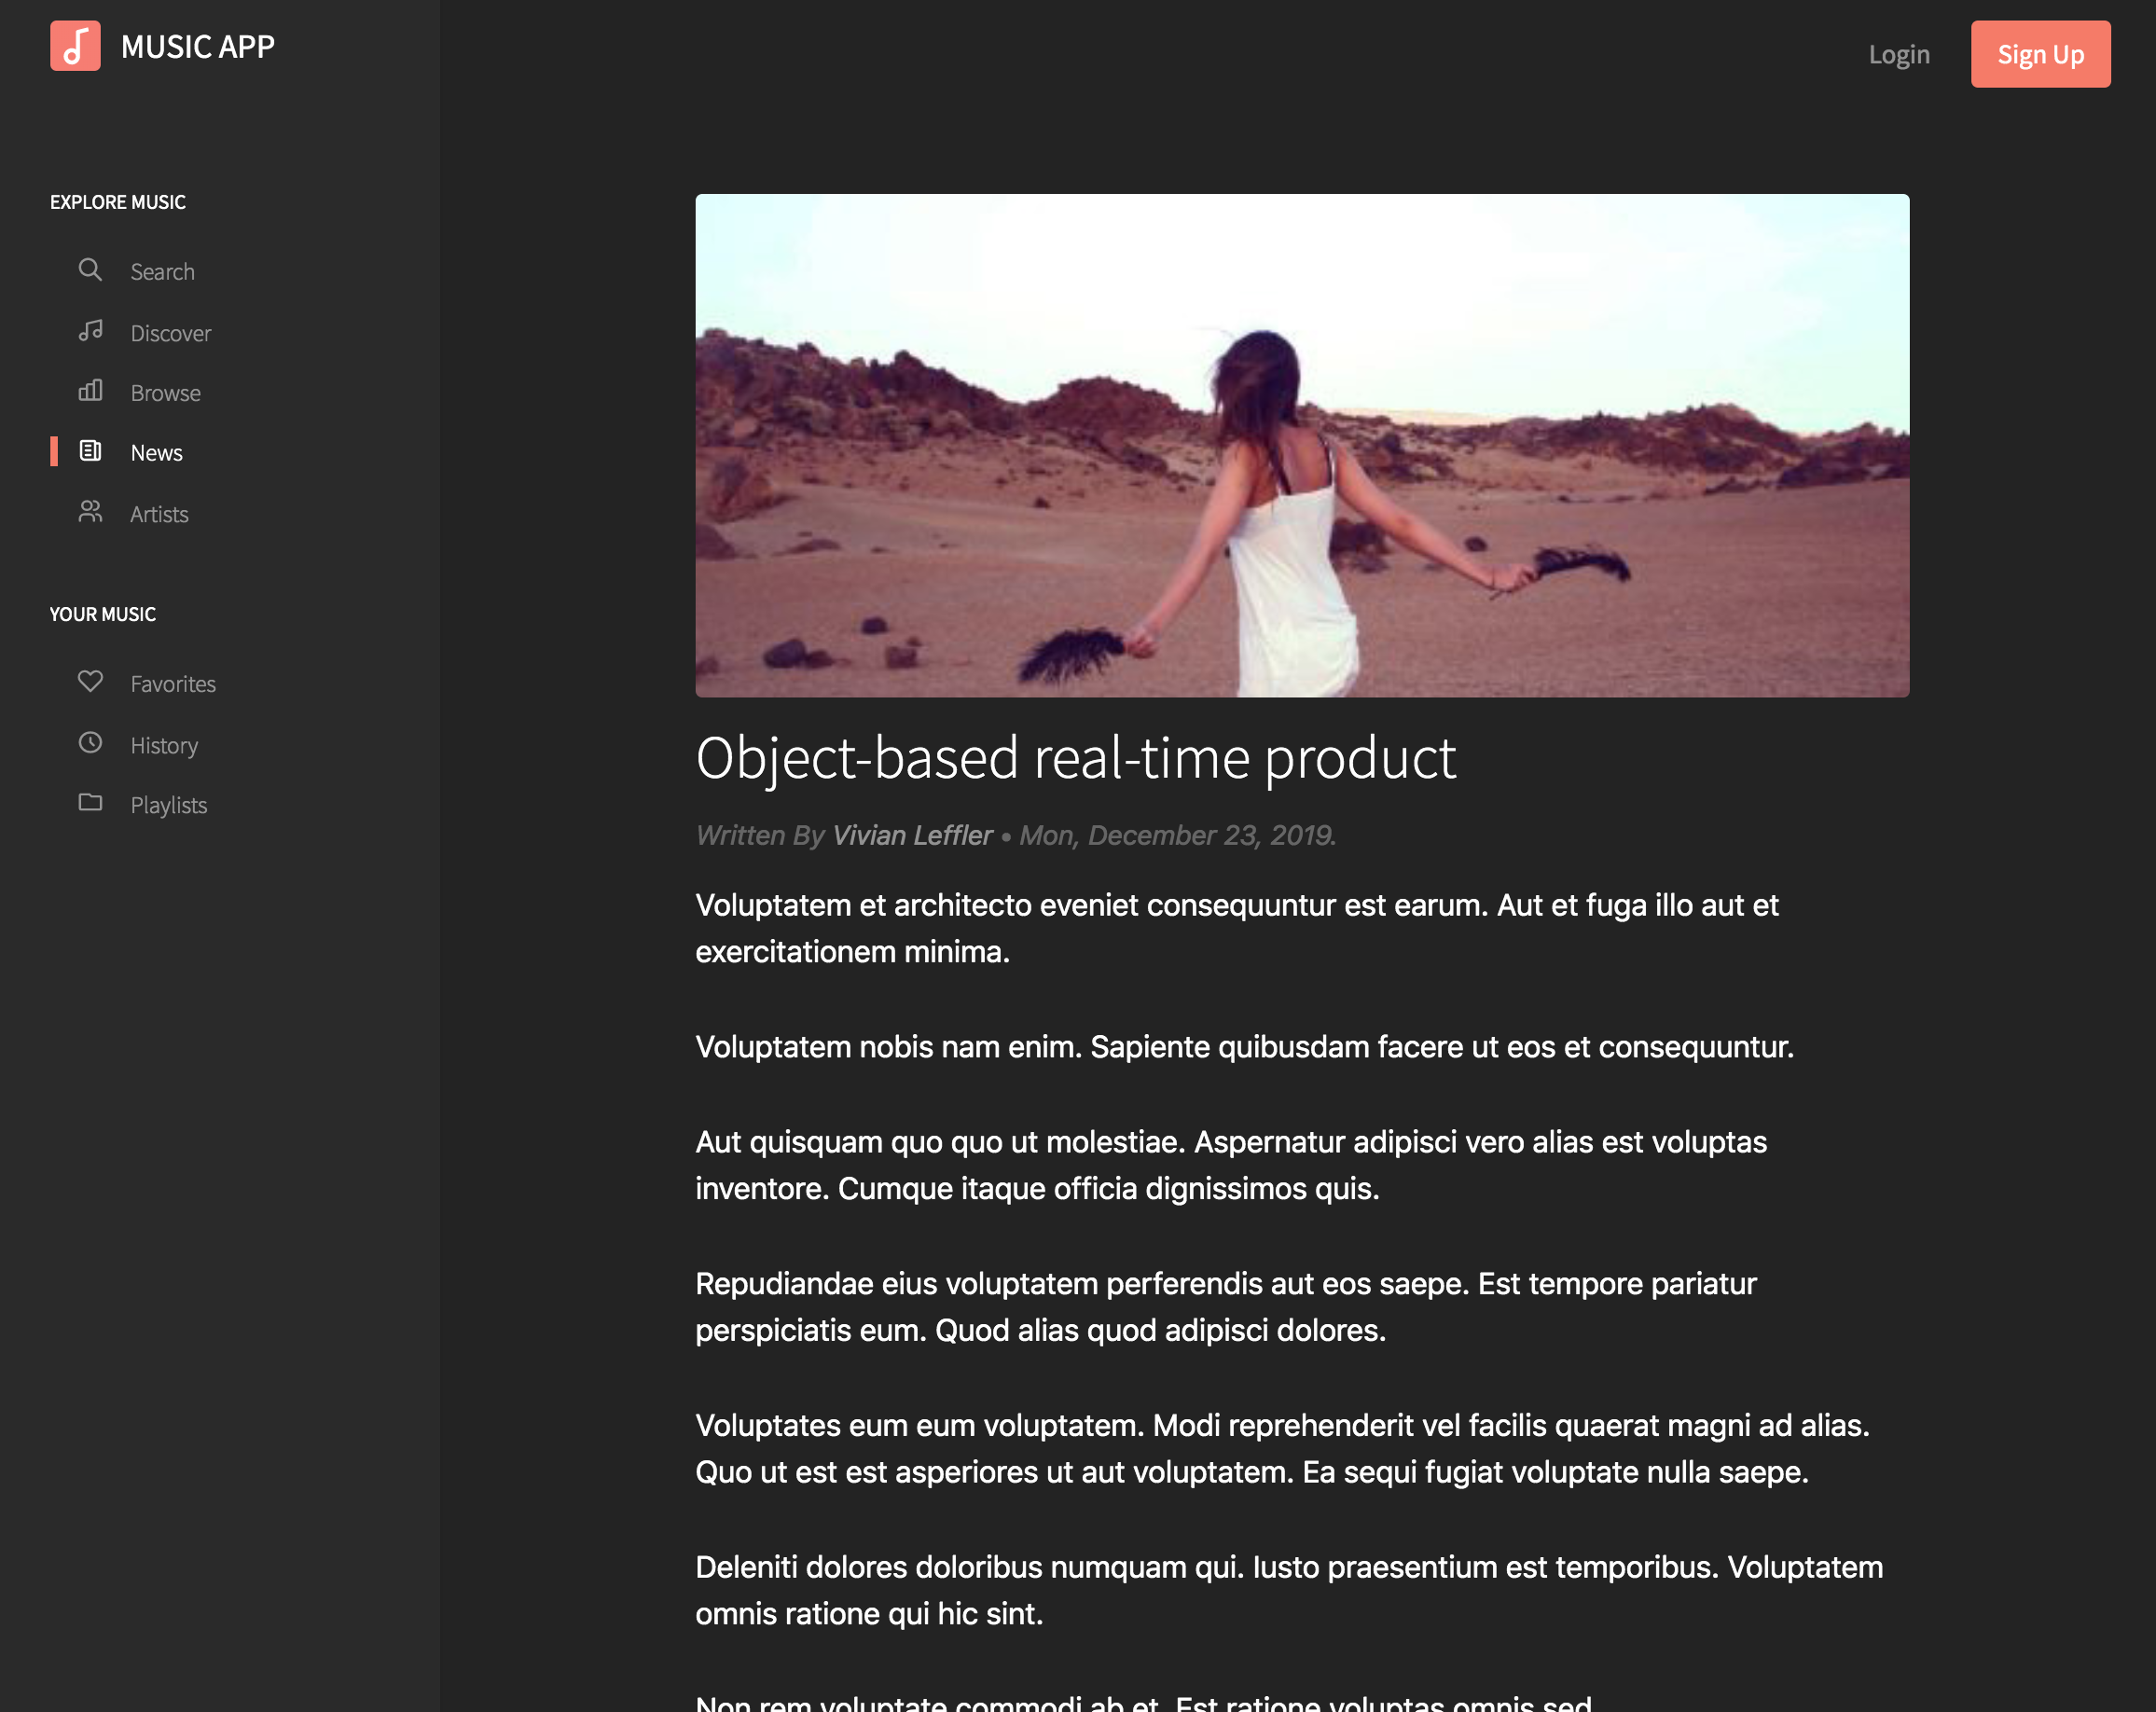
Blog detail
Guests can read published posts as well as comments left by members. Guests are not allow to see author's profile page, if they click the link the login page will appear.
Members can leave comments to the post.
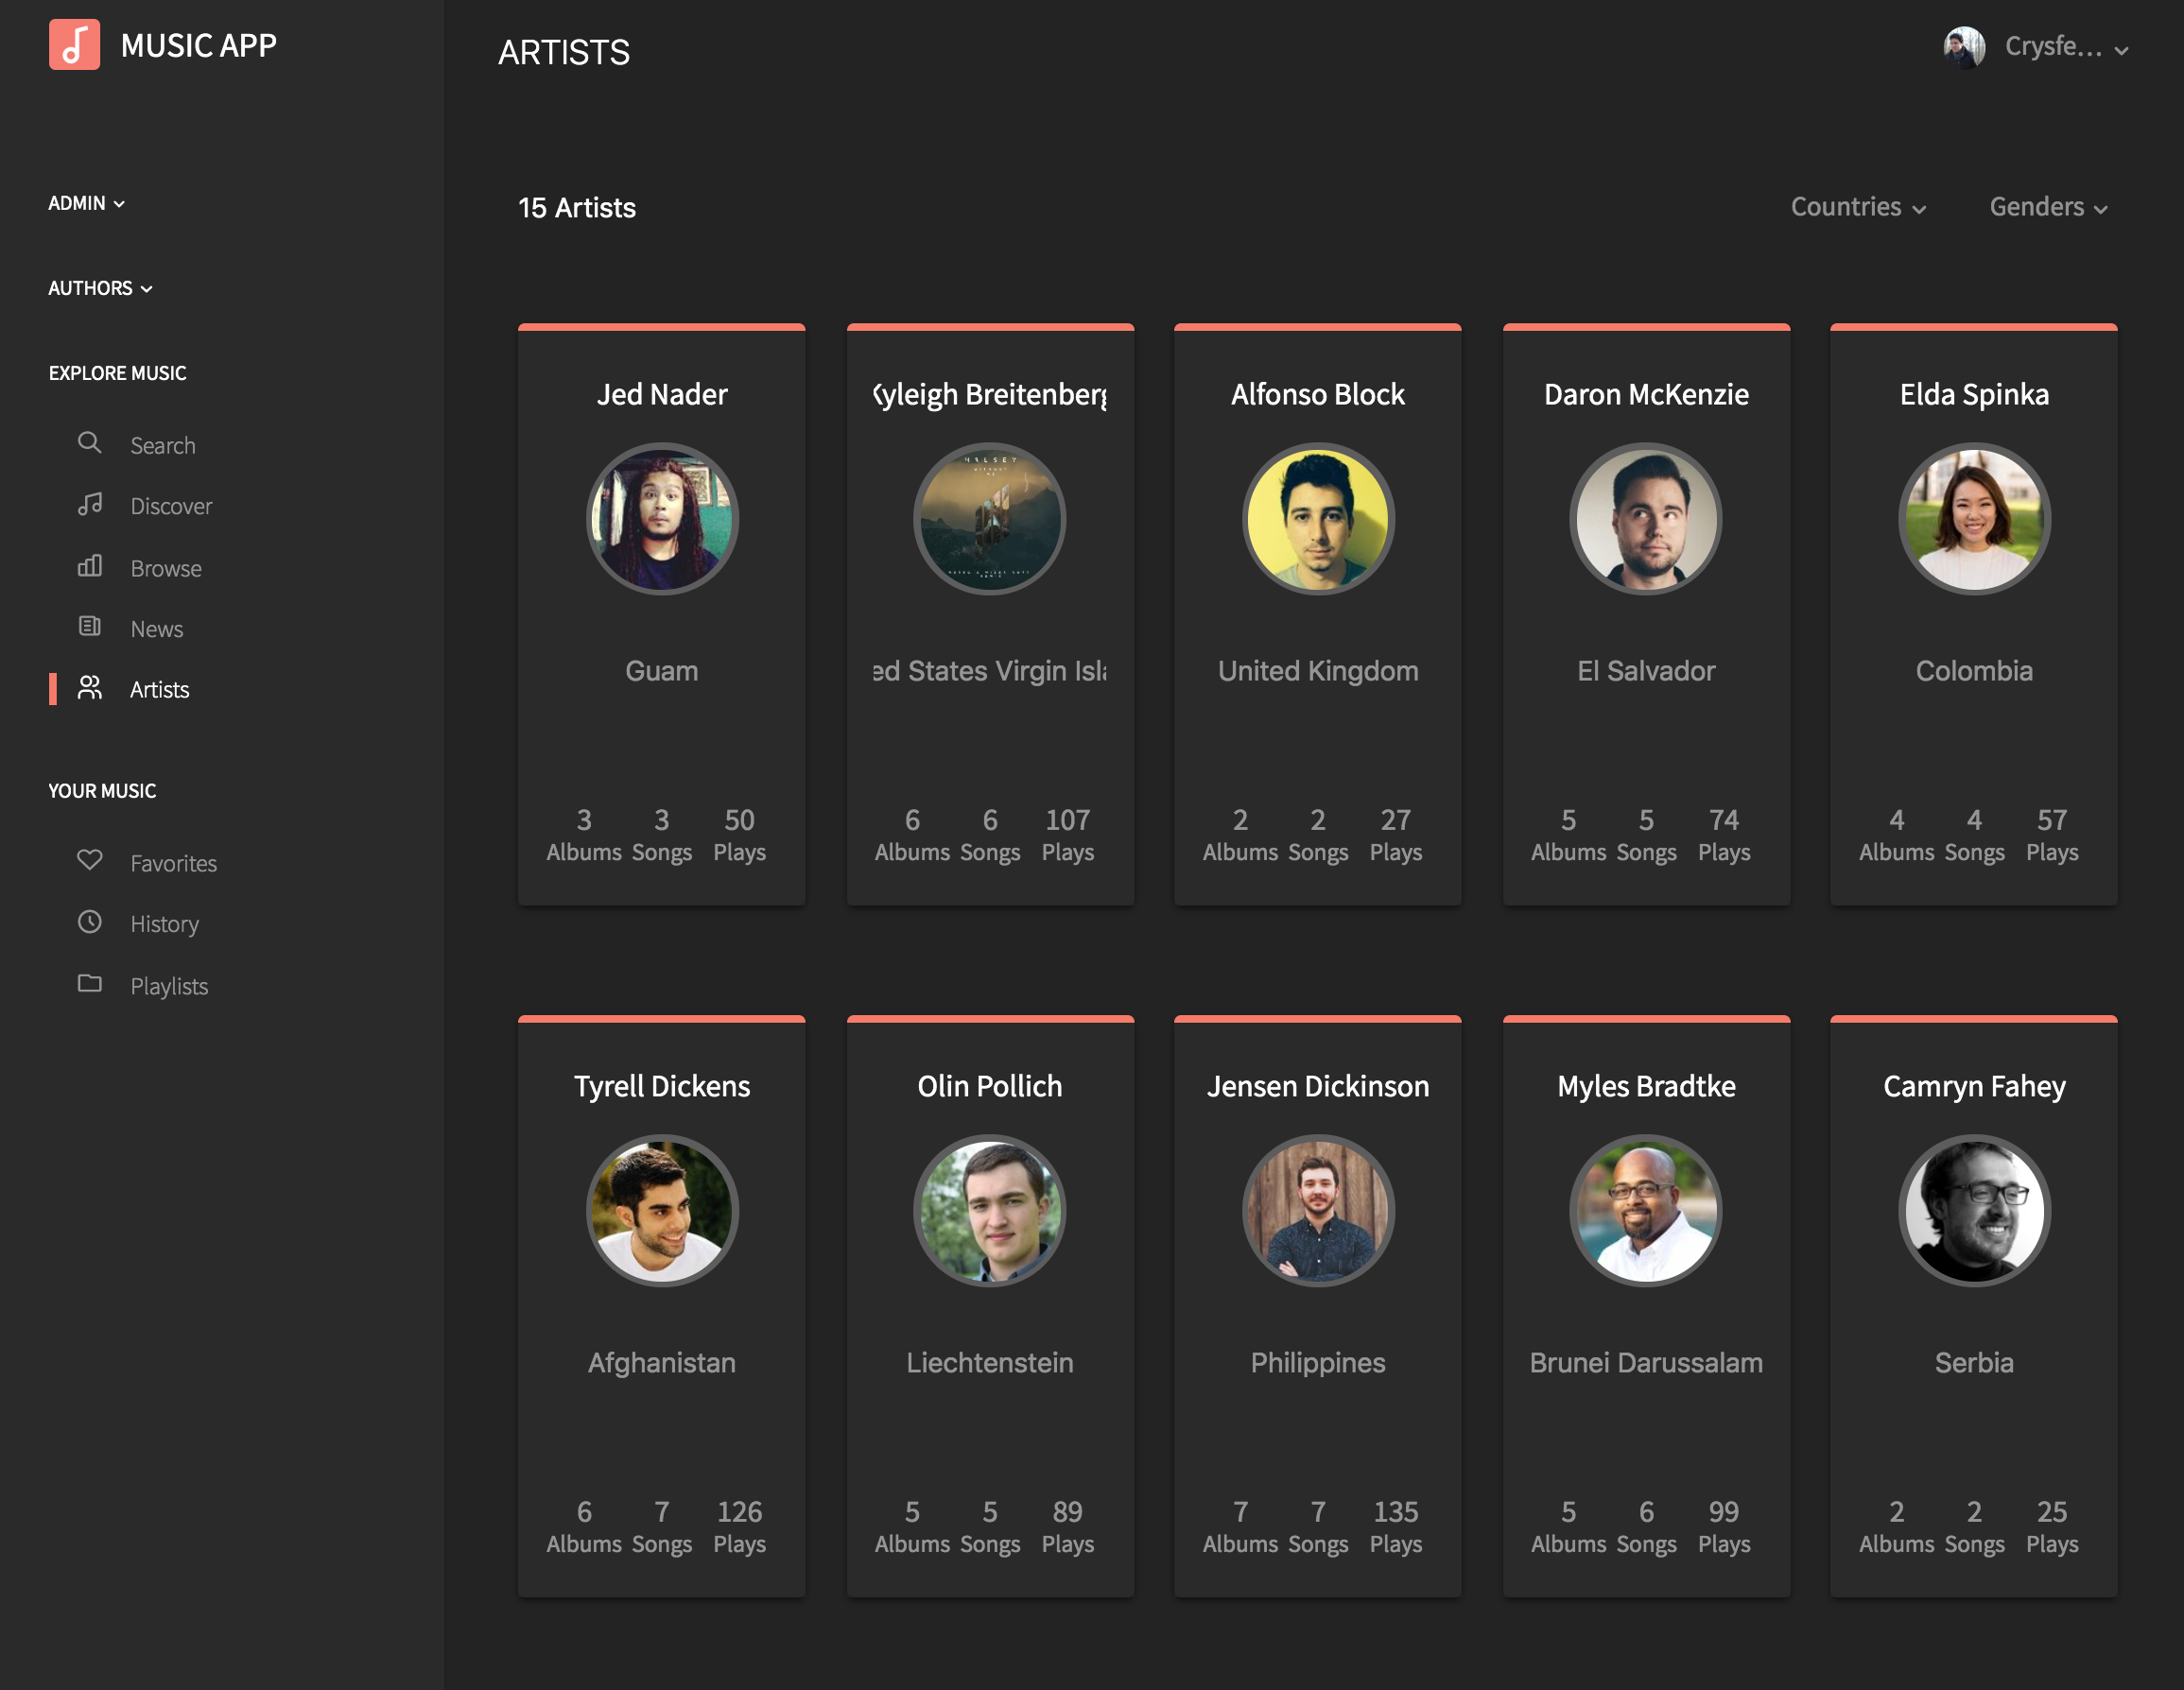
Artist
In this page users can find authors, this is a great way to connect and meet new people.
Members can follow links to the profile page, visitors will see the login page.
Users can filter by country or gender.
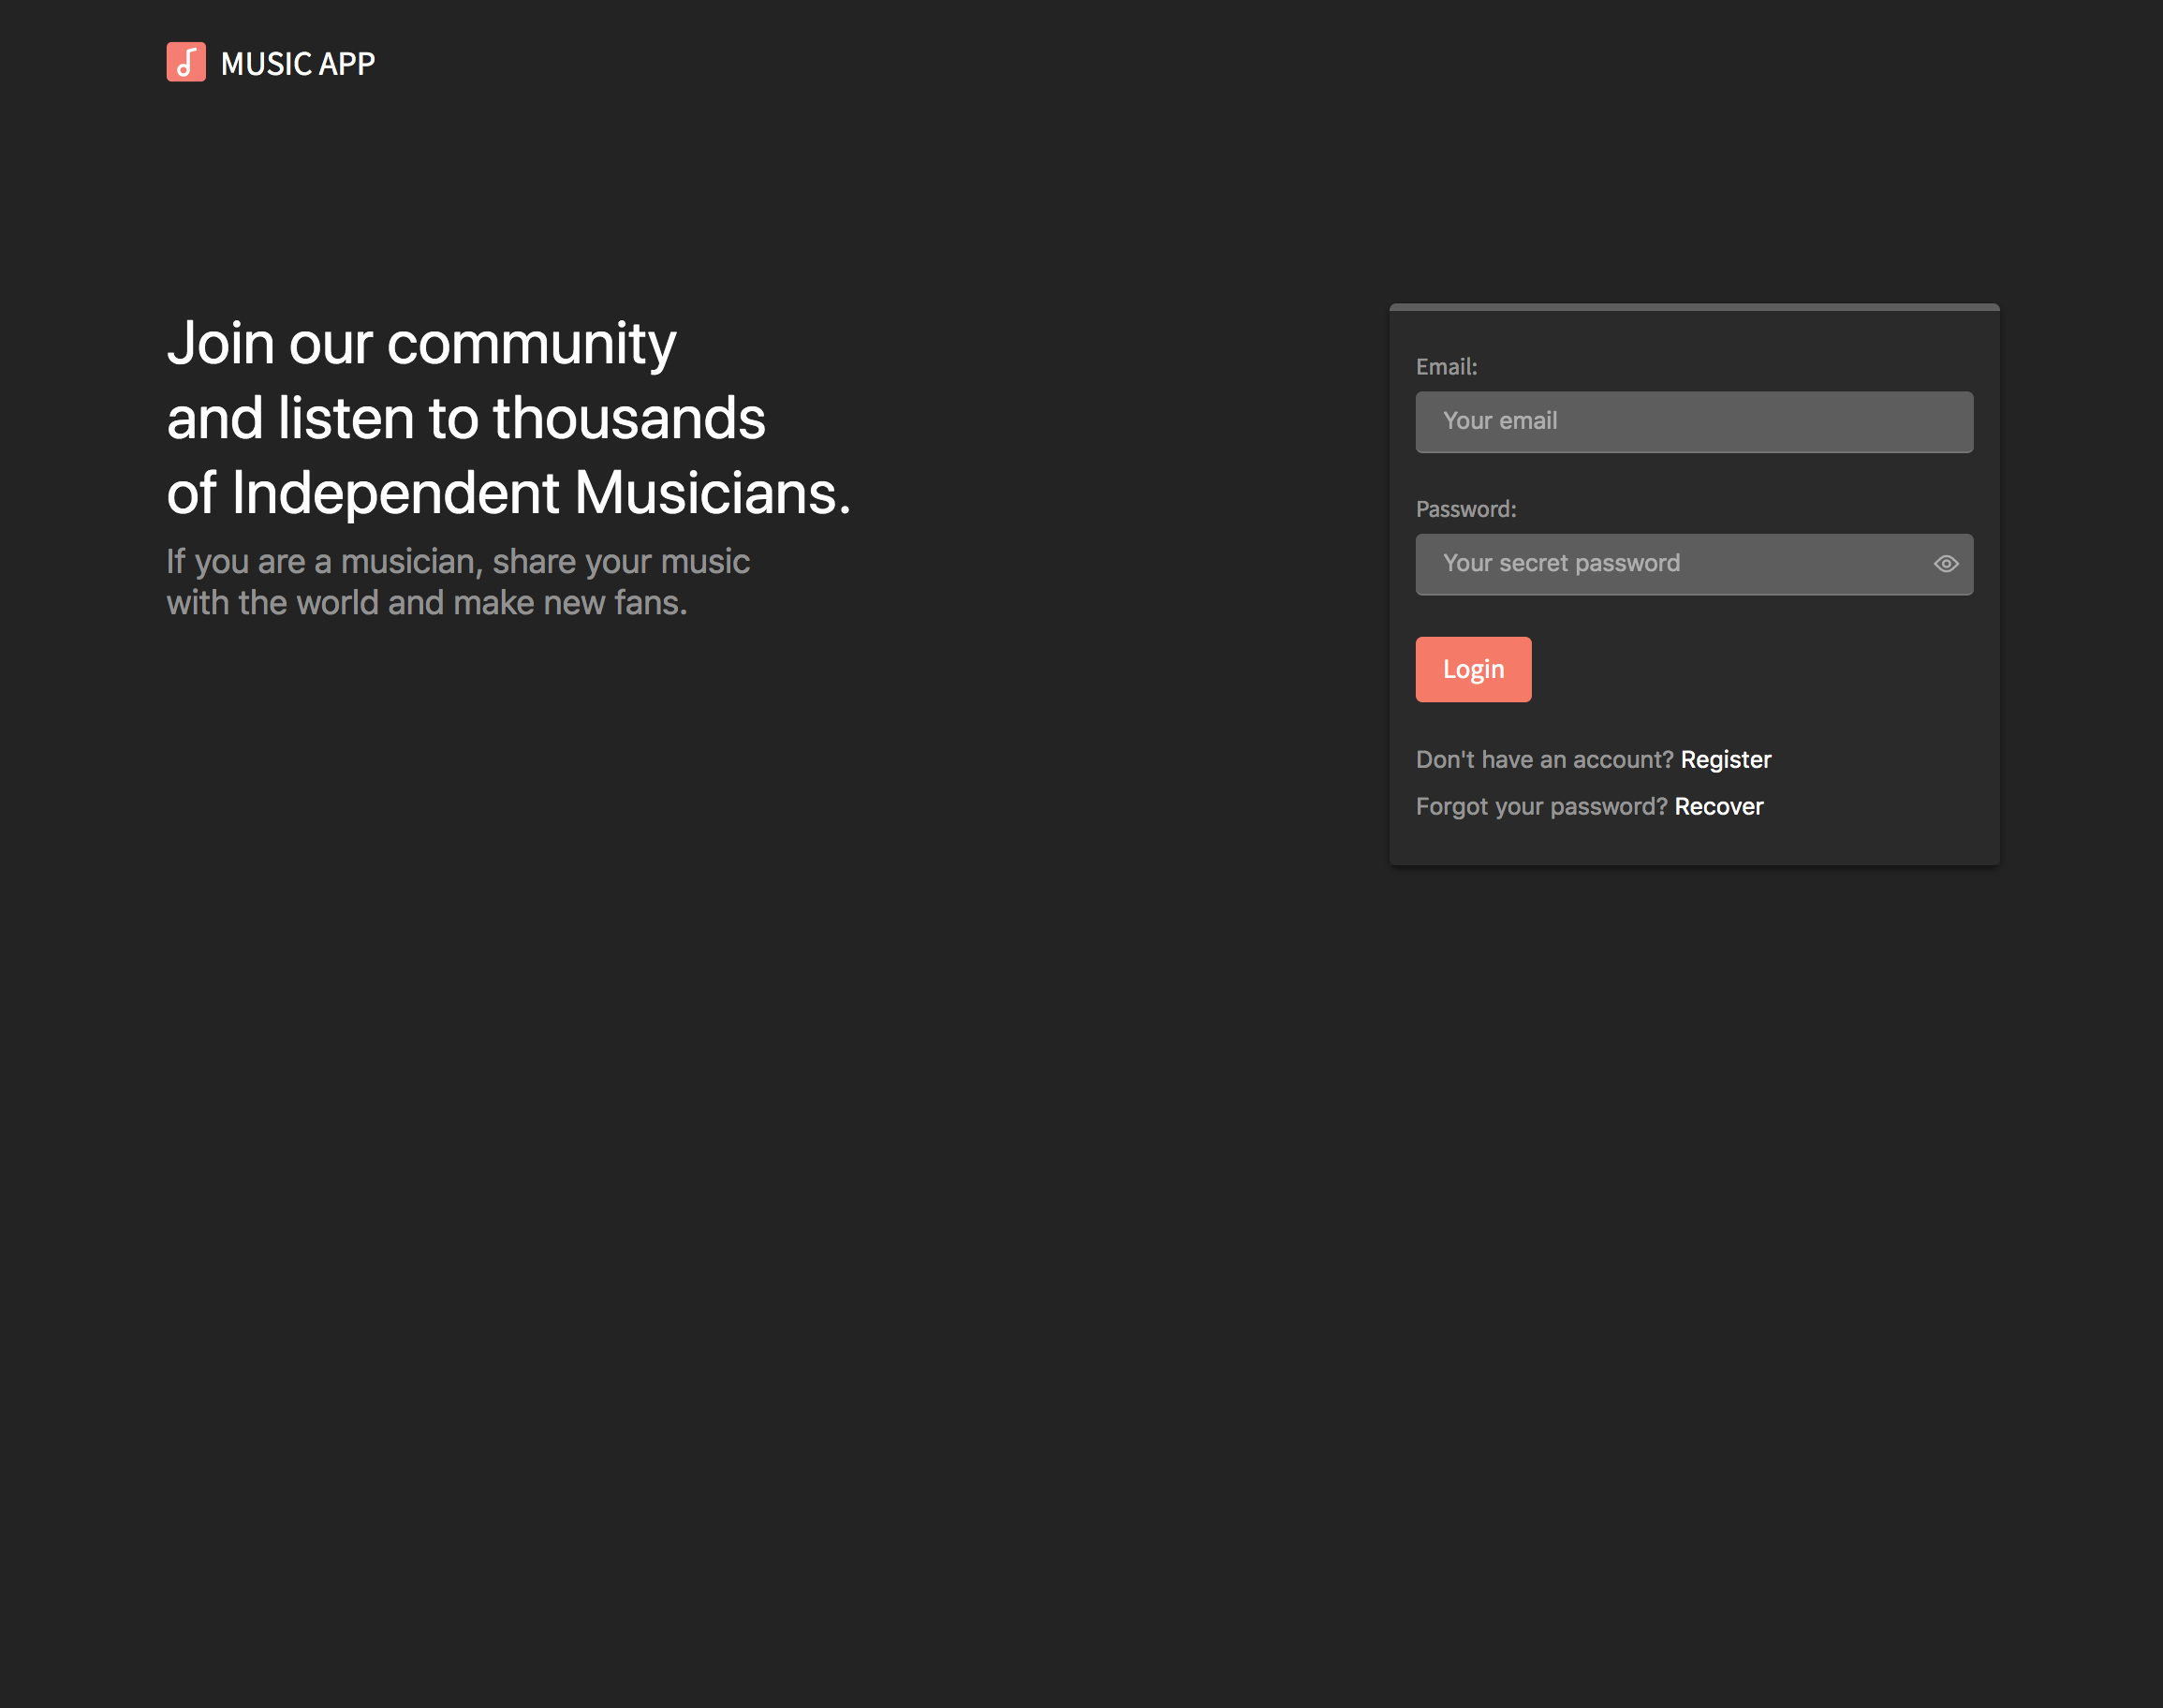
Authentication pages
The are several authentication pages included in this platform, such as login, registration with email/password, forgot password and recover password.
Members
A member is a registered user, by using email/password.
As a member of the platform you can do several things that guests are not allowed. However, members can't create albums, only listen and explore existing songs.
As mentioned in the installation steps, you can decide whether a new member will be an author by default or not.
Profile page
Every member has a profile page, other users can visit the page and see the public activity feed.
From here the user can update the avatar and see the latest activity with links to the content.
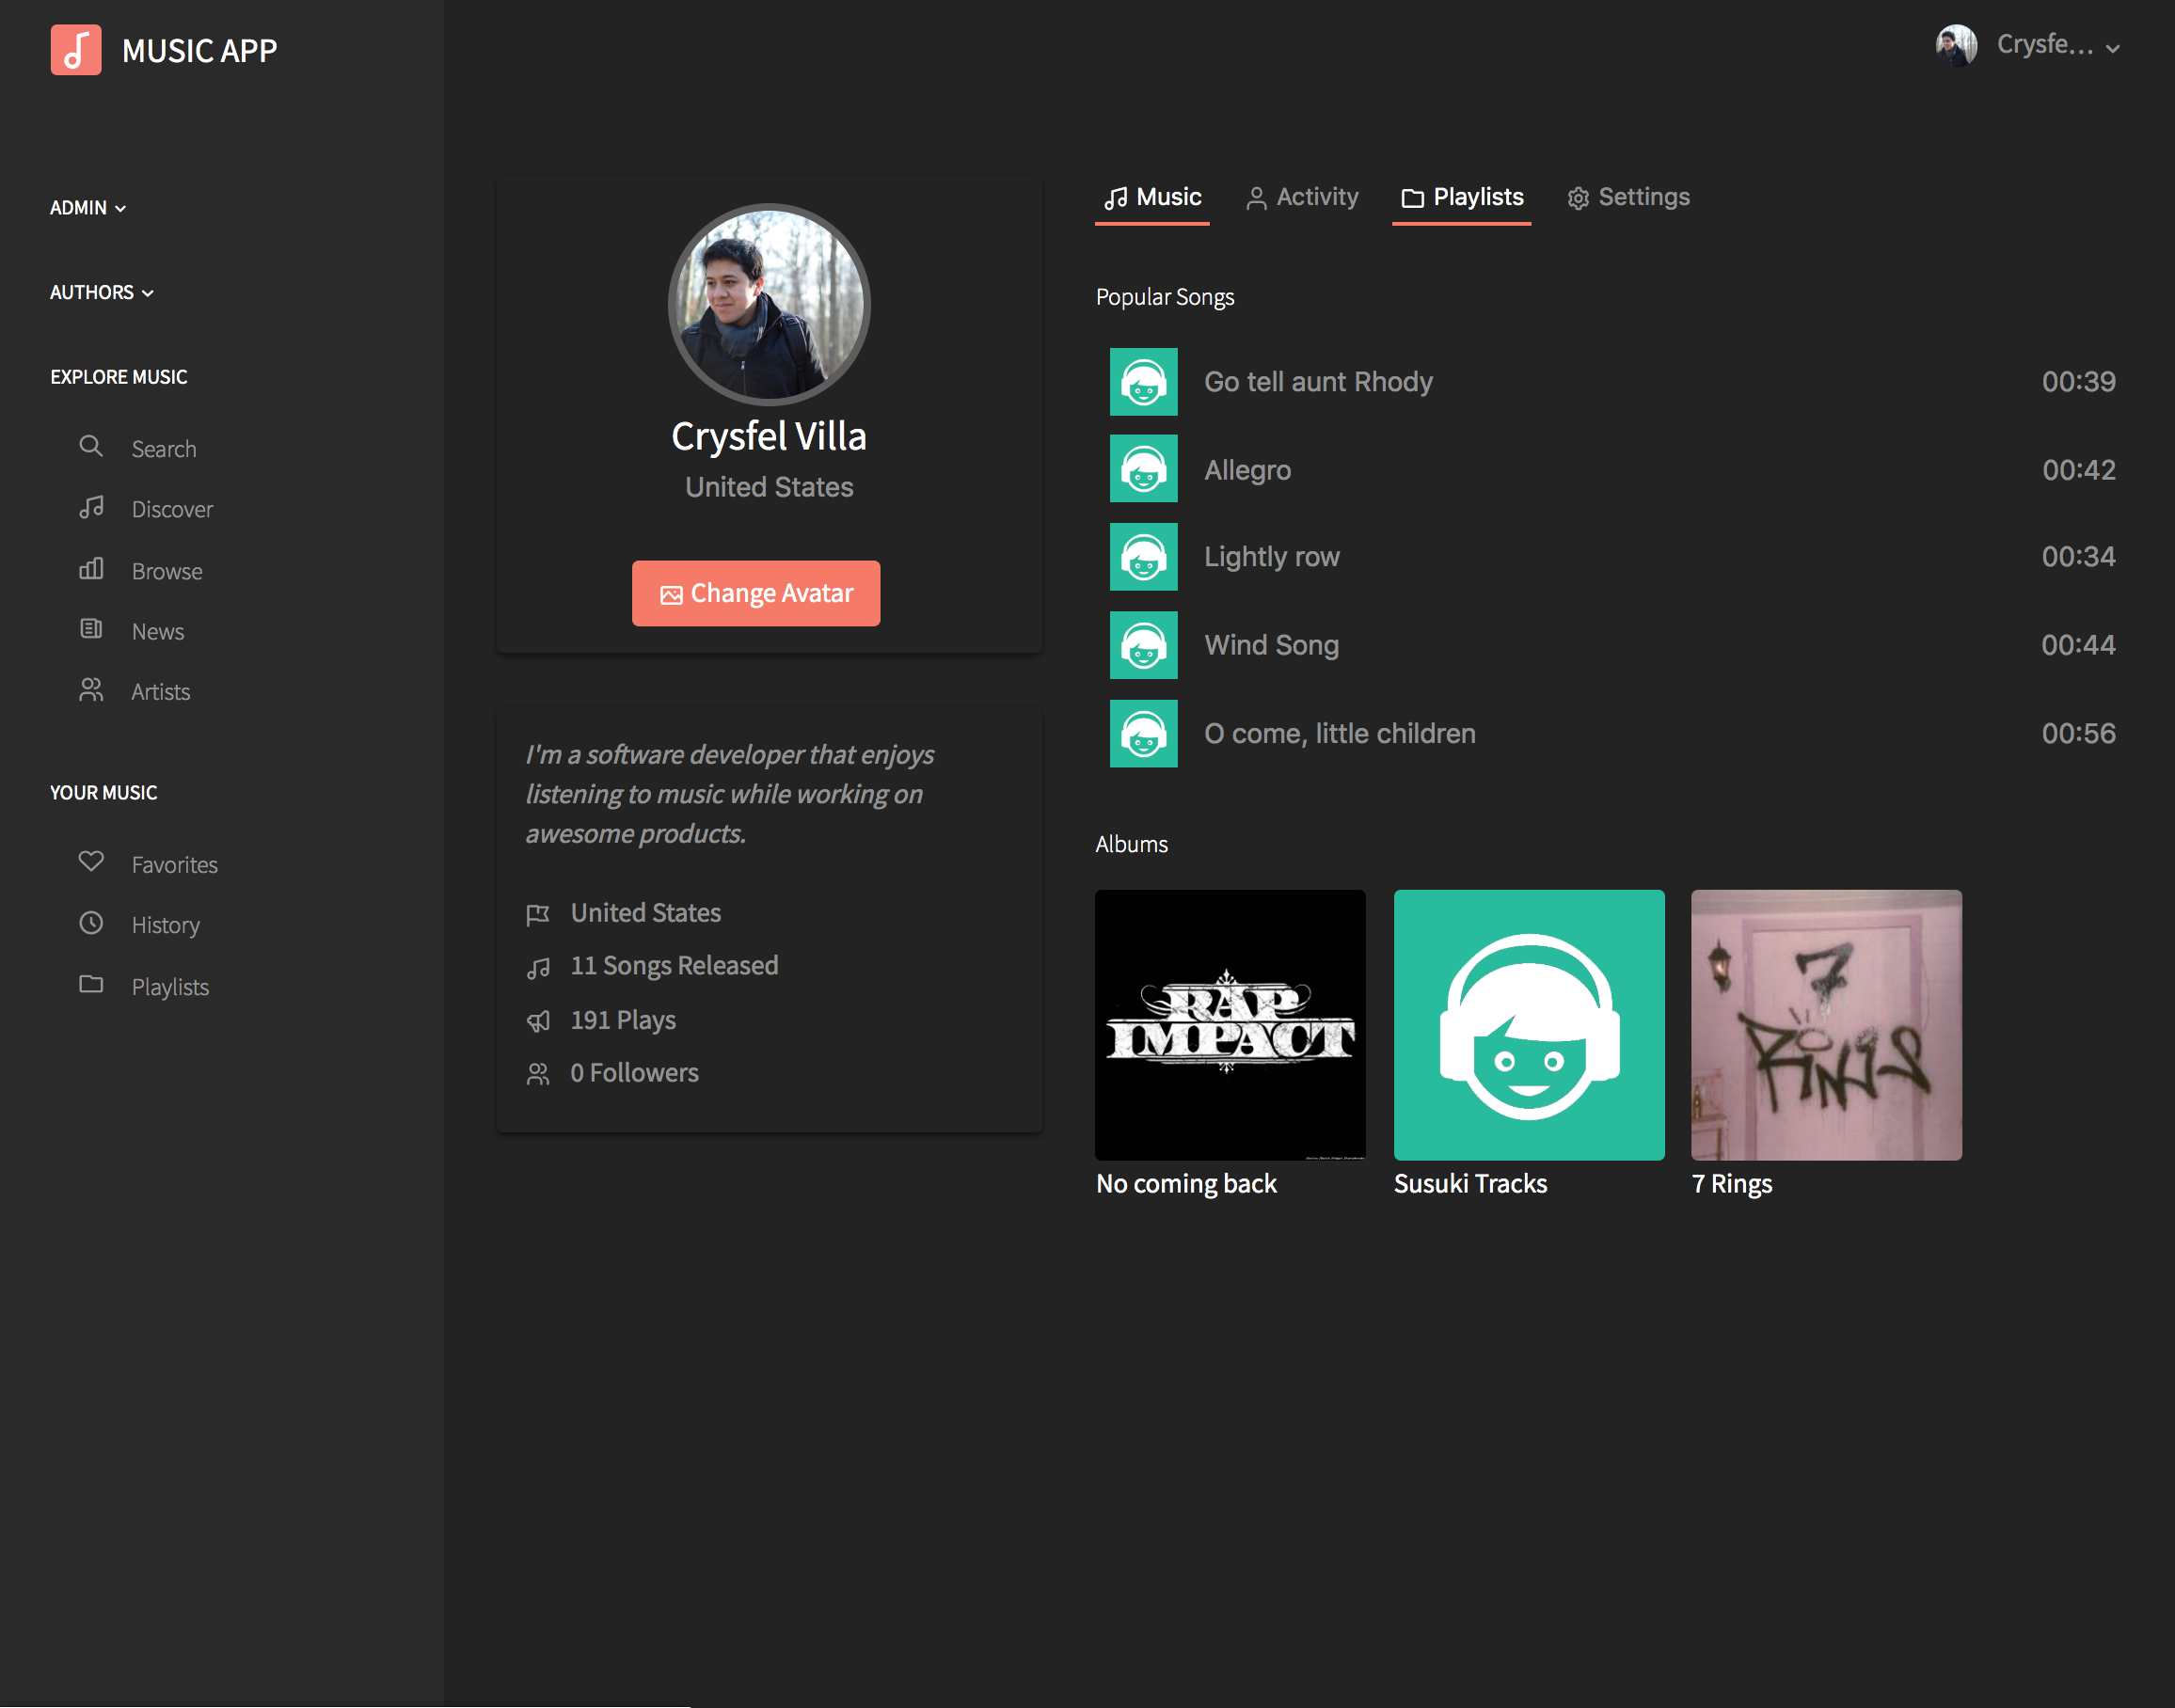
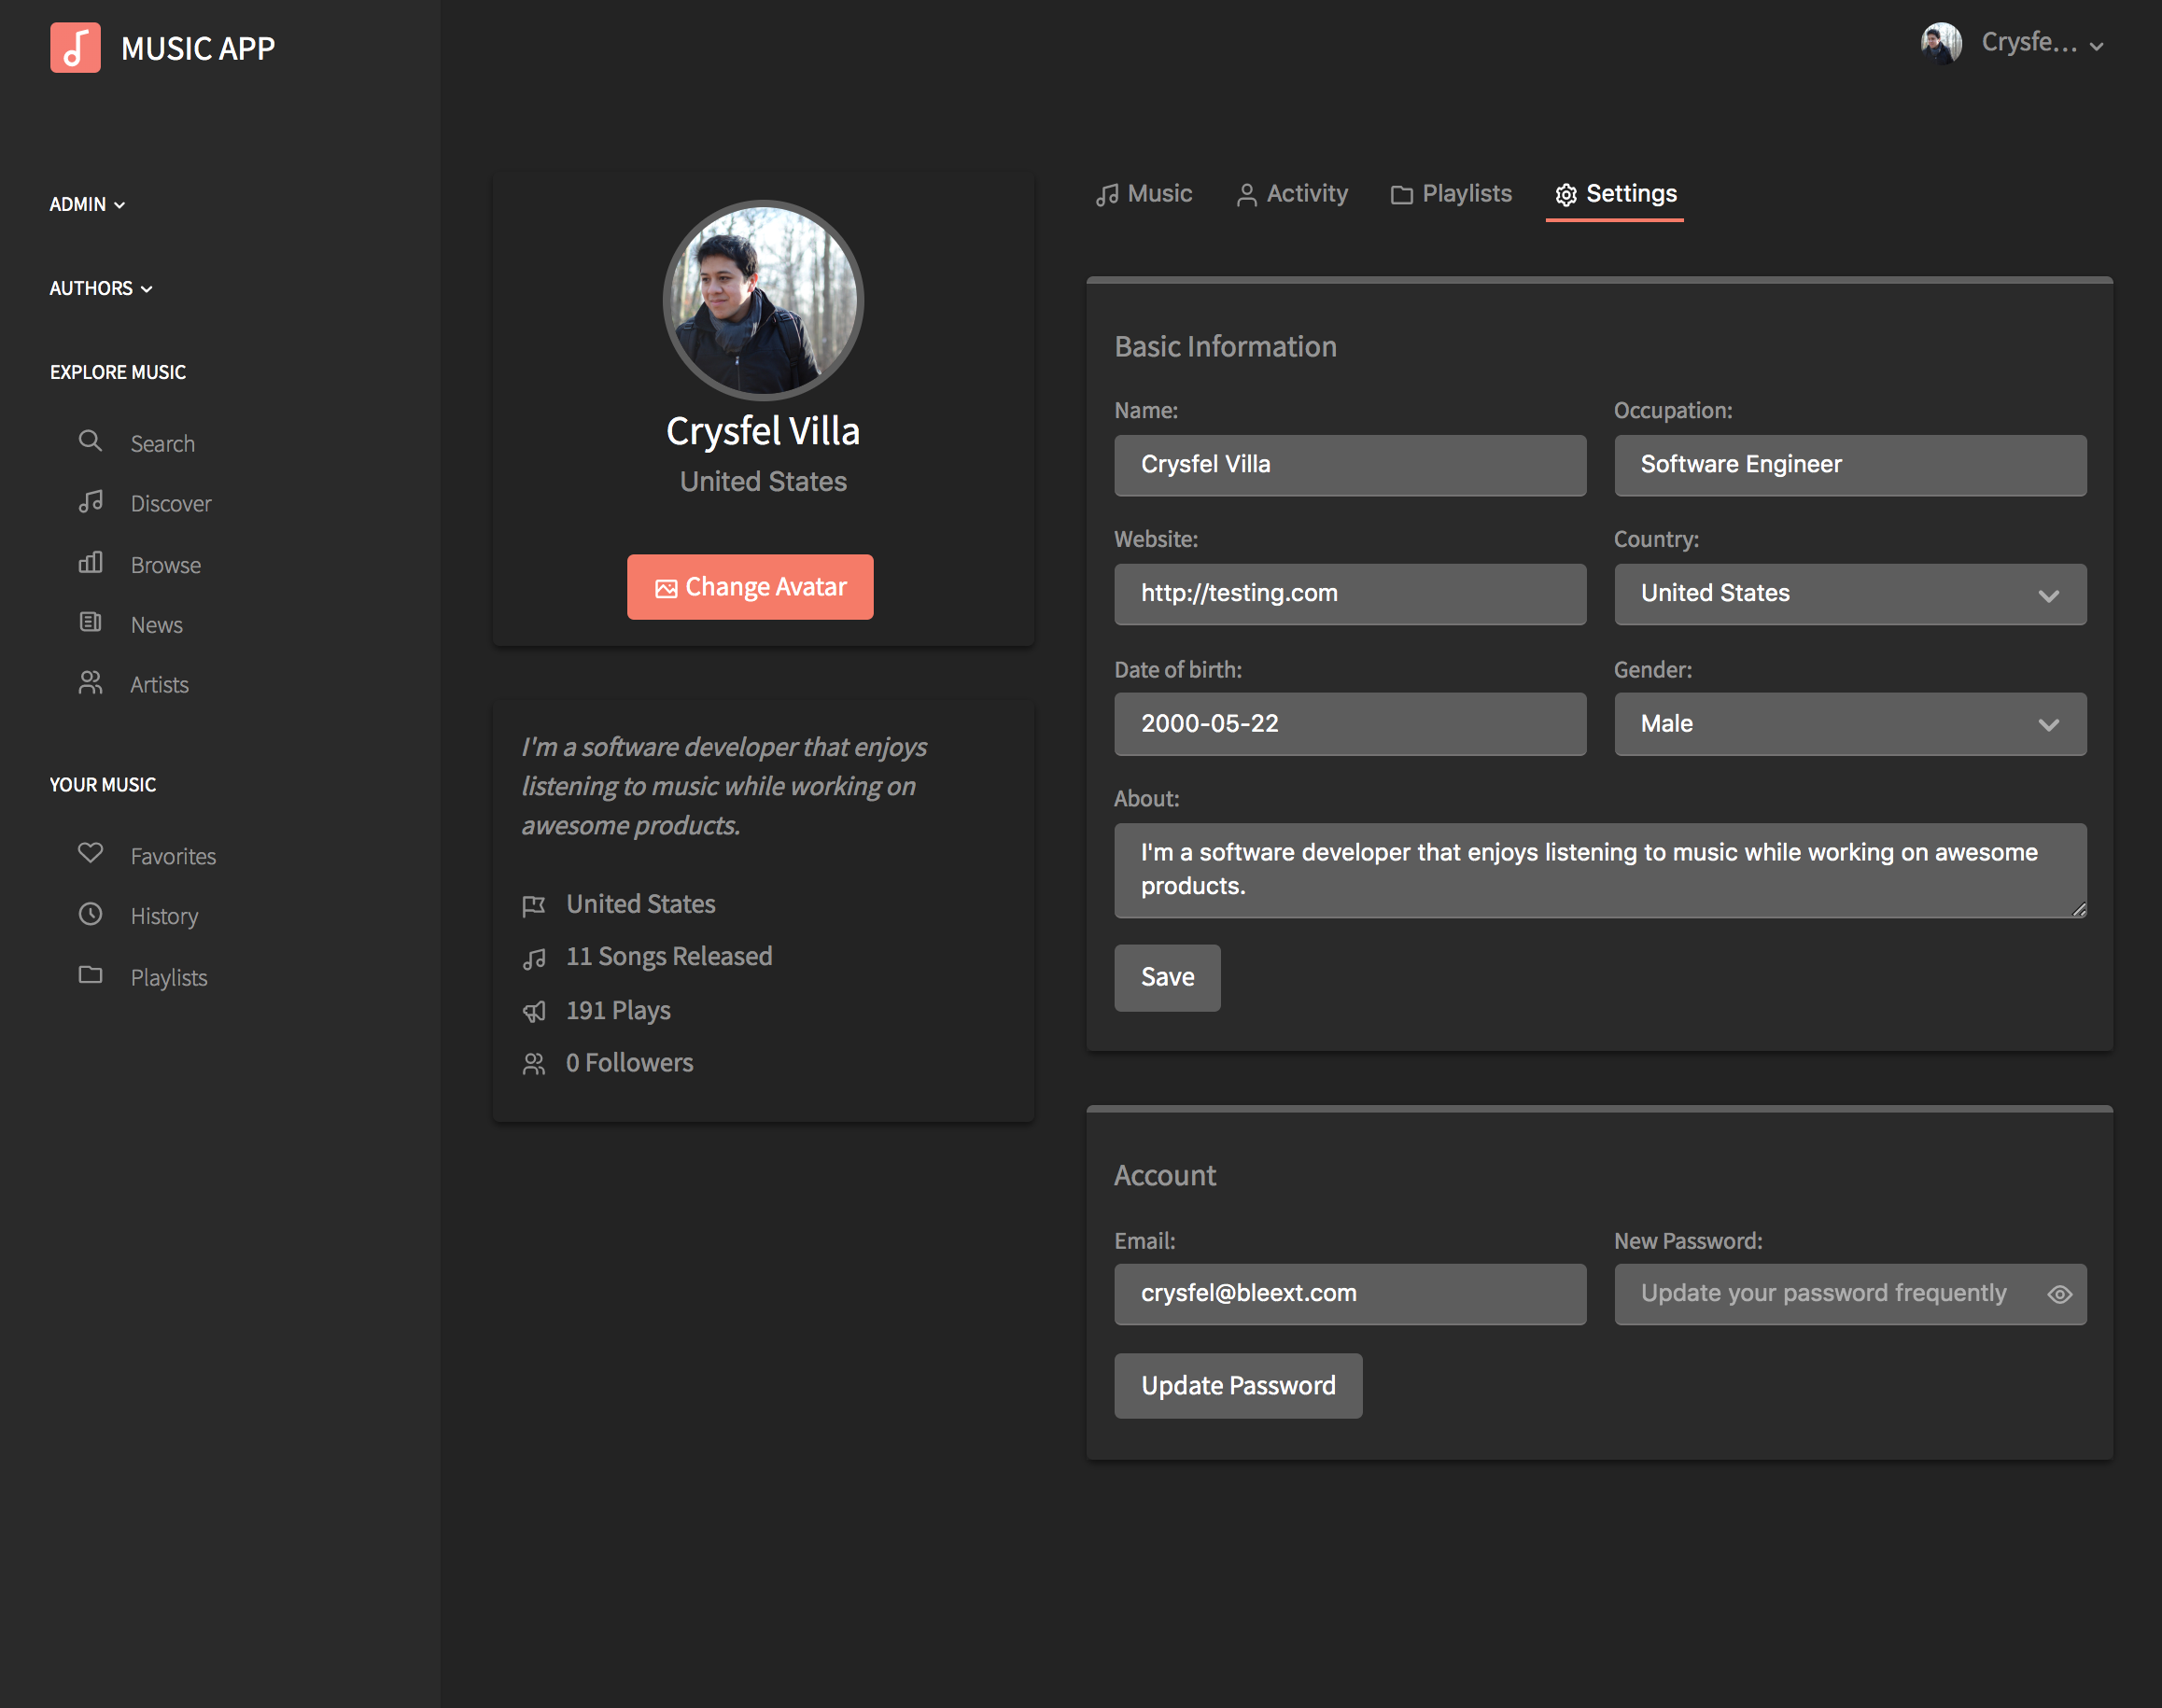
Profile settings
As a member, you can update your profile page. You can update your name, description, location, gender and any of the existing fields.
You can also update your password from this page.
Playlist
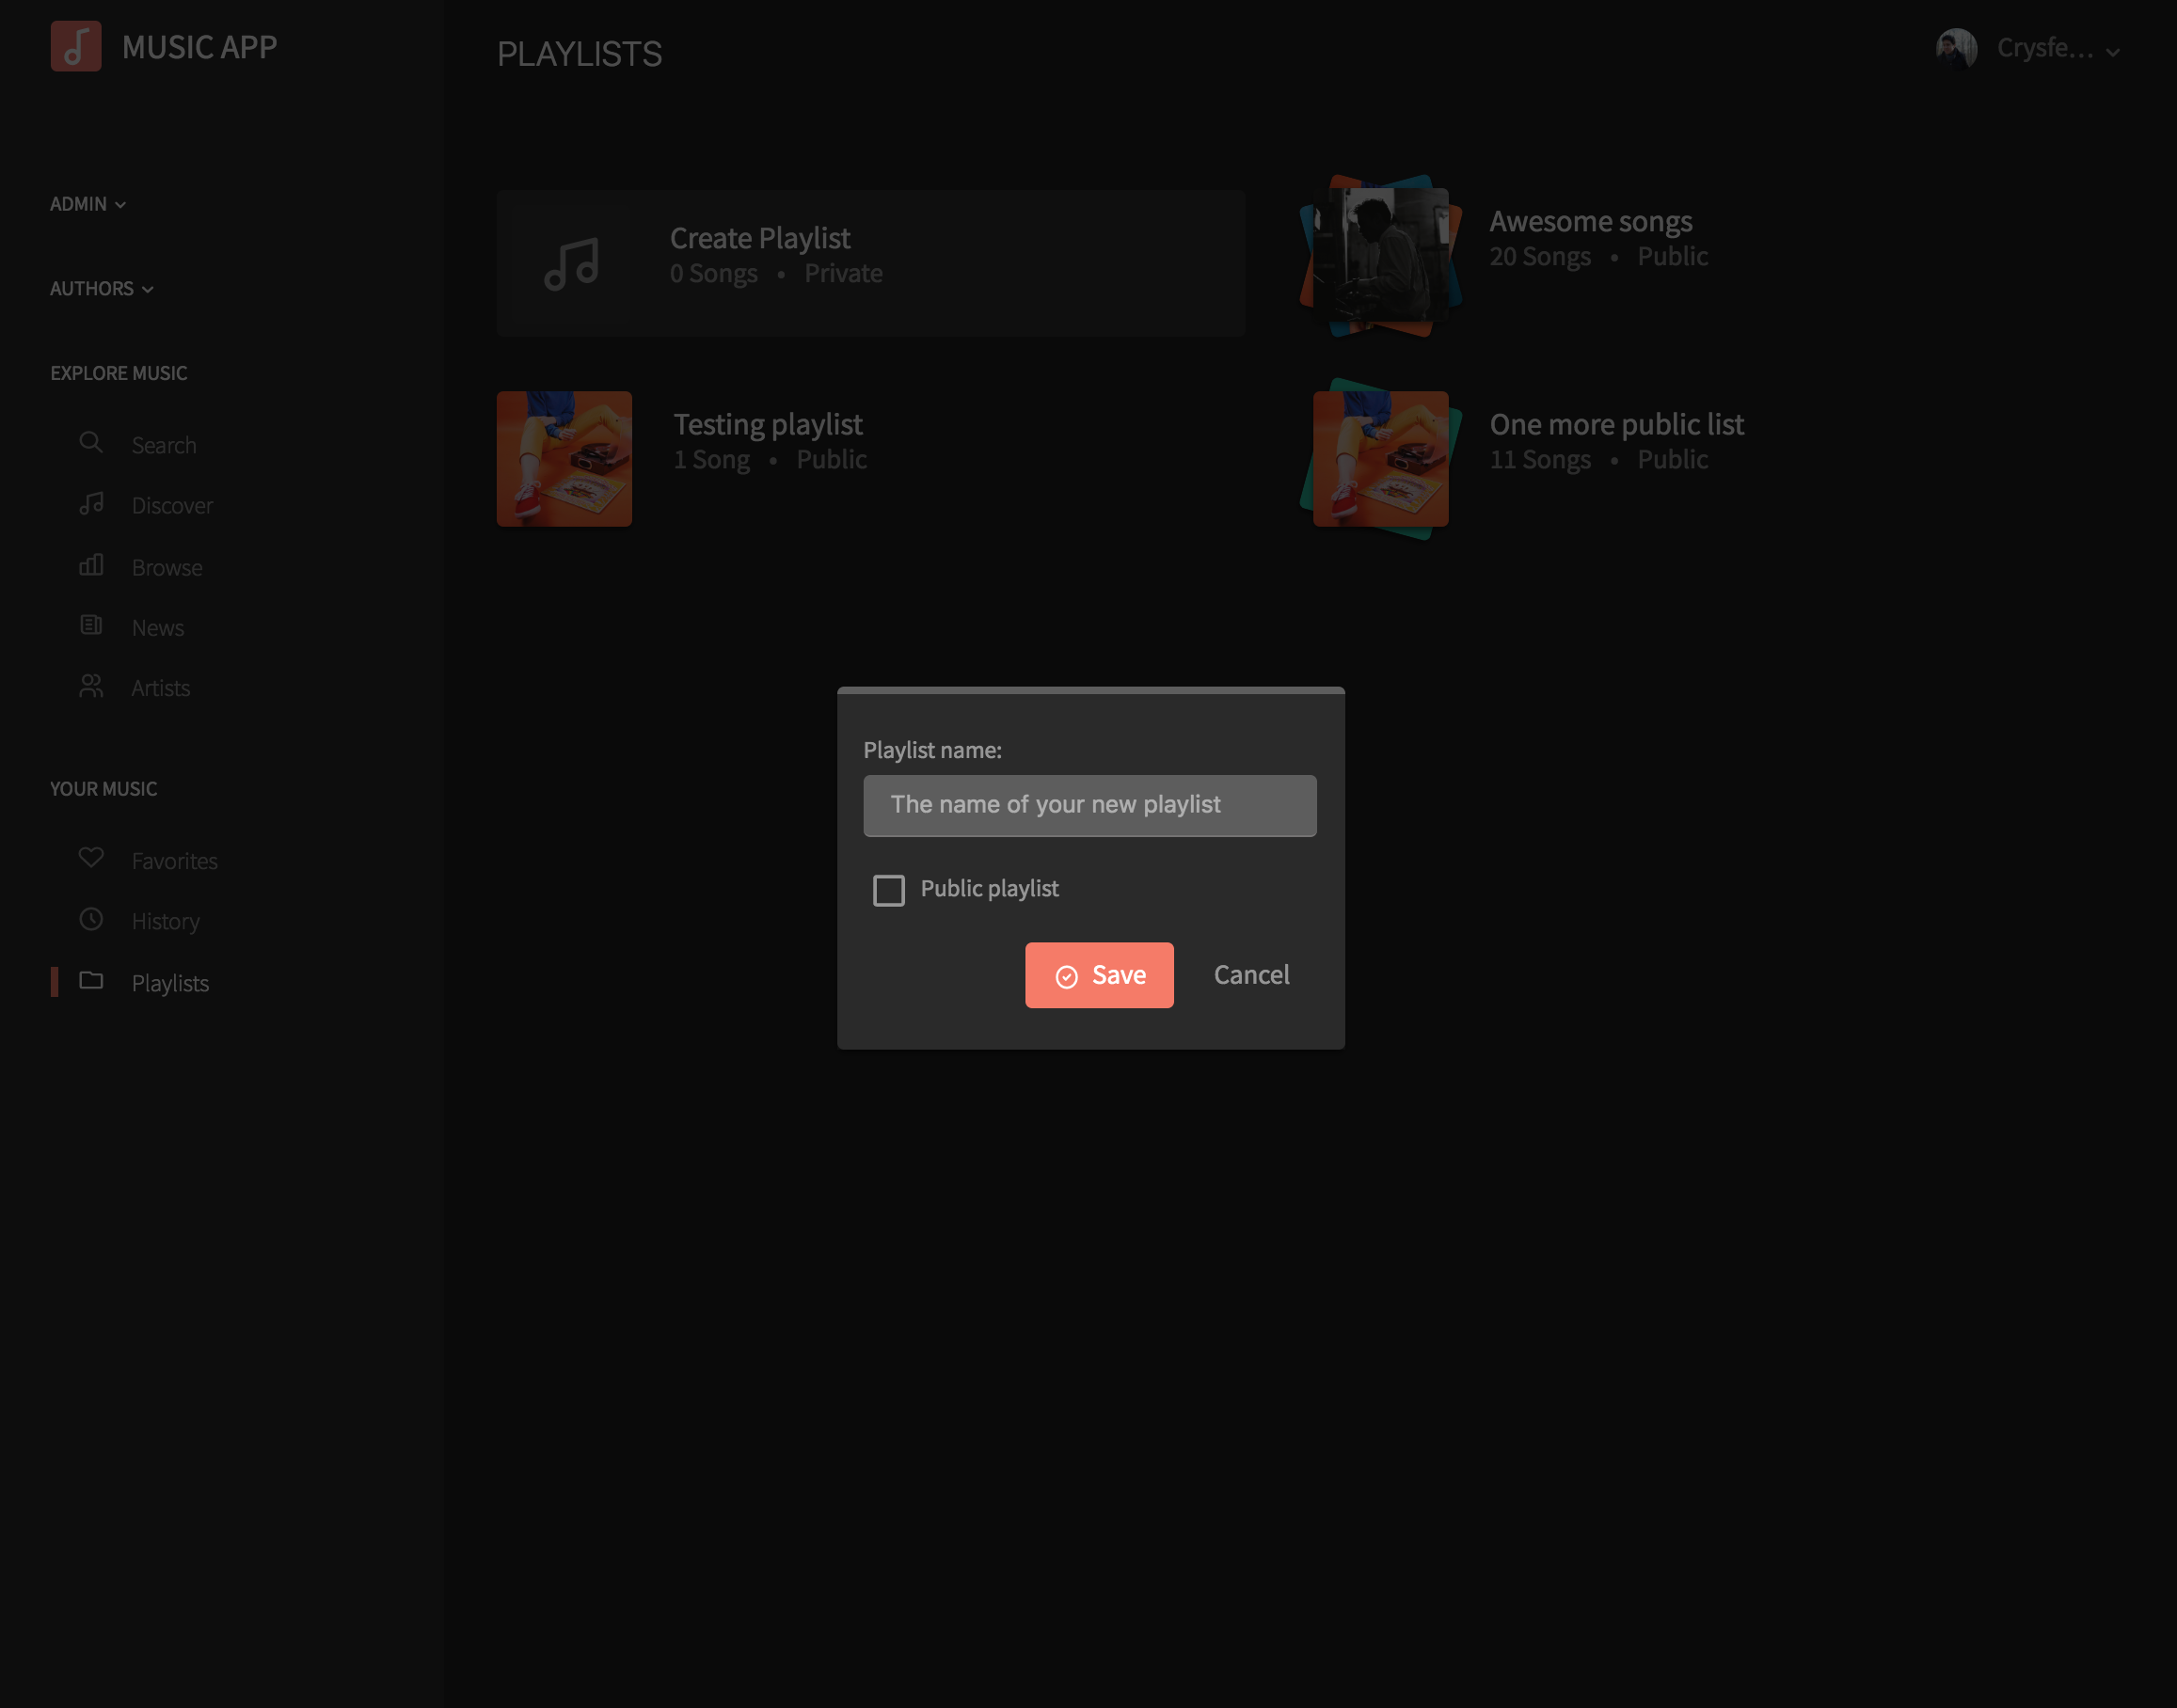
As a member, you can create playlists to add songs.
You can create a new playlist from the playlist module, just click the Create Playlist button and the form will show up as a modal window.
You can also create a new playlist from the song detail page, the add to playlist menu contains an option to create a new playlist.
Your playlists can be private or public. Public playlists will be visible to all members in the platform.
Playlist detail
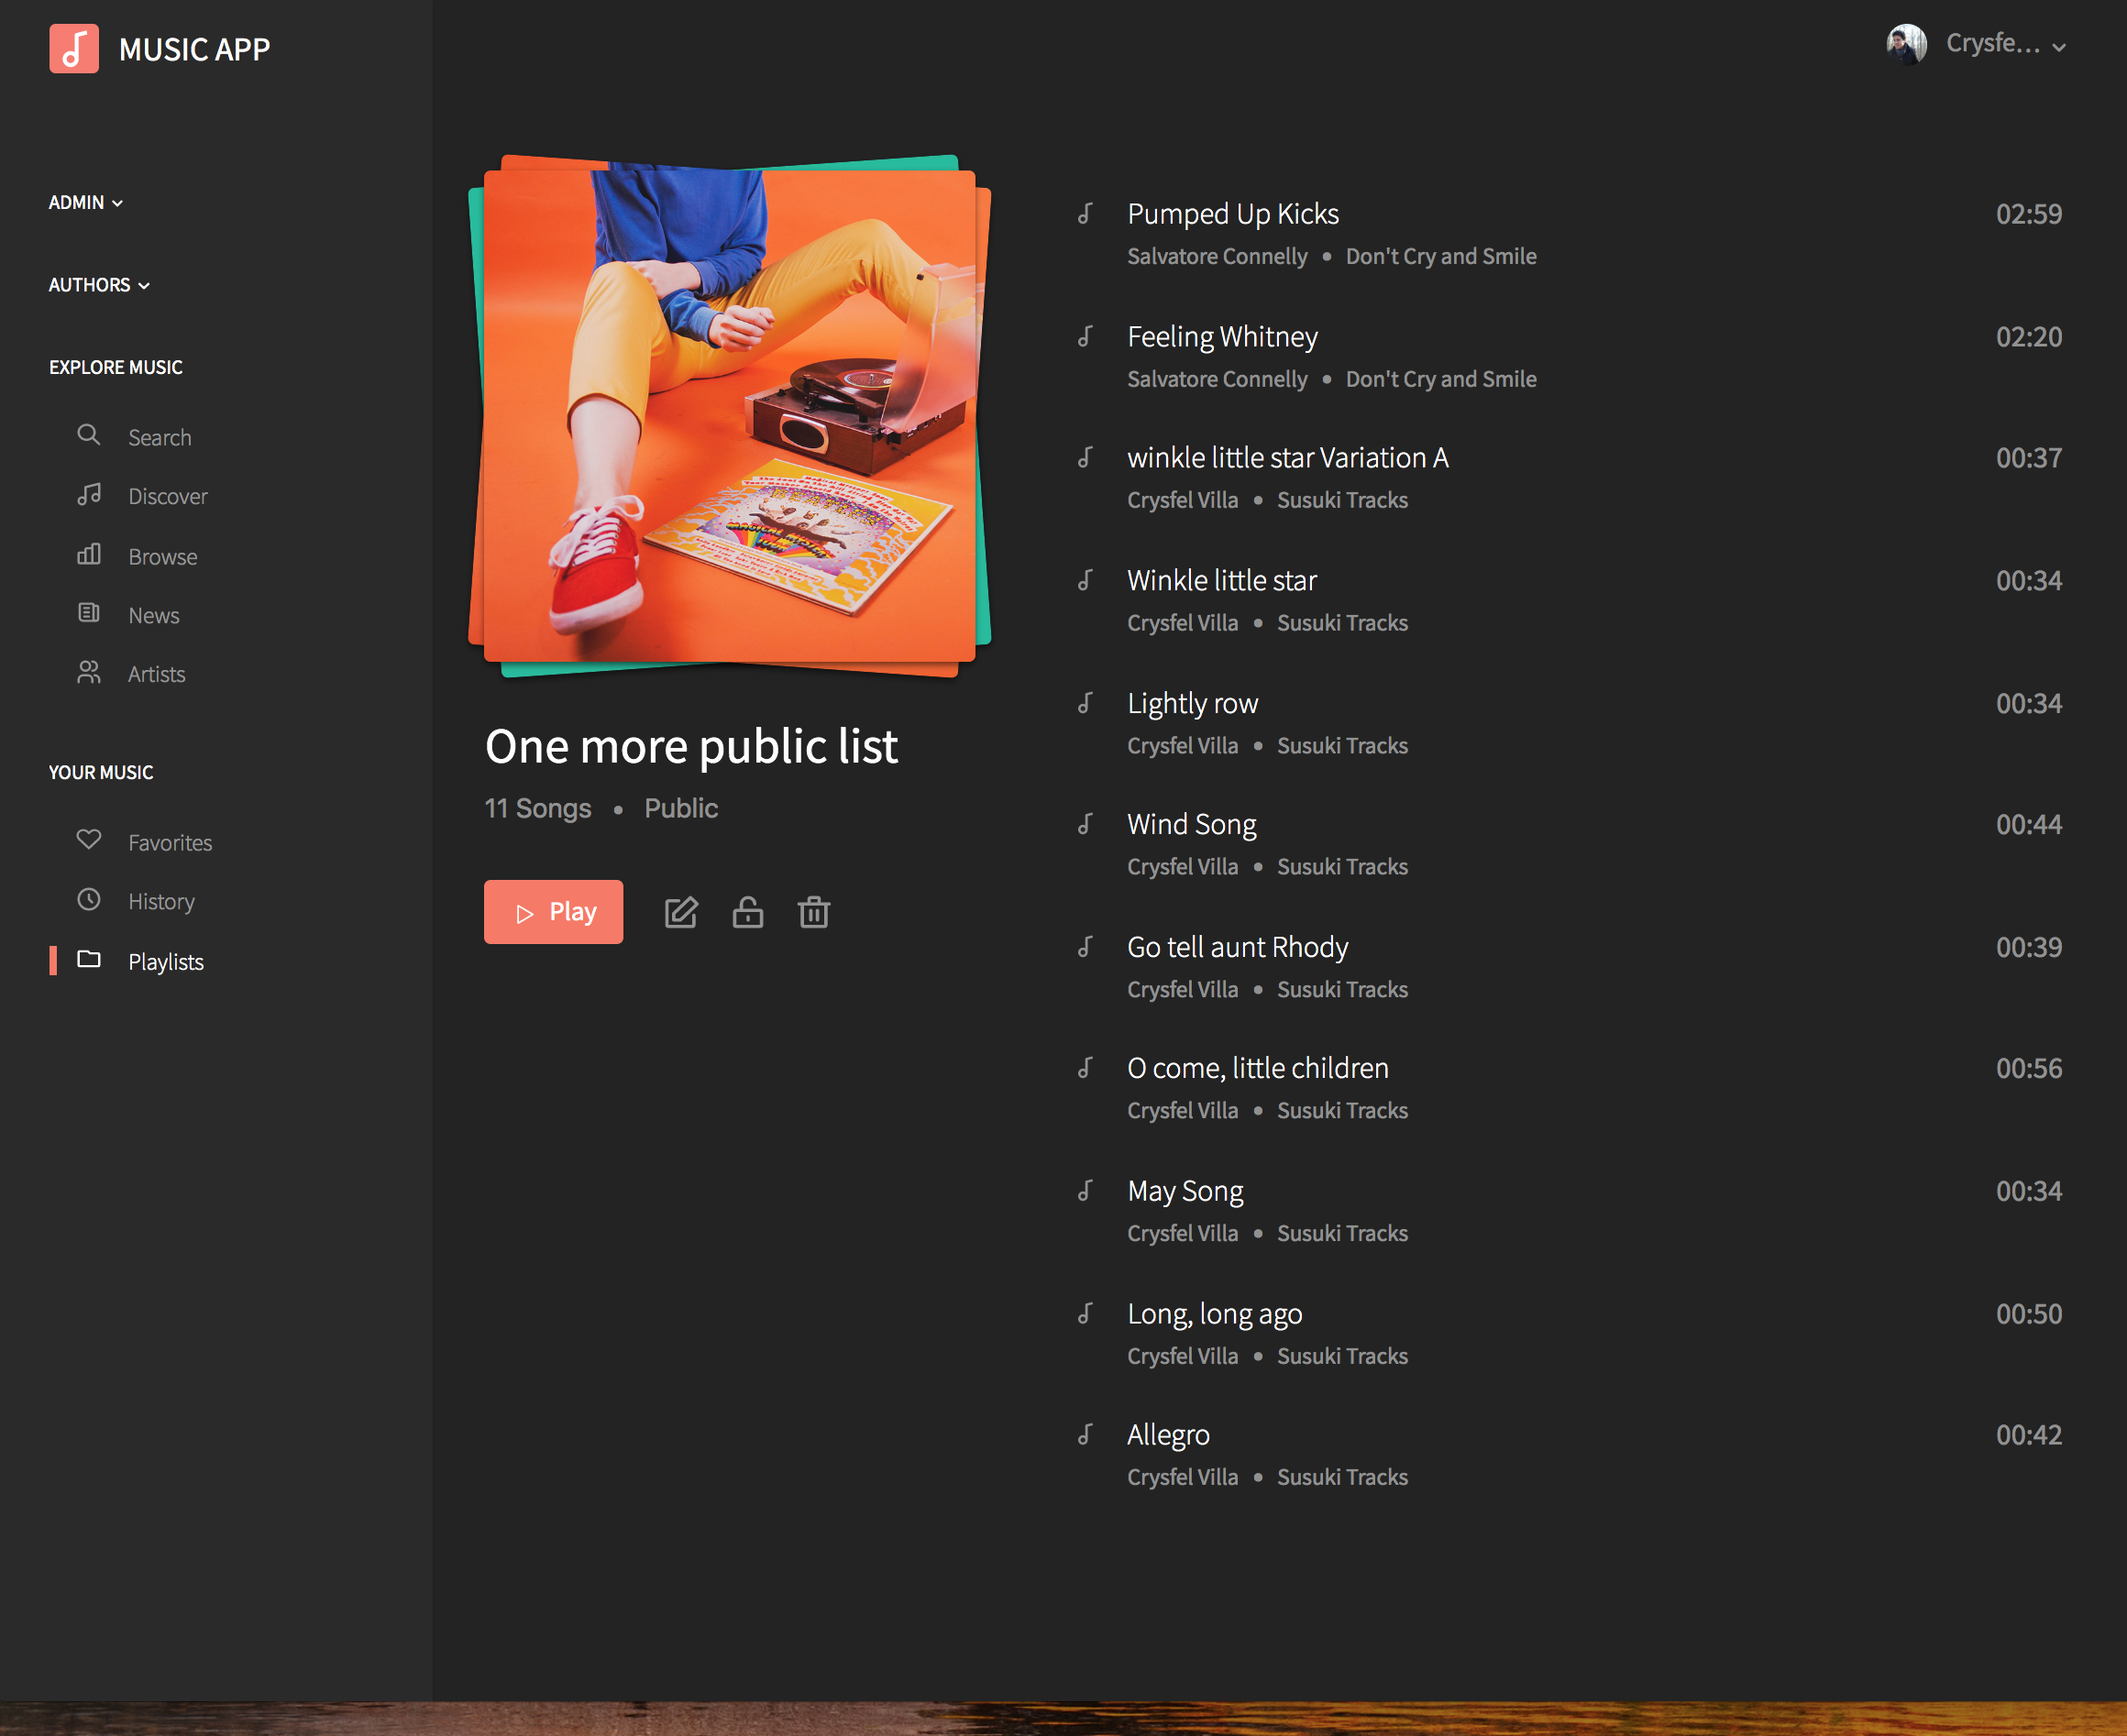
You can access your playlists from the main menu.
From the detail page, you will see a list of songs, if you select one you will see the details of that song in the right side.
You can edit the name of the playlist, remove the entire playlist from here or a single song.
You can also play any of the songs.
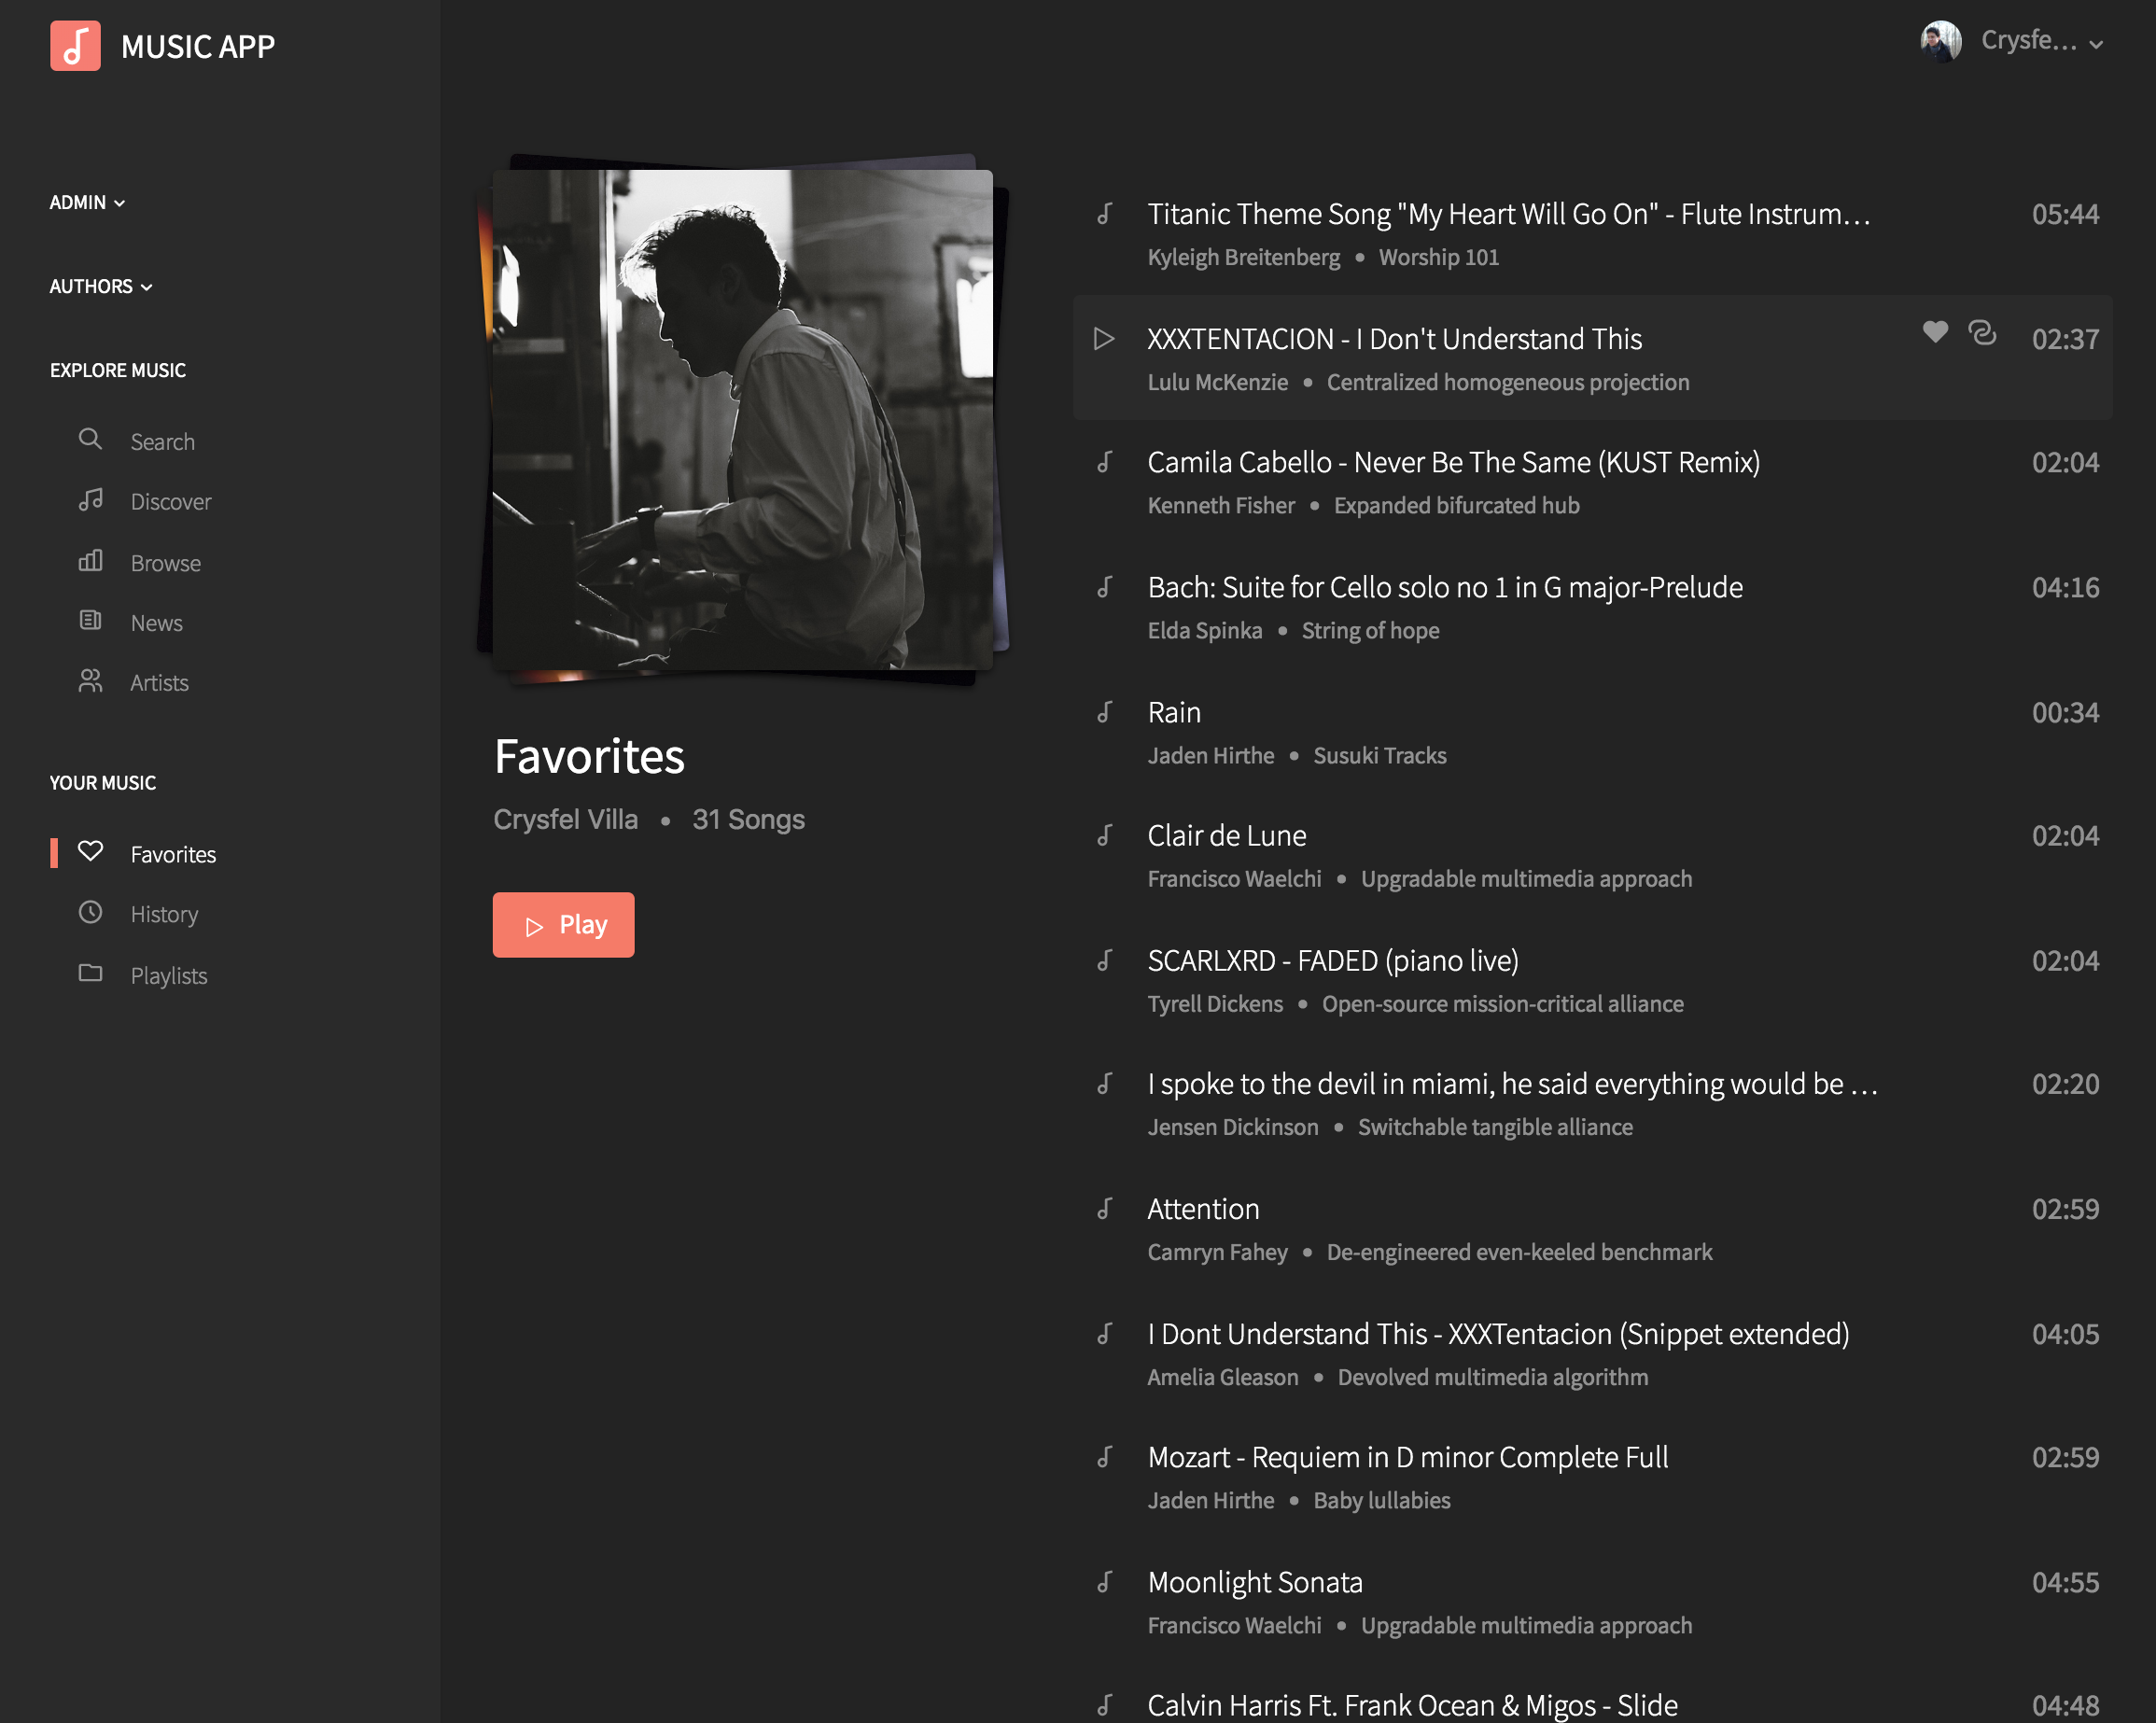
Favorites
You can see all your favorites songs from this page. When you like a song, it will appear in this list.
In order to remove the song, you can always unlike it and it will disappear from the list.
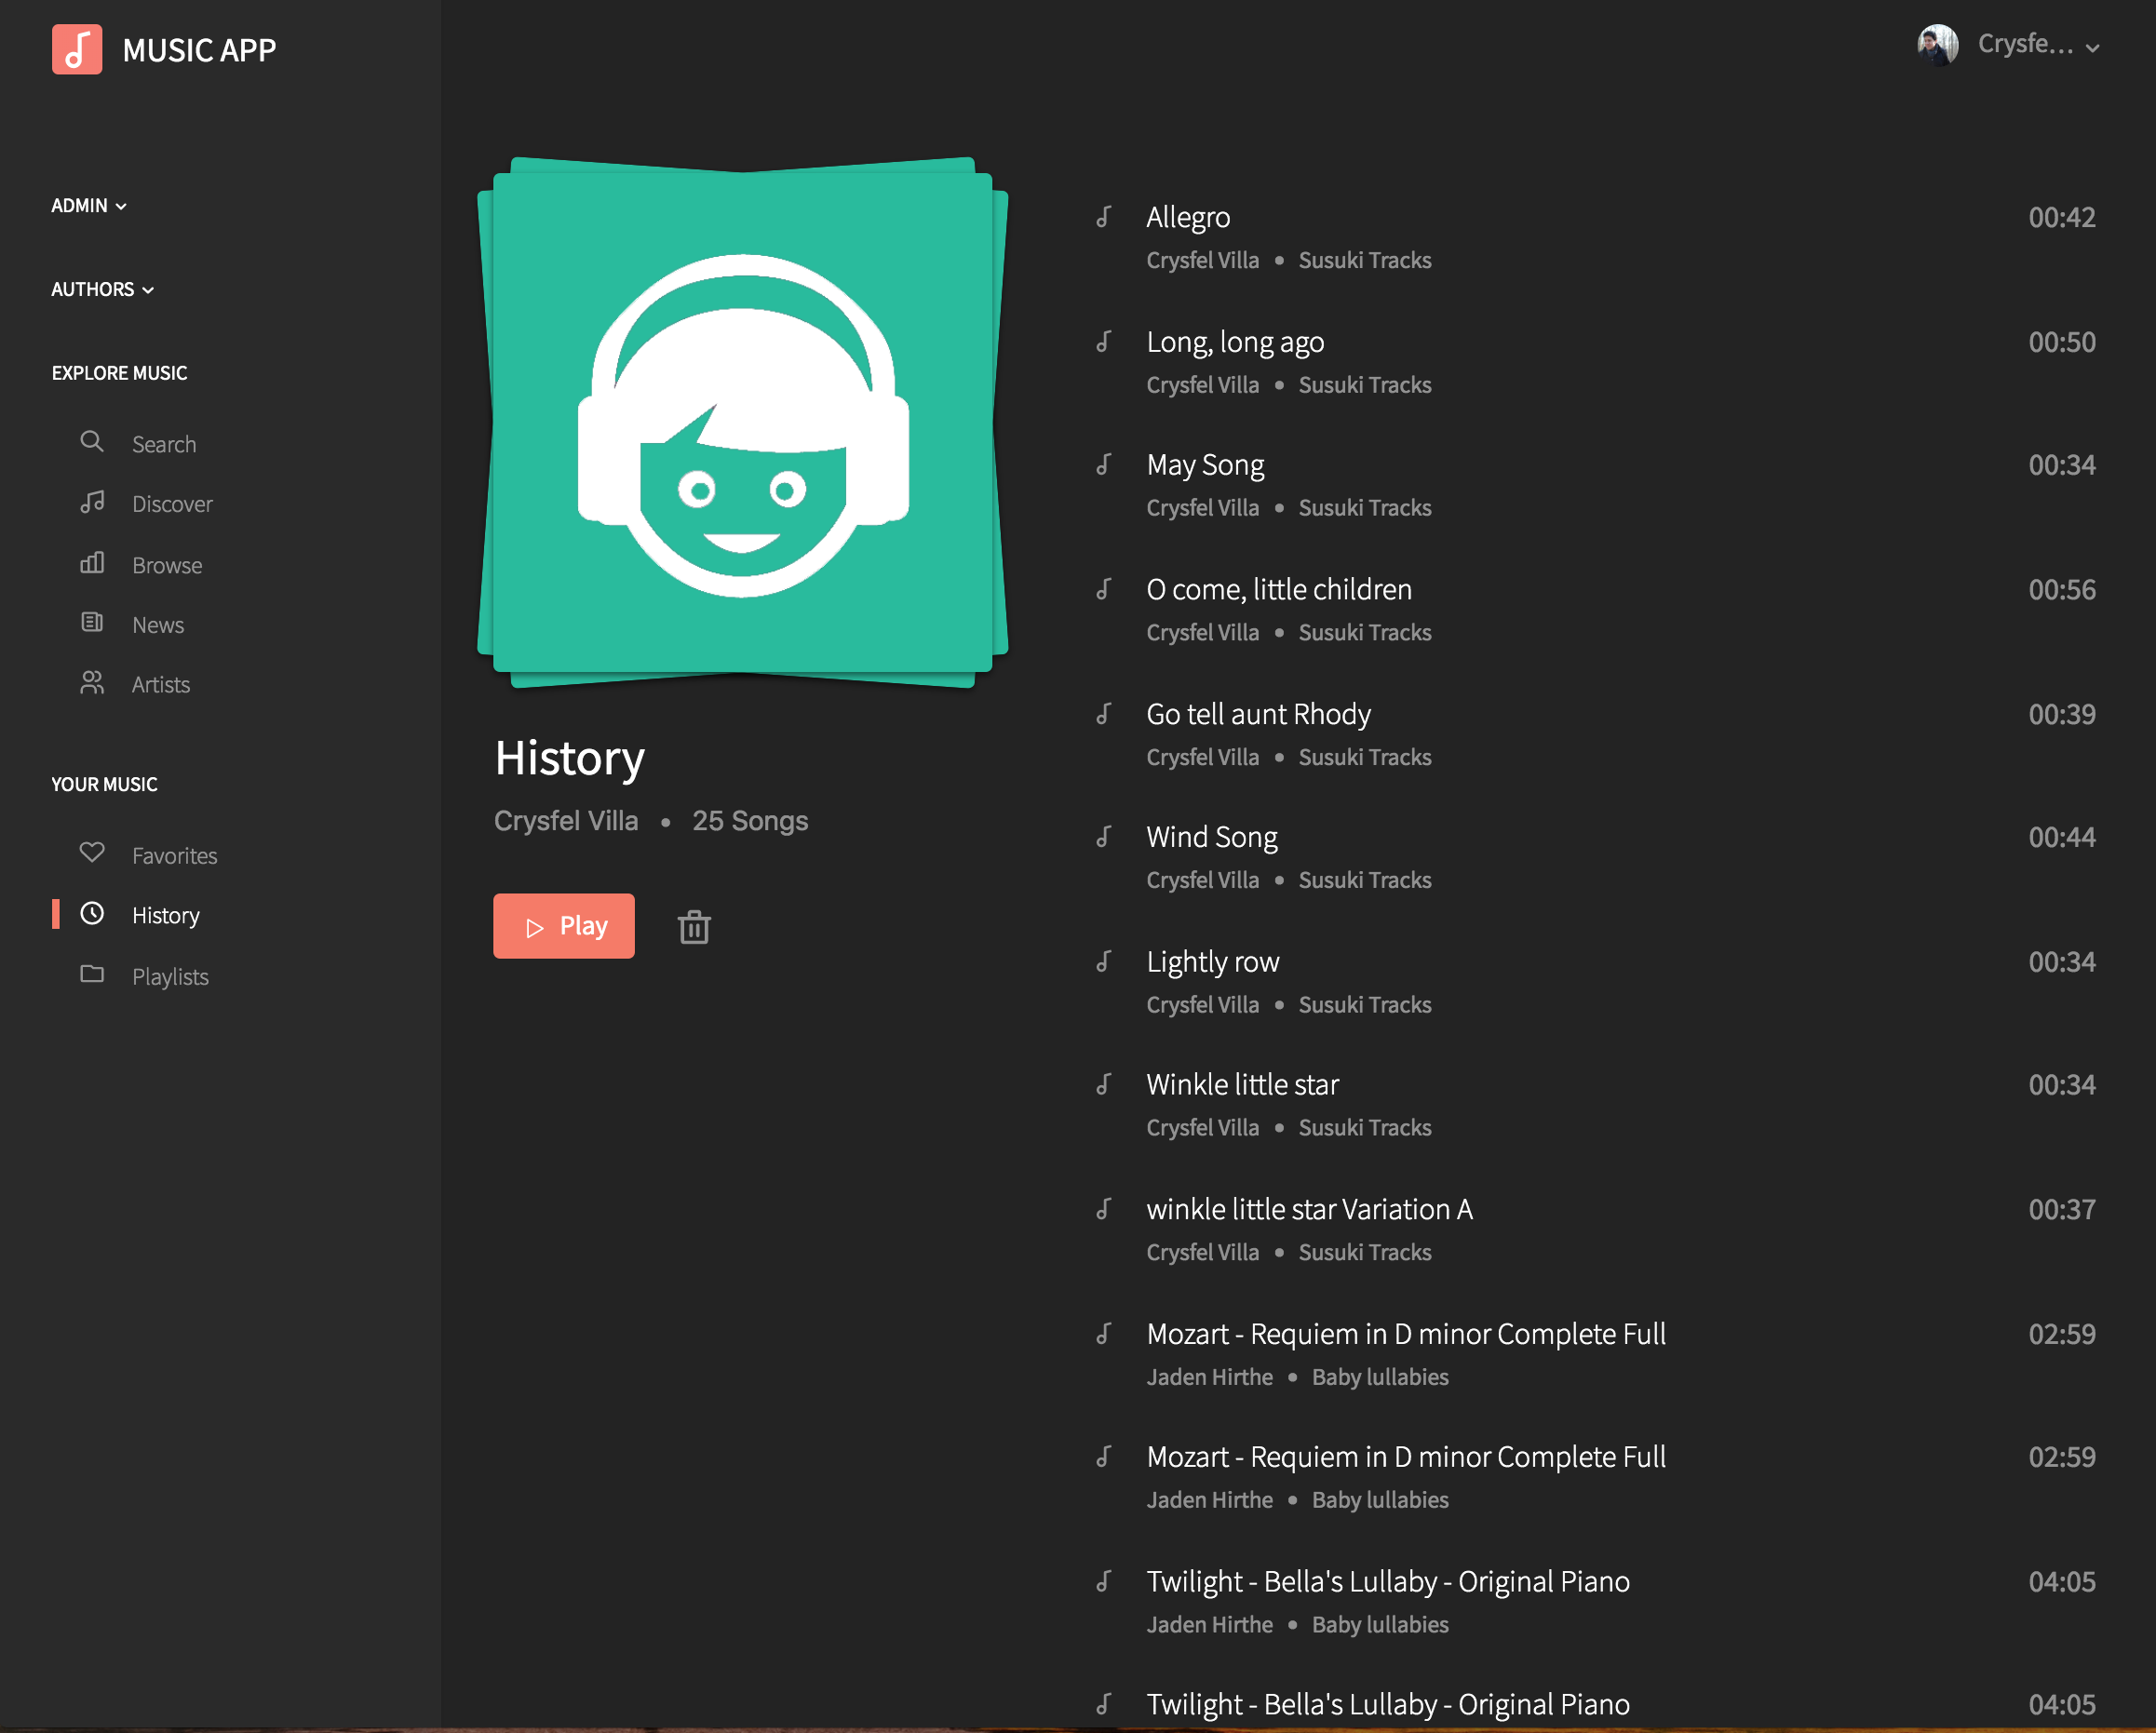
History
As a member, you can see the history of the latest music you have played. If you select a song from the left, you will be able to see the detail of that particular song.
You can also play gain the songs from here.
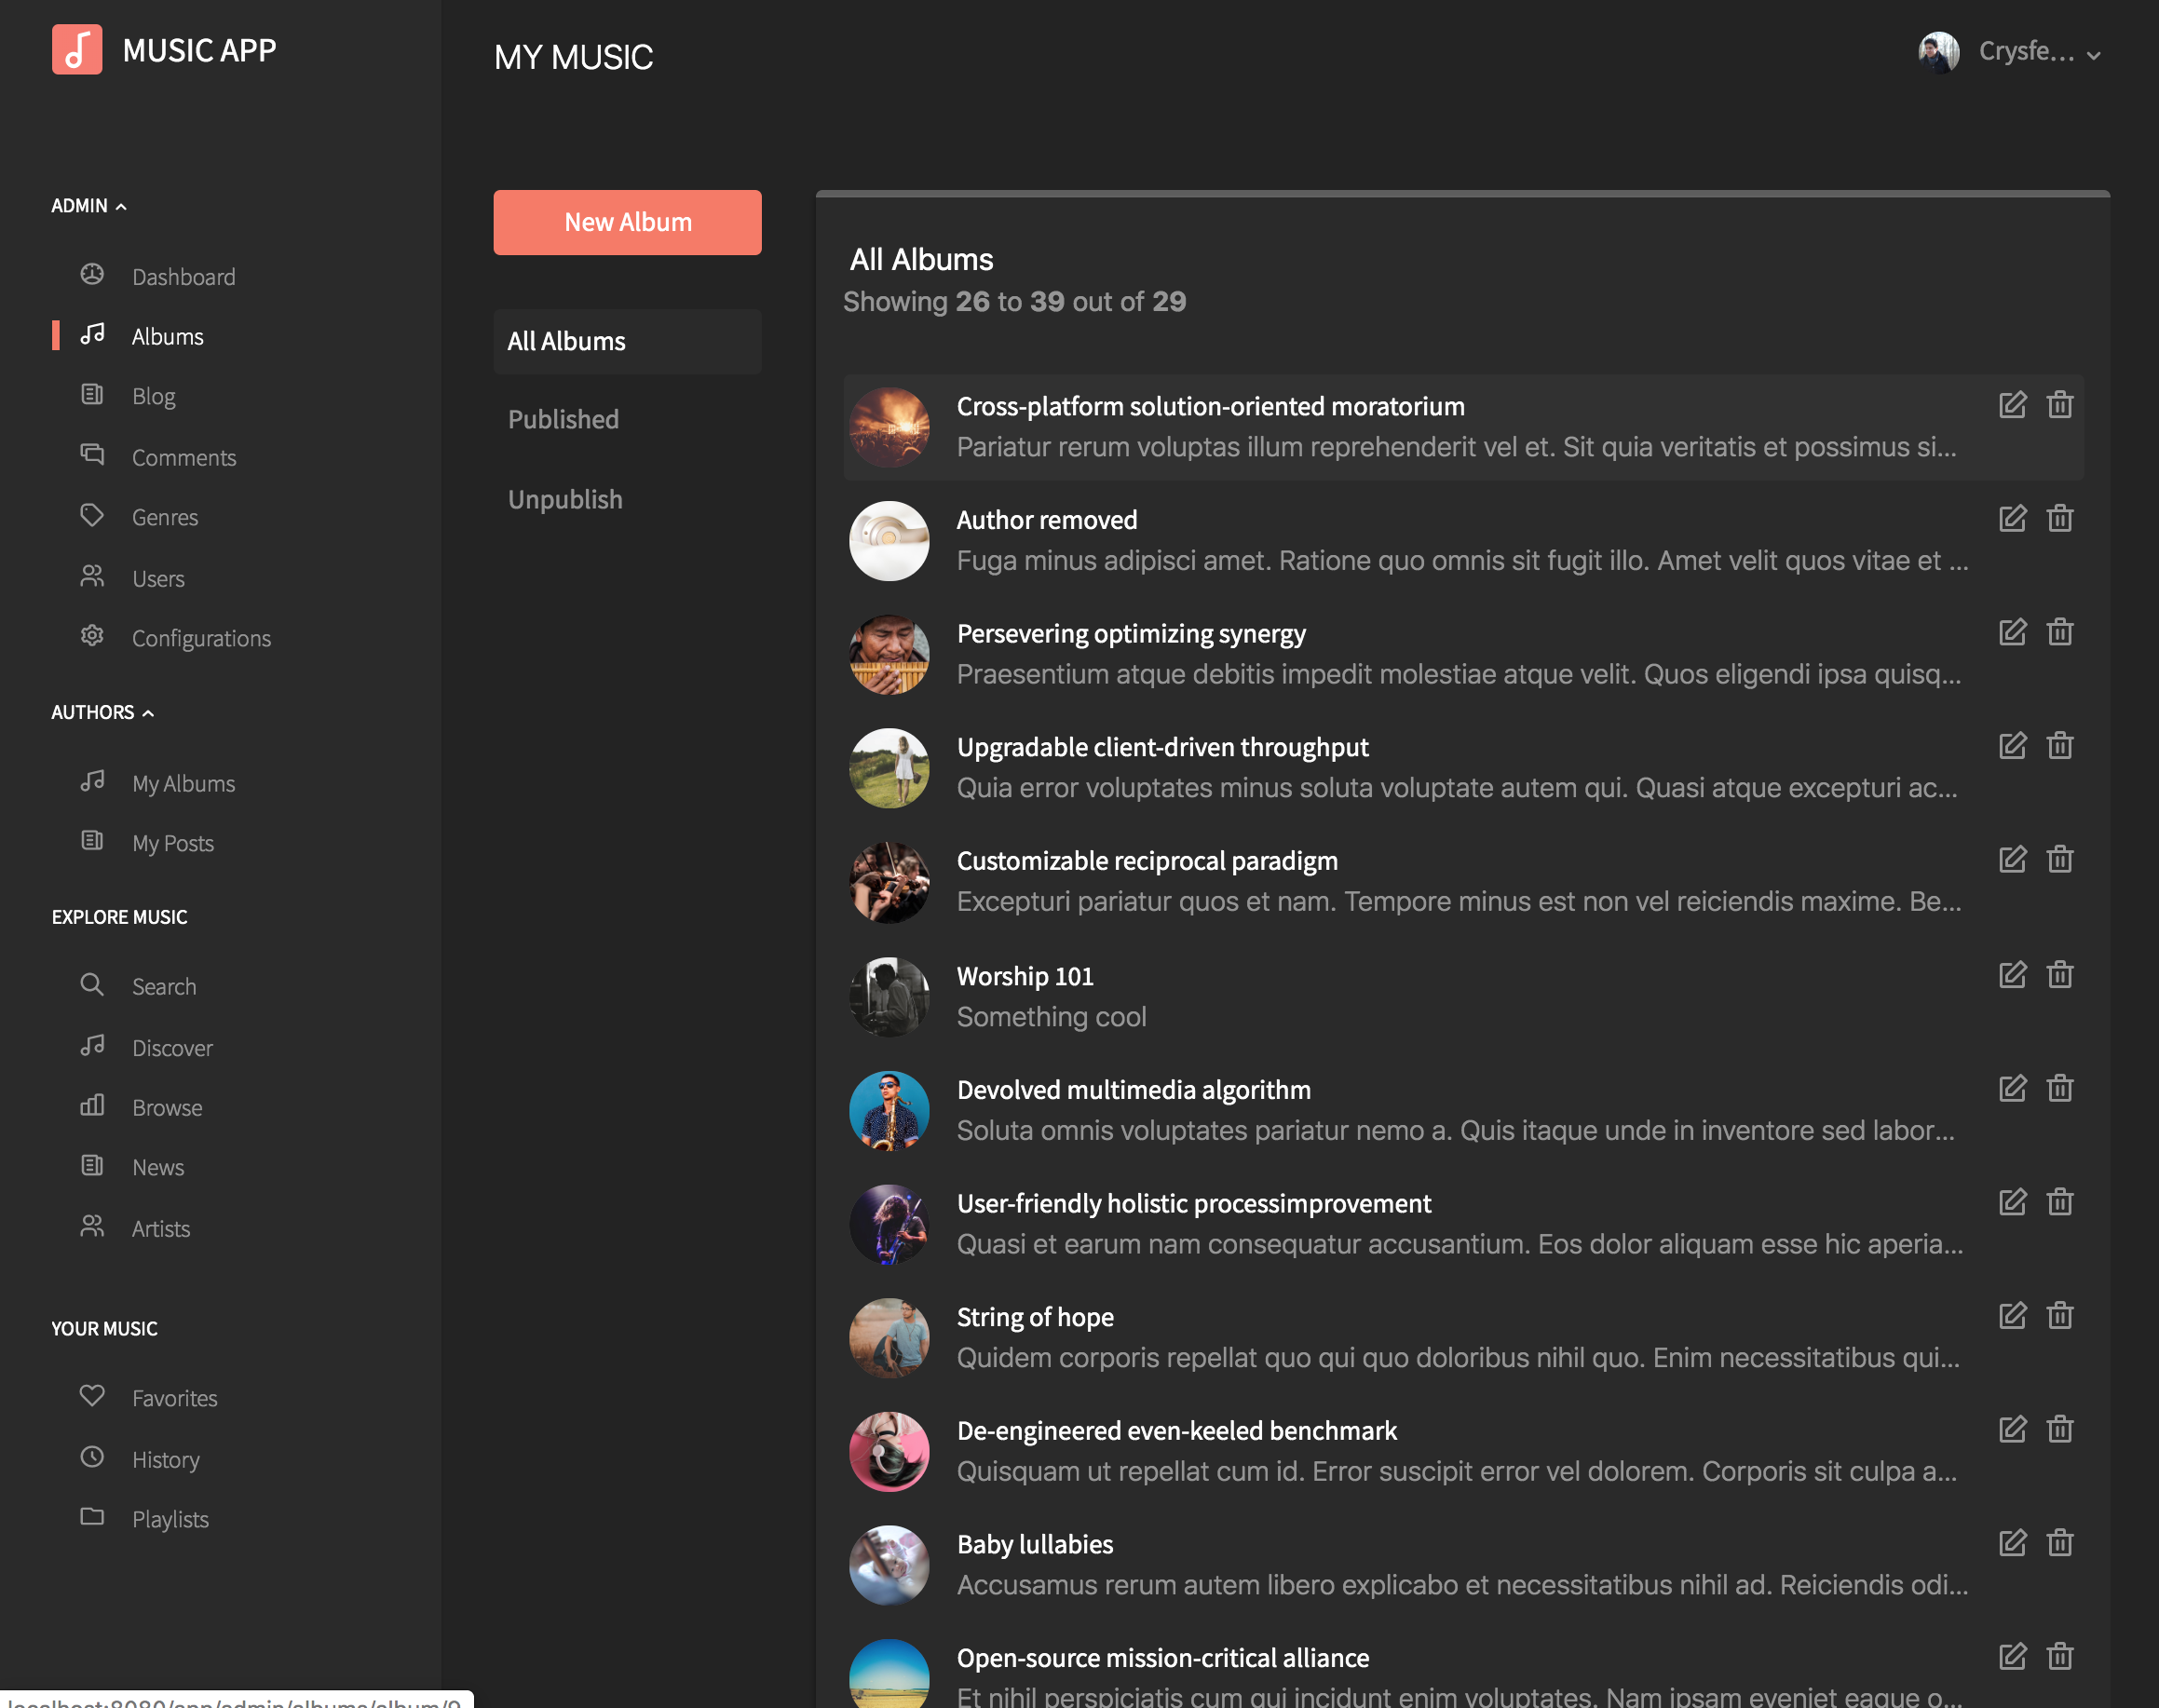
Authors
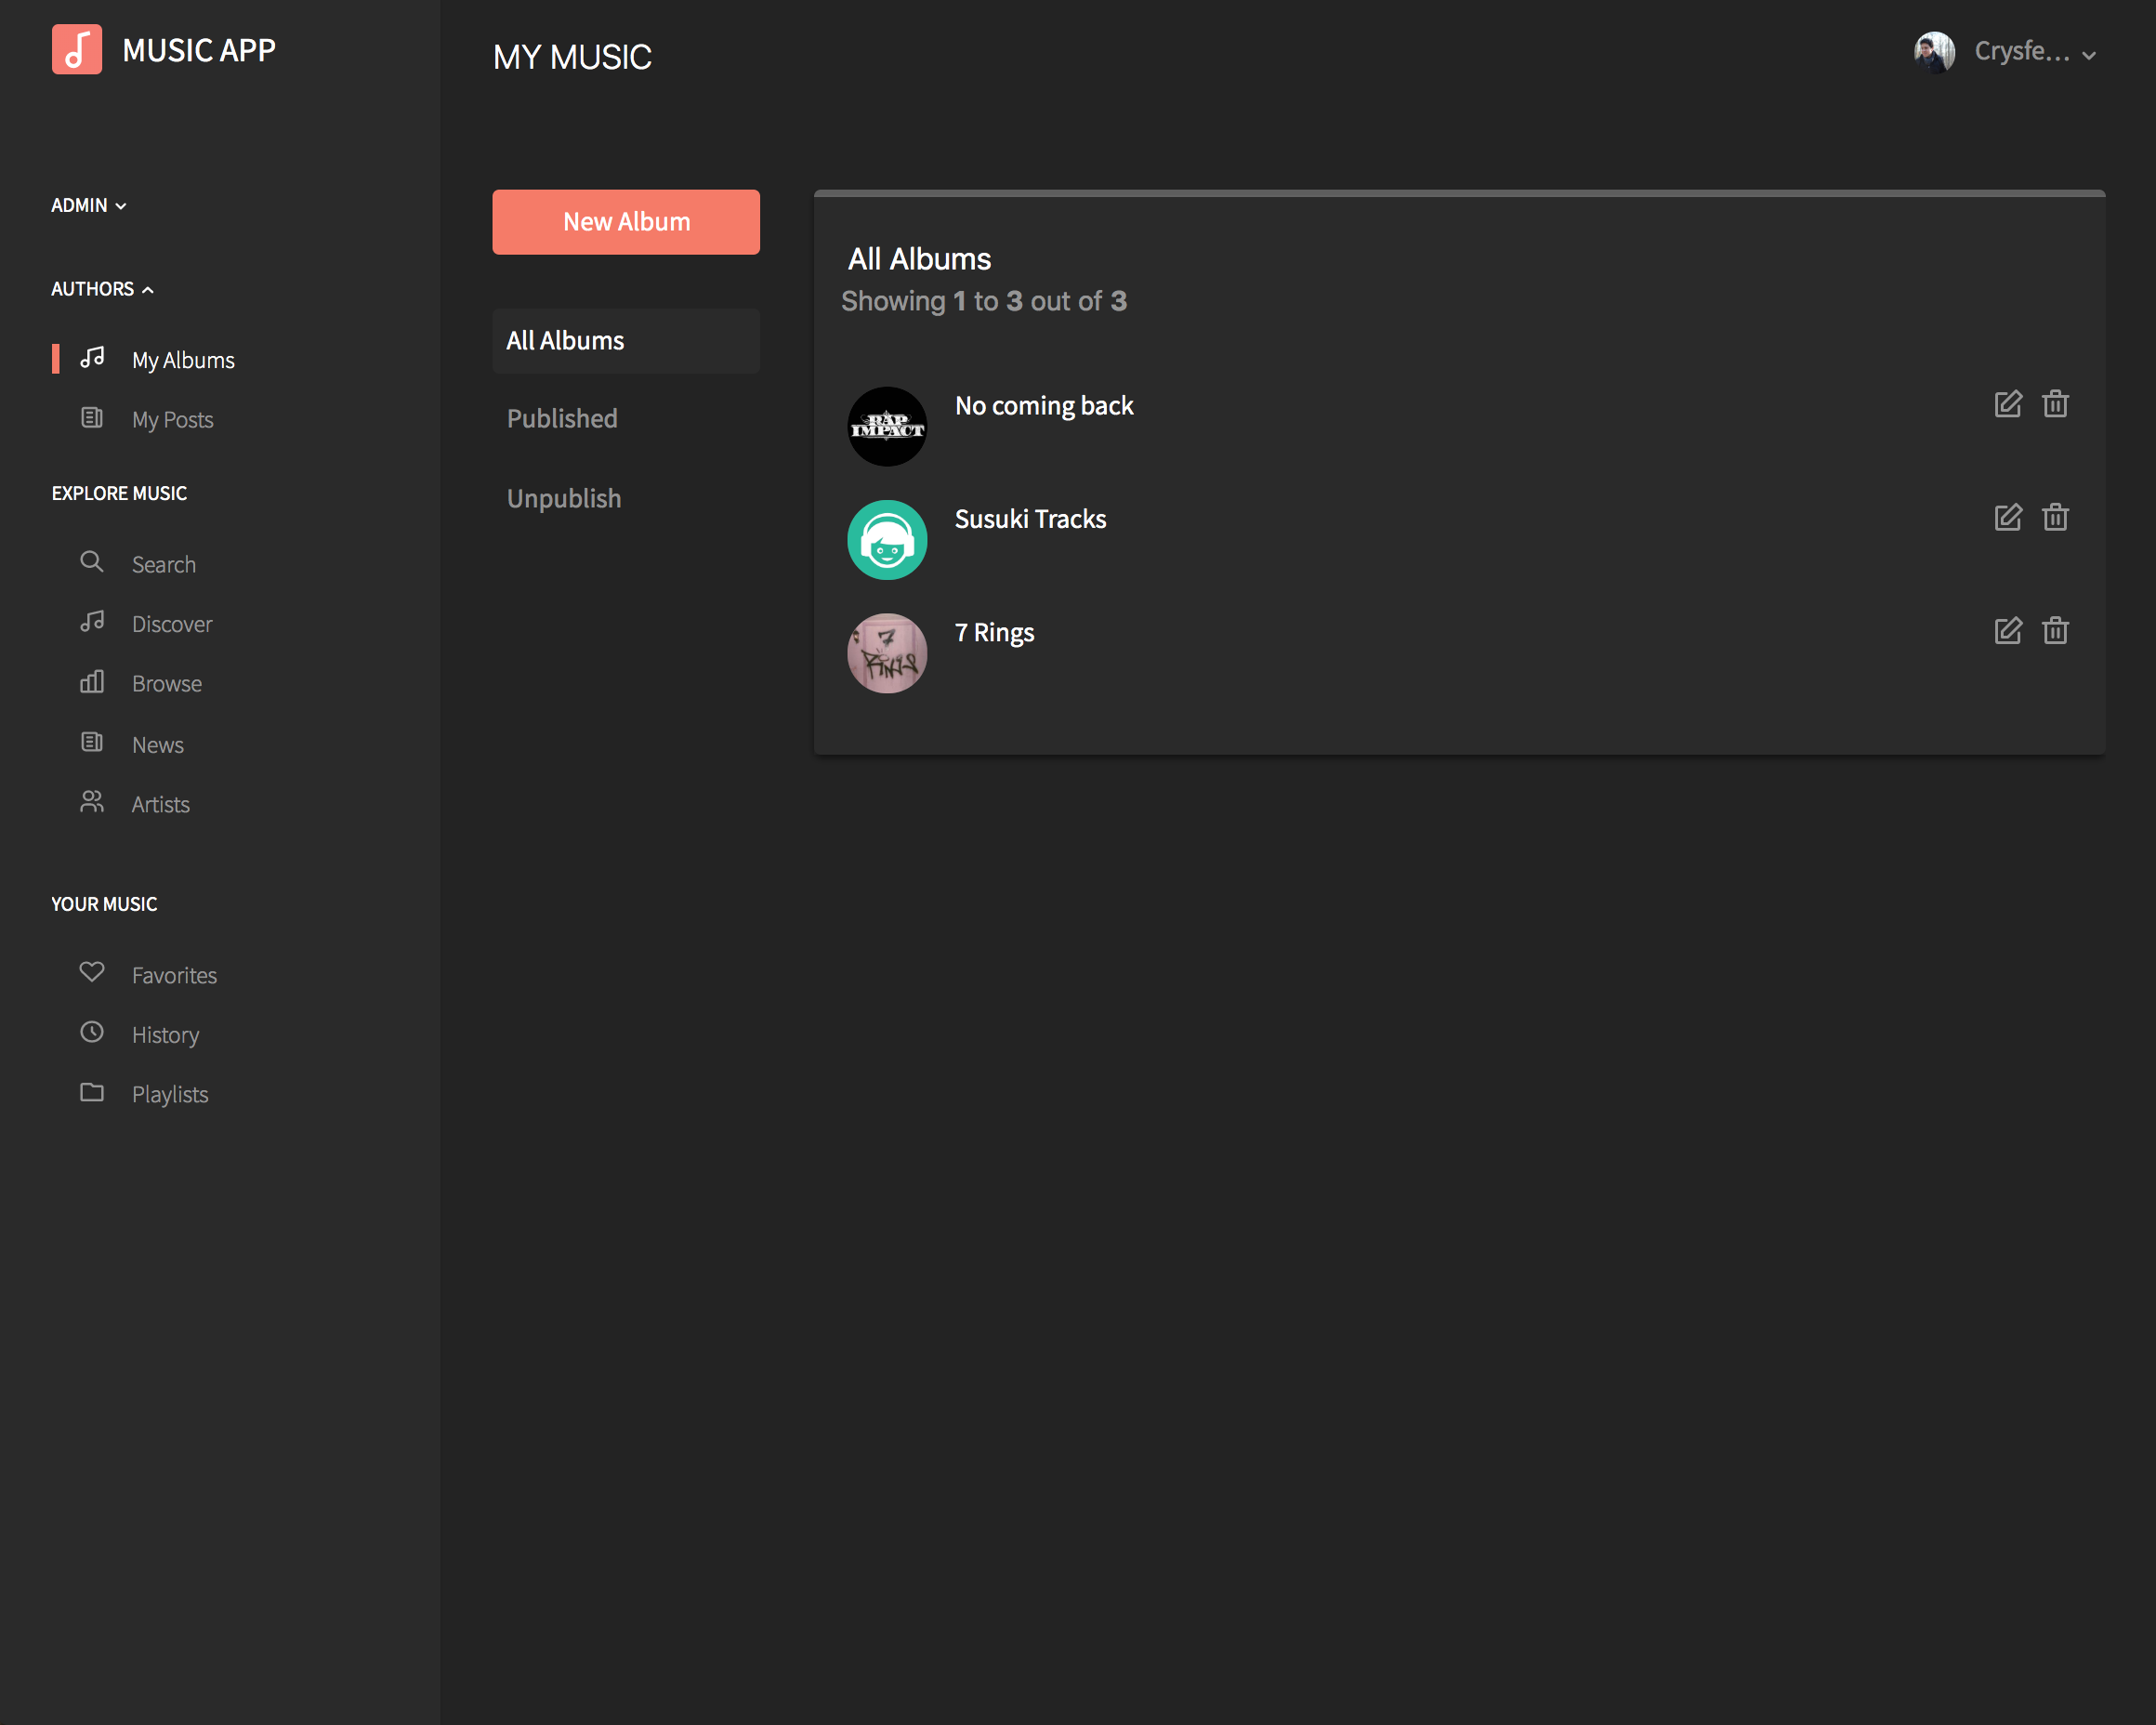
An author is a registered user, but they can create albums, songs and publish content in the blog. There's an additional option in the main menu for authors only where they have access to manage their own music and posts.
Album list
As an author, you can see only your albums. You can filter the list by published and unpublished albums. From here you can remove any of your albums.
If removing an album, all songs and files attached to the album will be completly removed from the platform, be careful when removing albums.
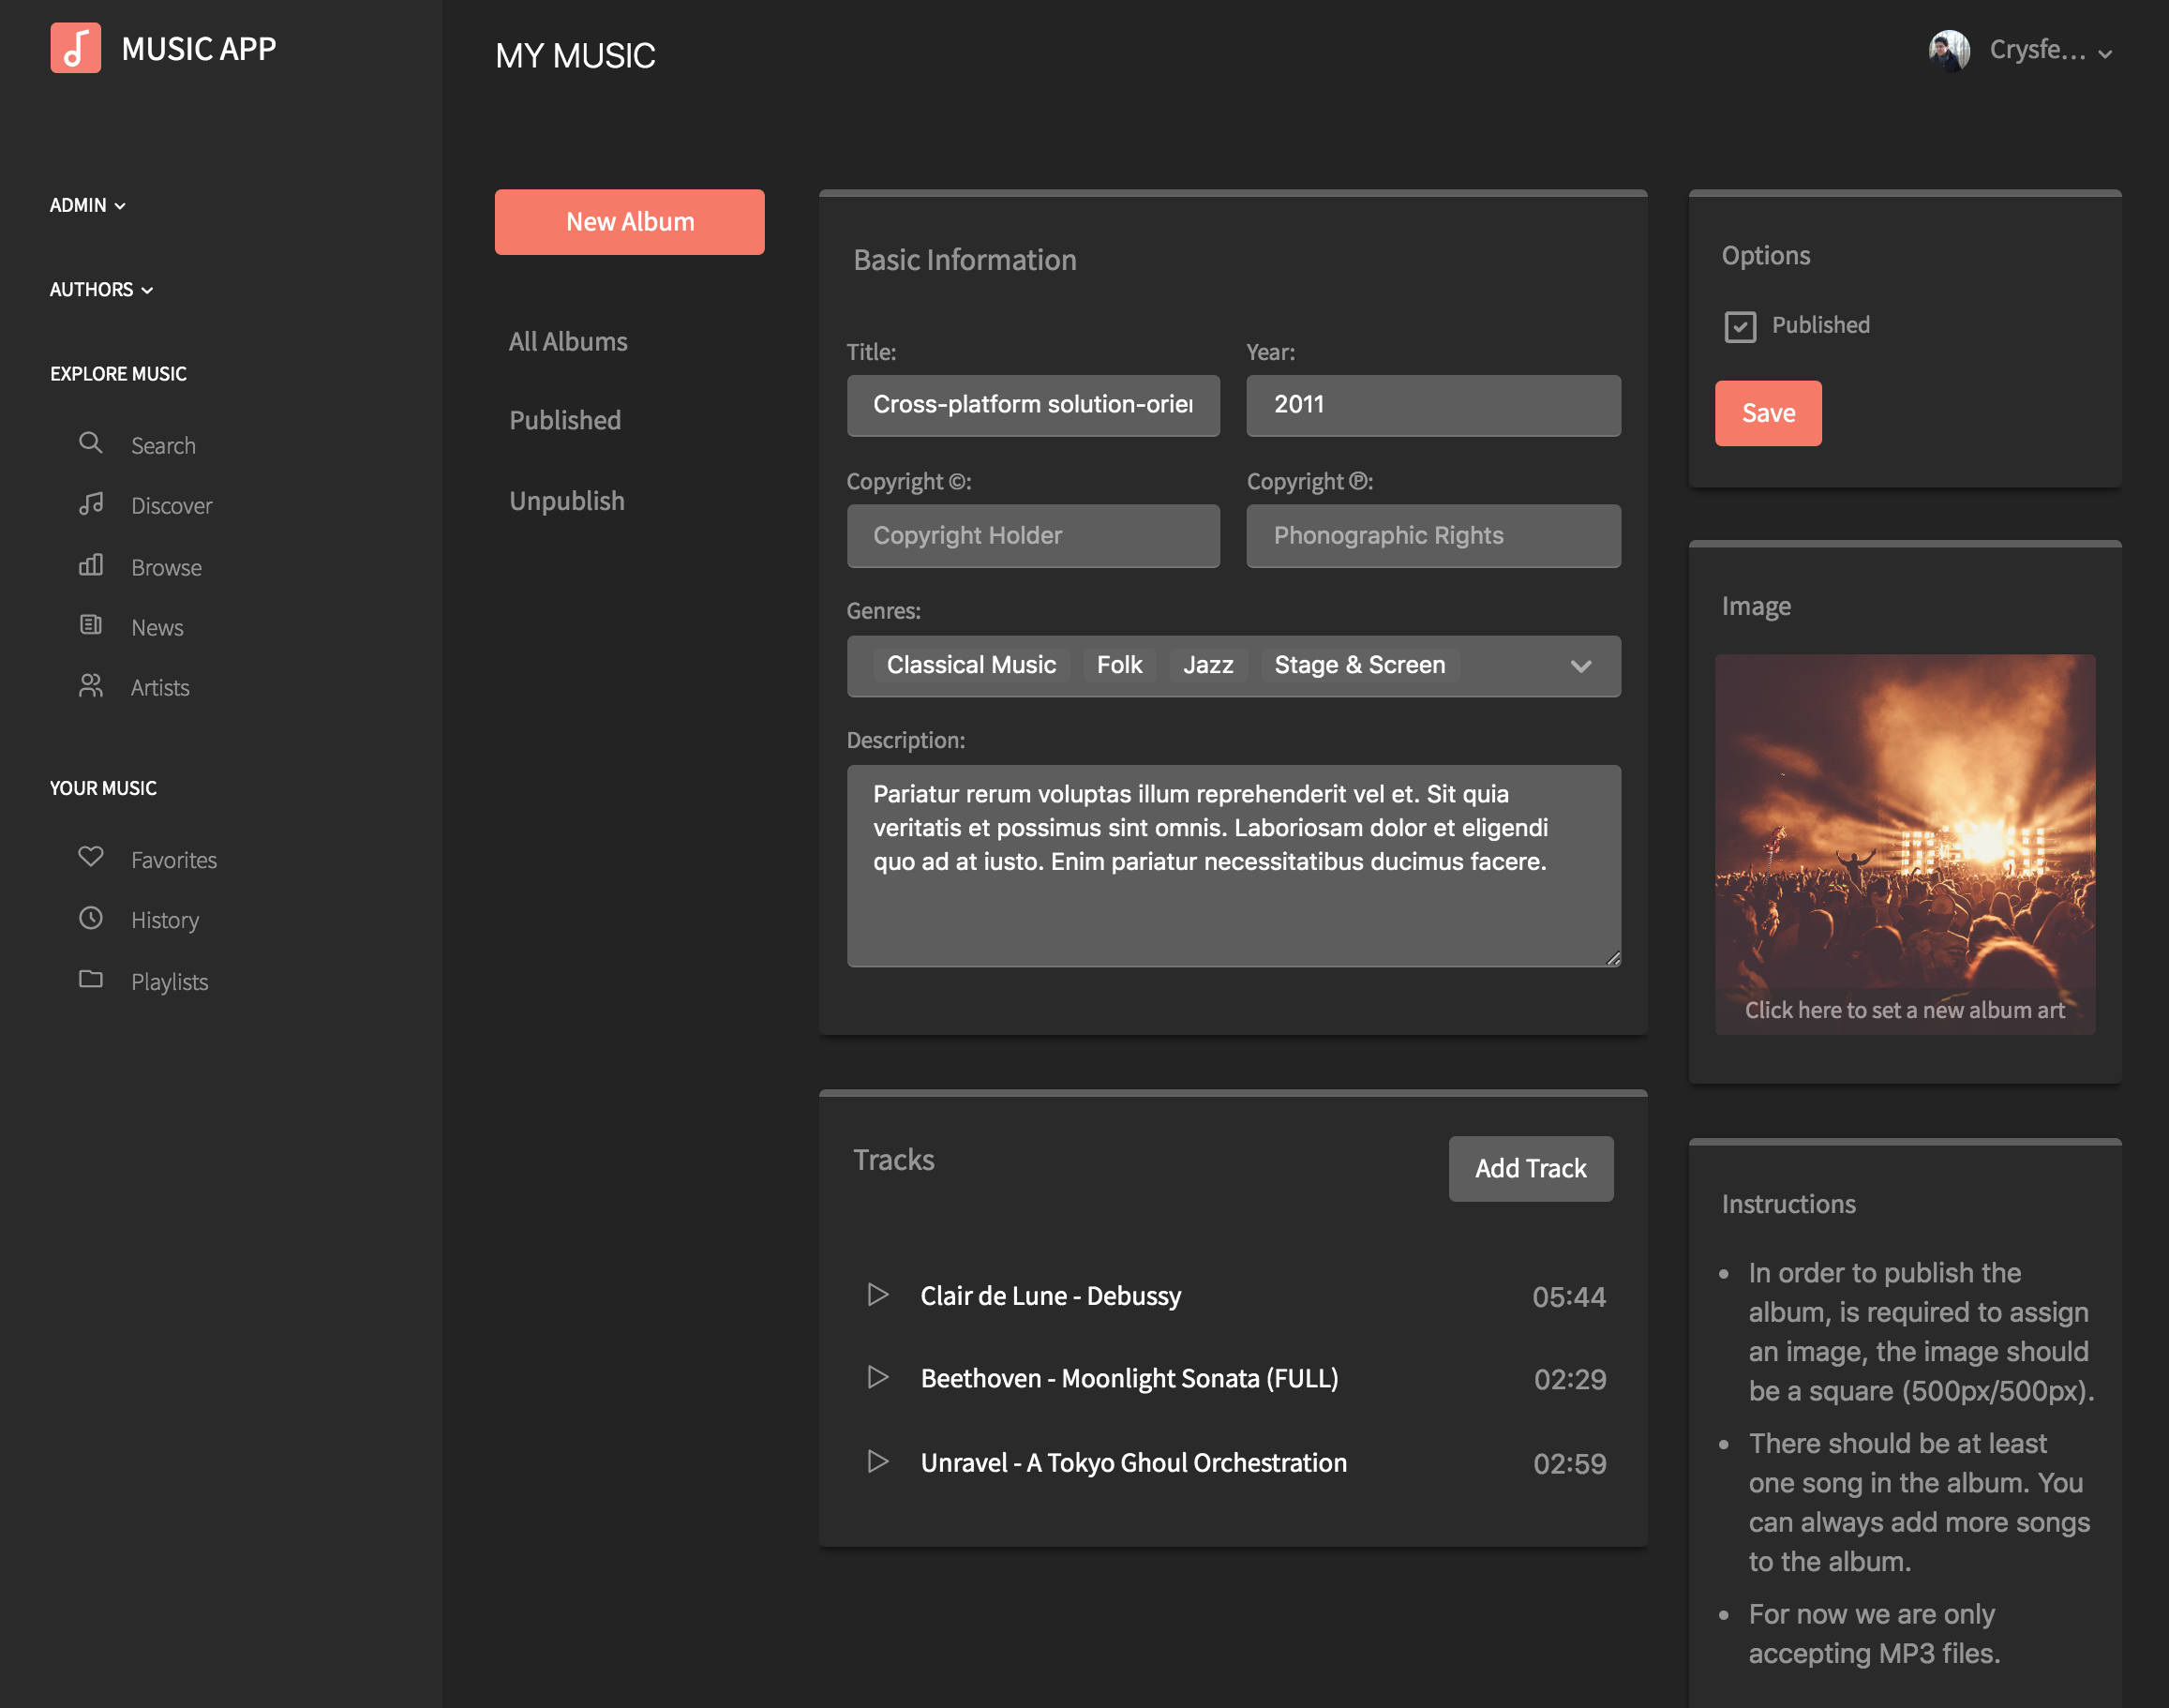
Album detail
Inside of each album, the author can edit the details of the album, play the songs, remove, edit or create a new song
Each album contains a list of songs, the admin can edit any given song.
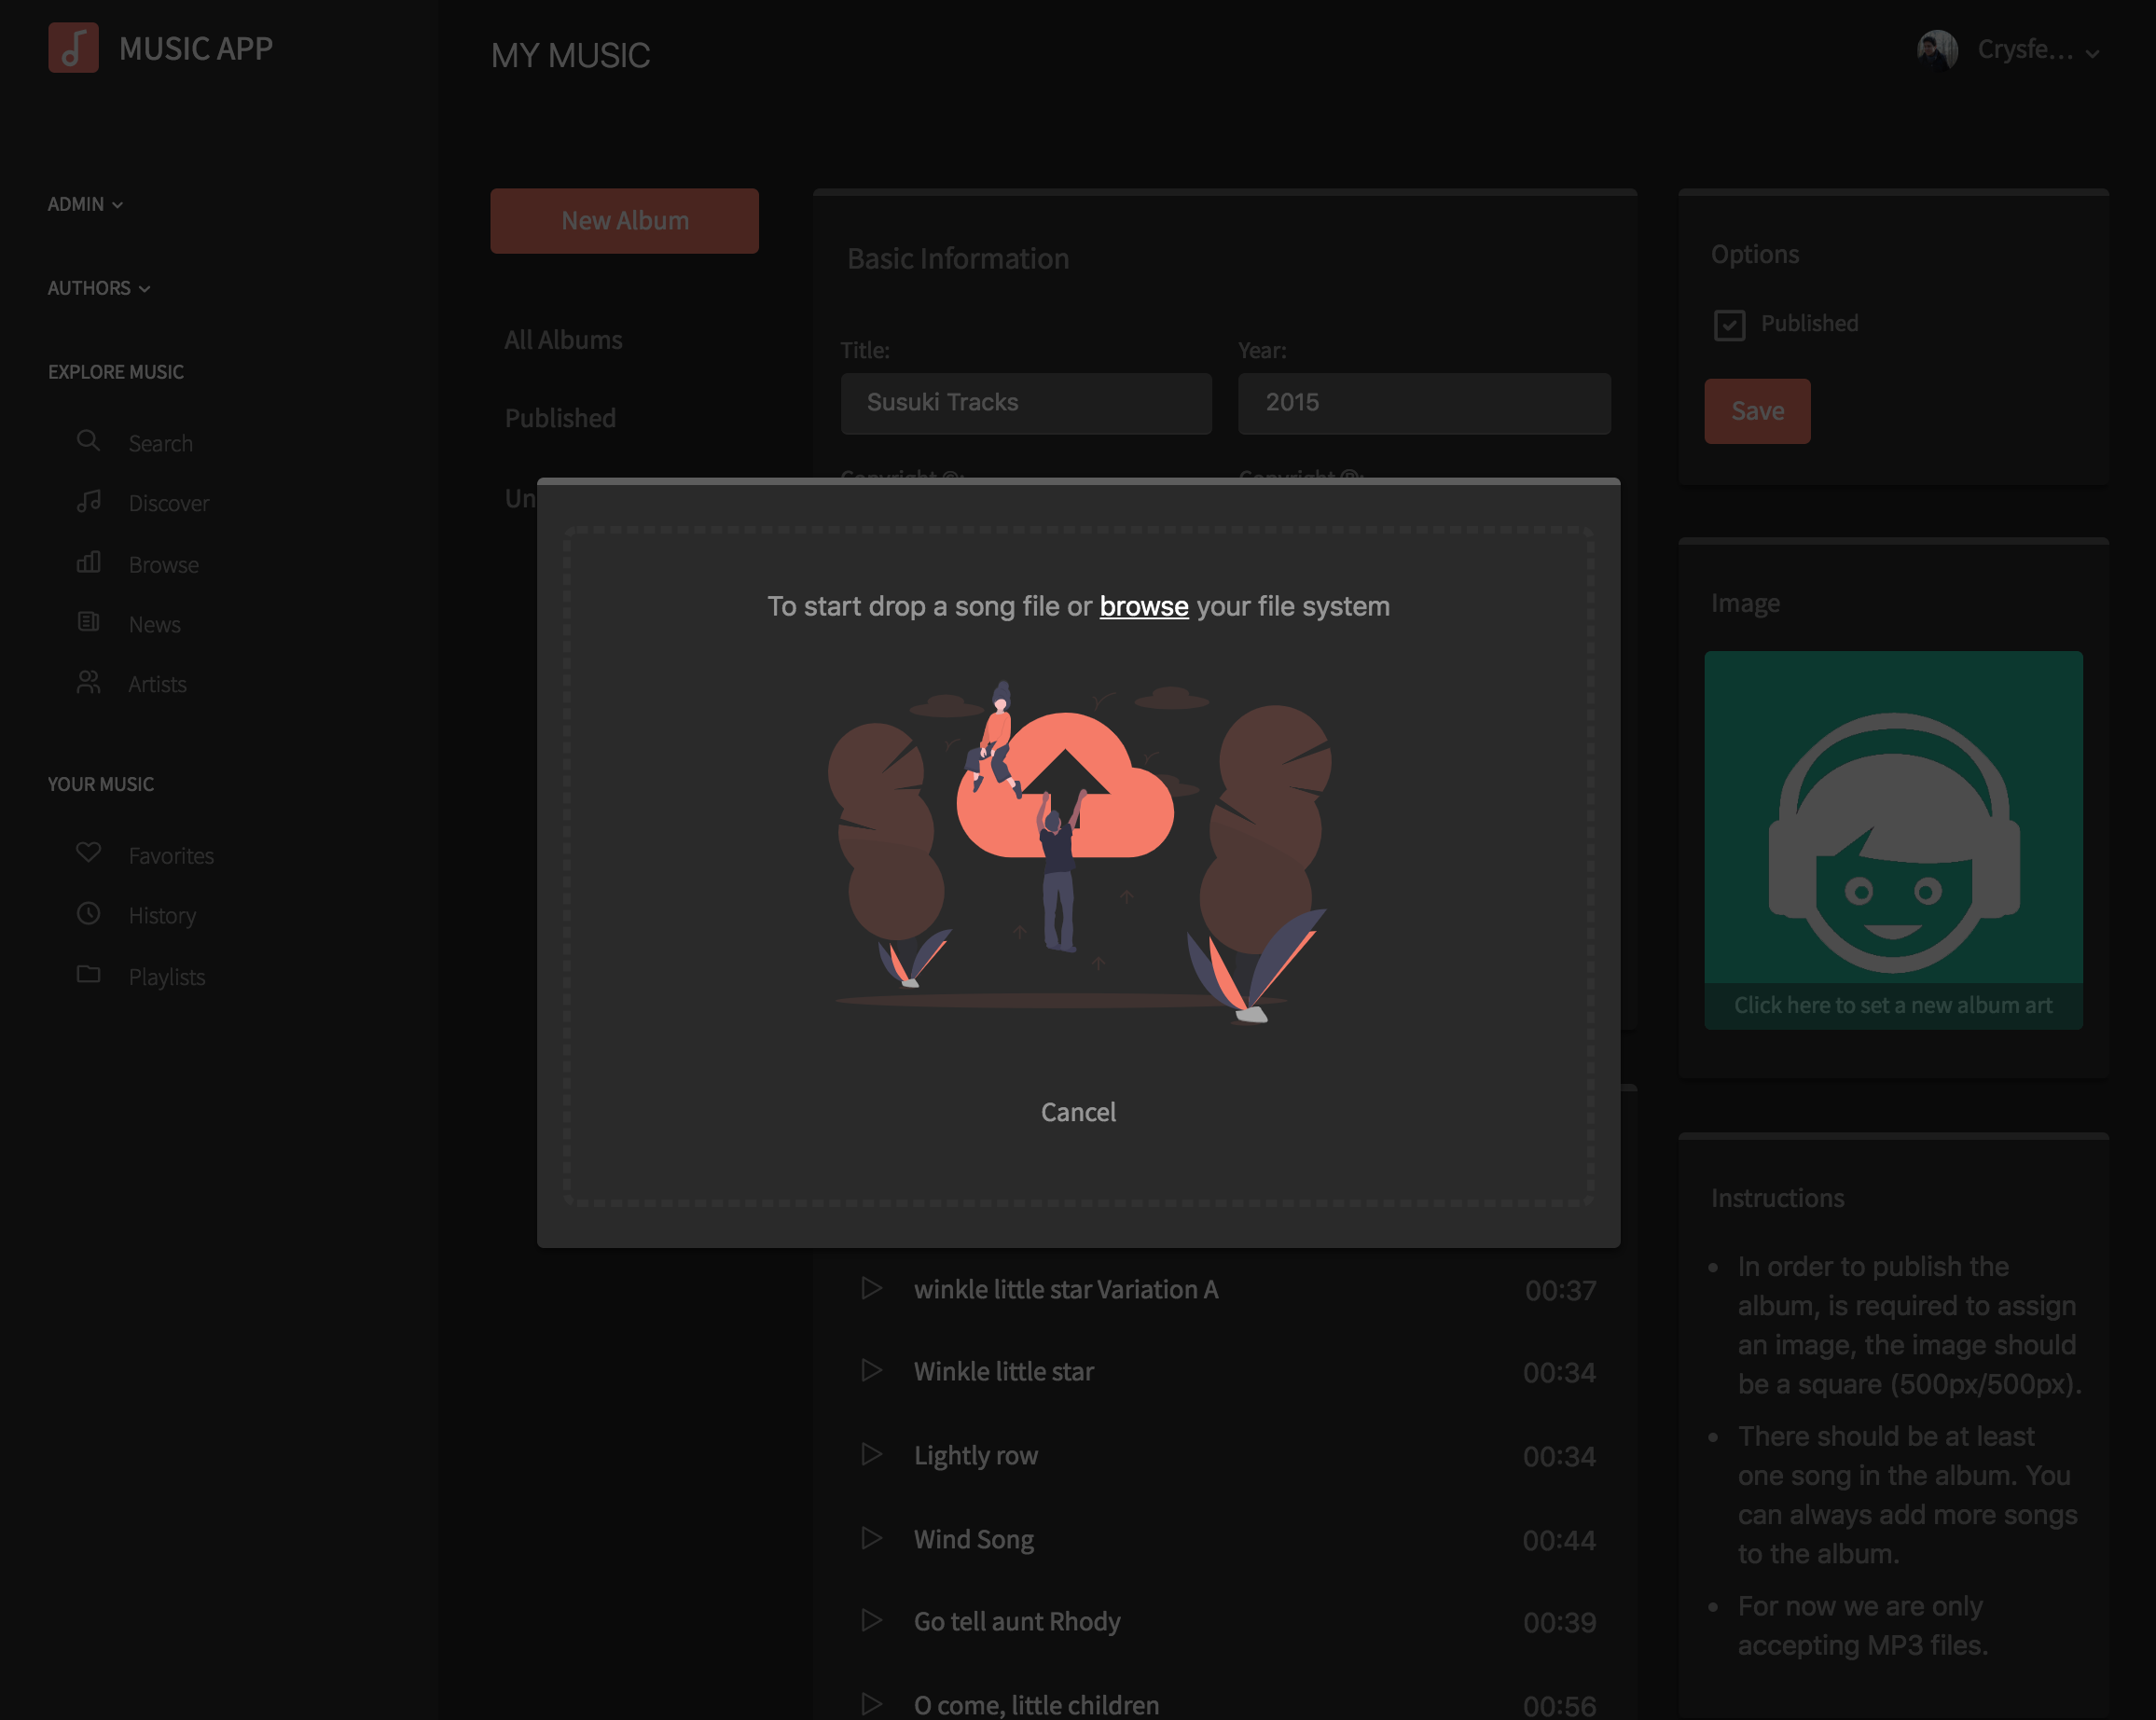
In order to publish a new album, it's required to assign an image to the album and there should be at least one song.
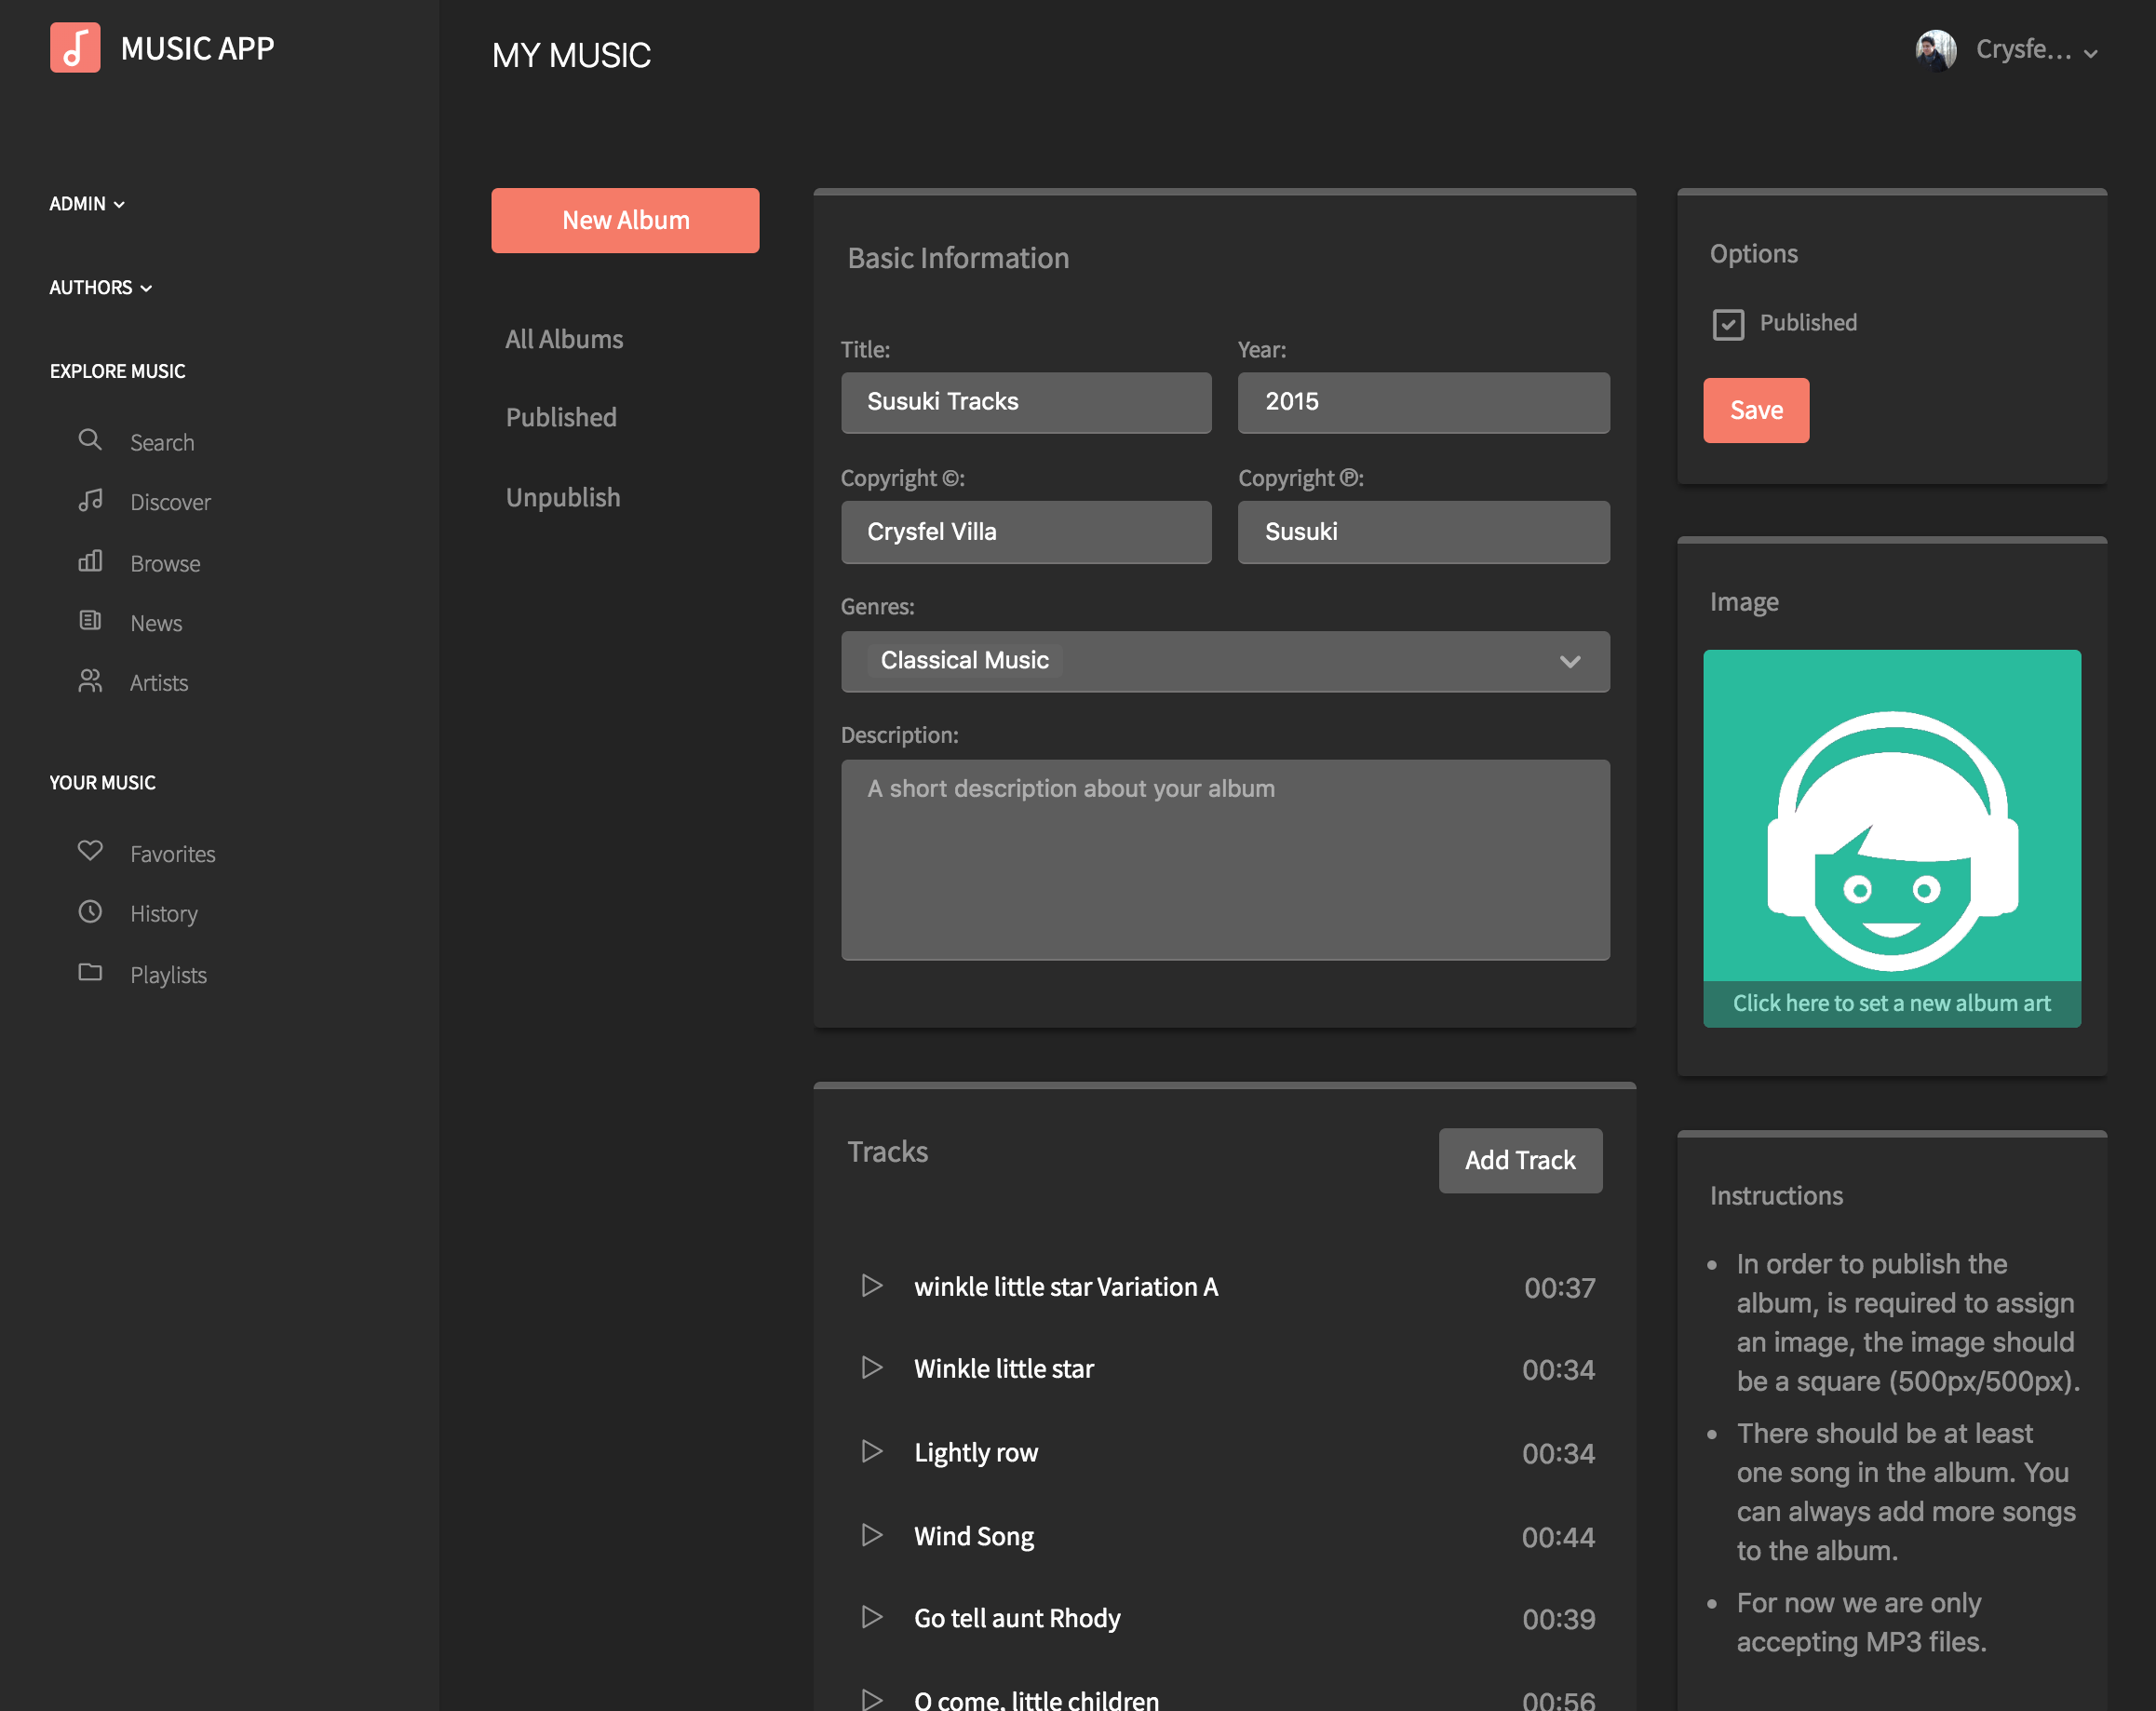
Upload Songs
You can now drag all the song files you want to upload into the modal window or you can always select each individual file from the explorer window.
After selecting the mp3 files, the system will pull some data from the metadata on the mp3 if available.
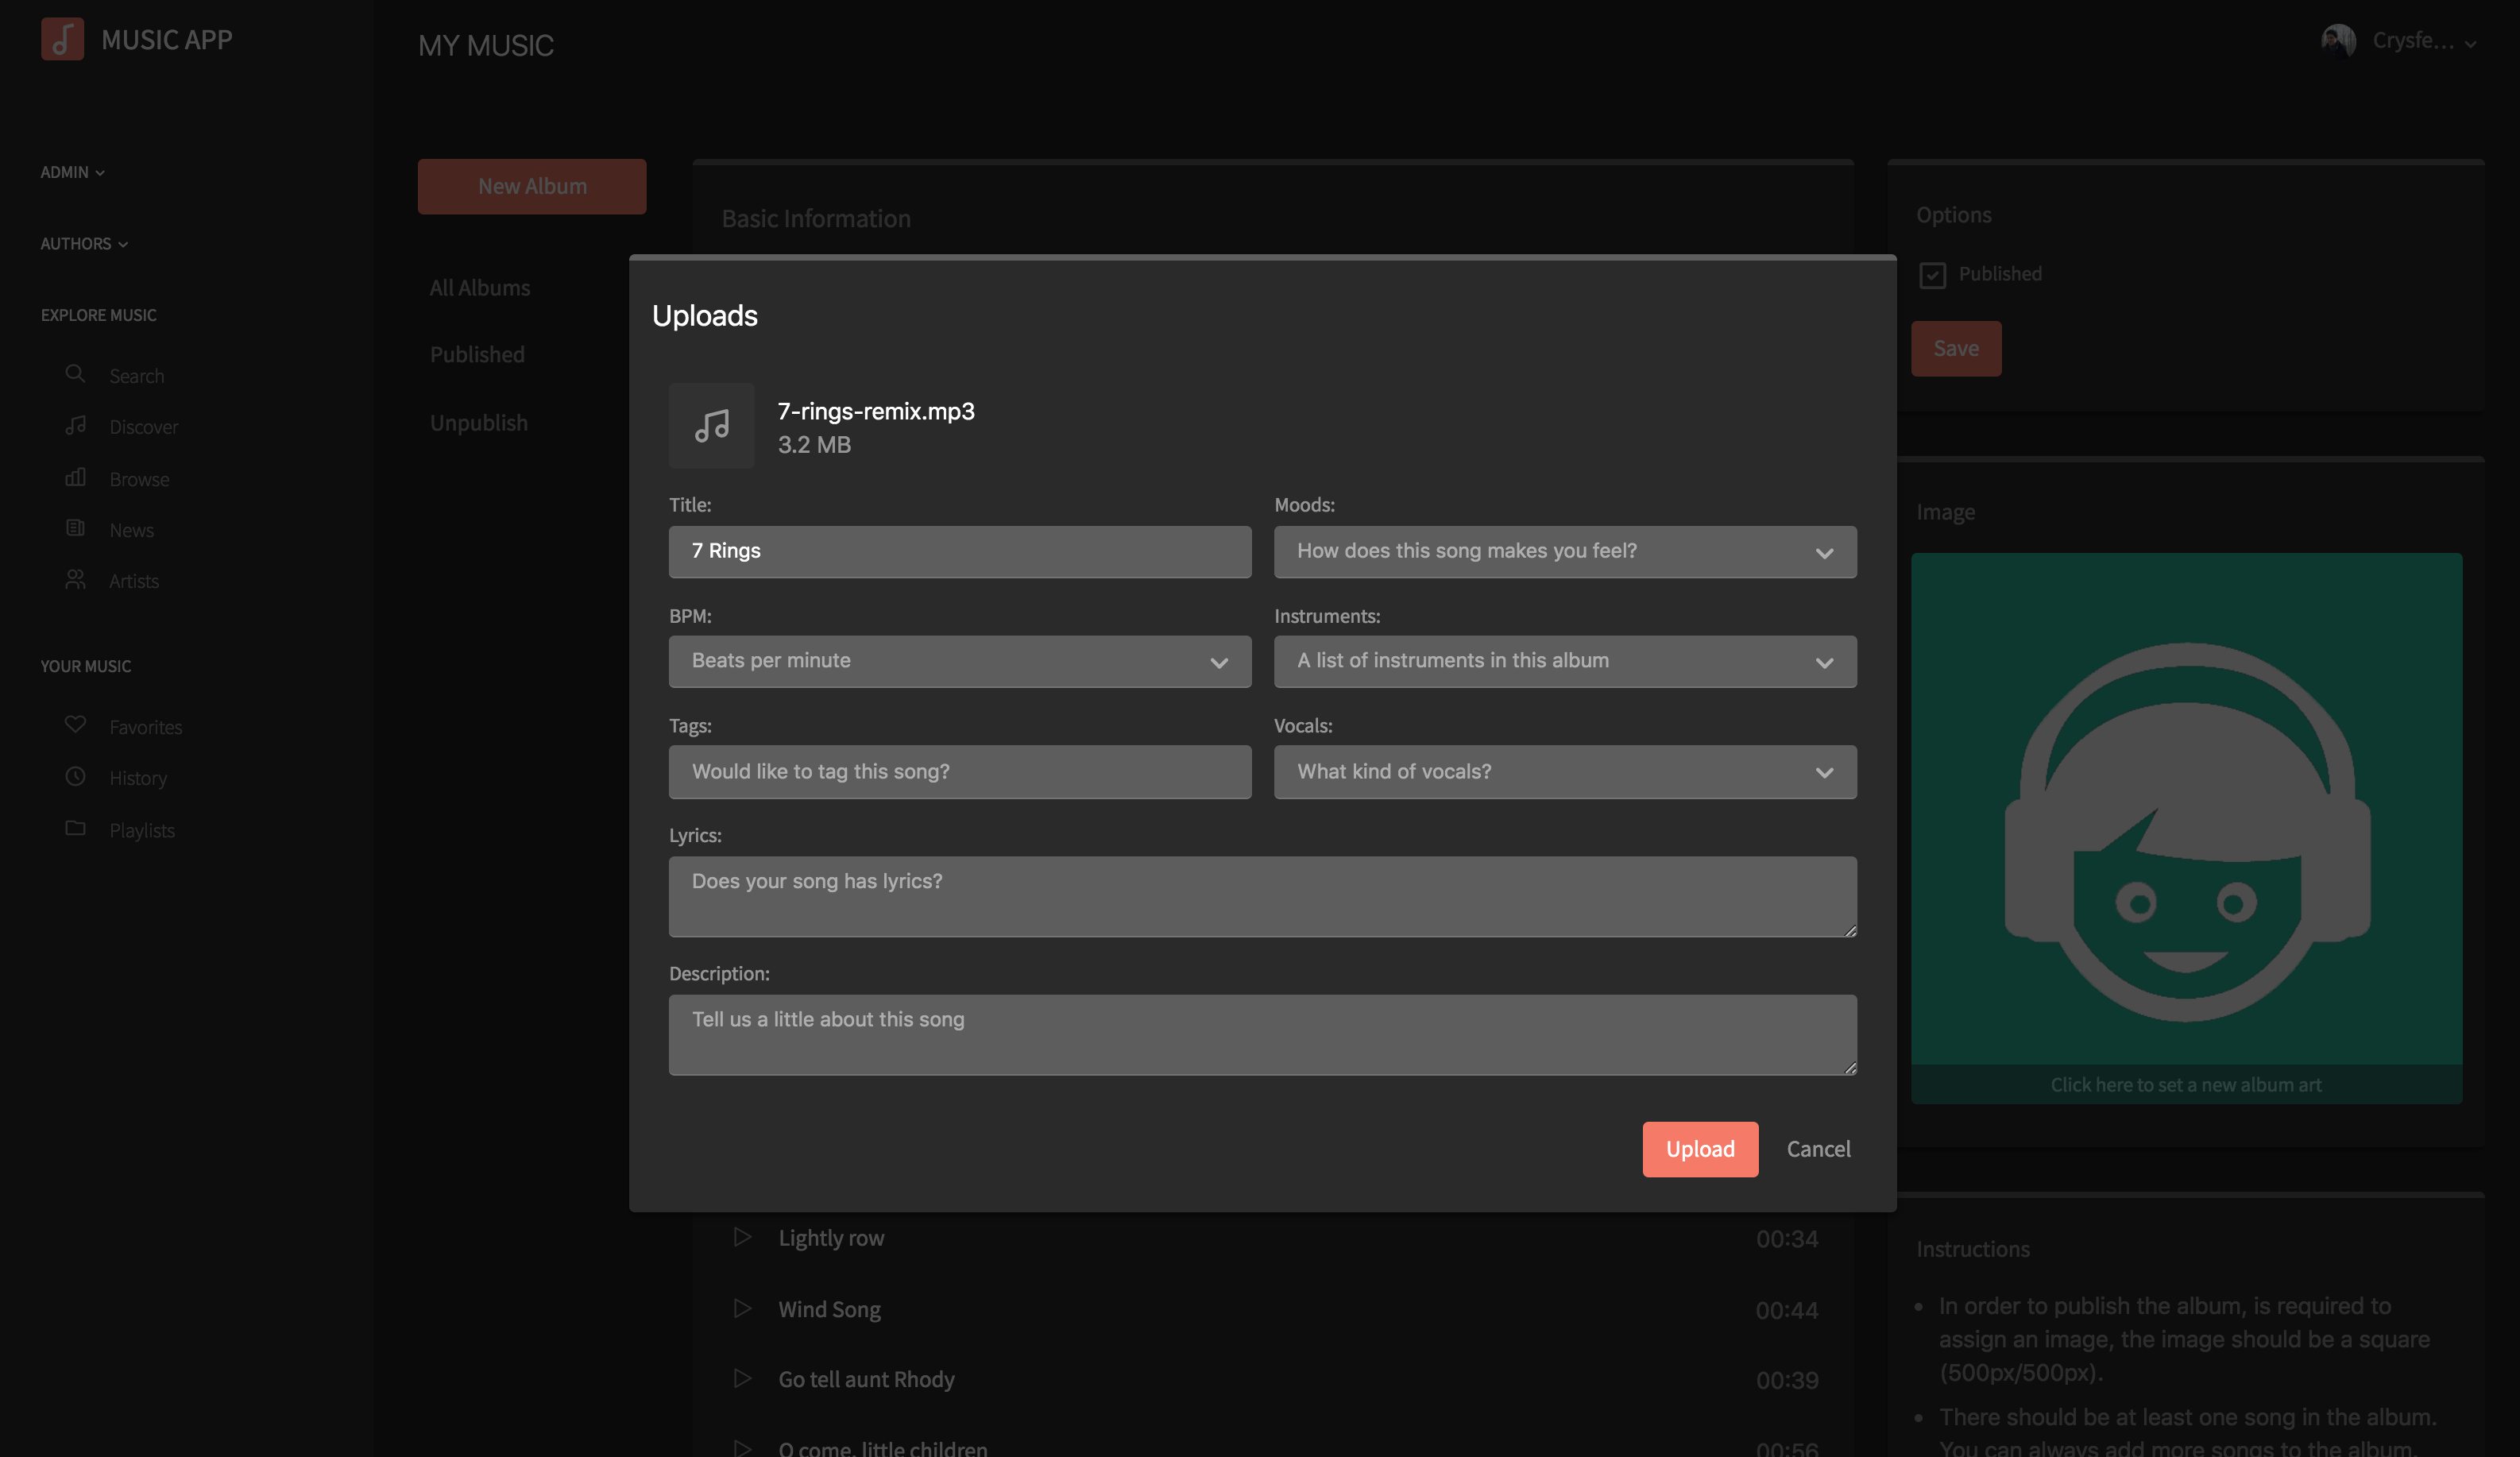
Song Detail
Each song can have additional data for filtering, it's recommended to fill it all.
The only required field is the name.
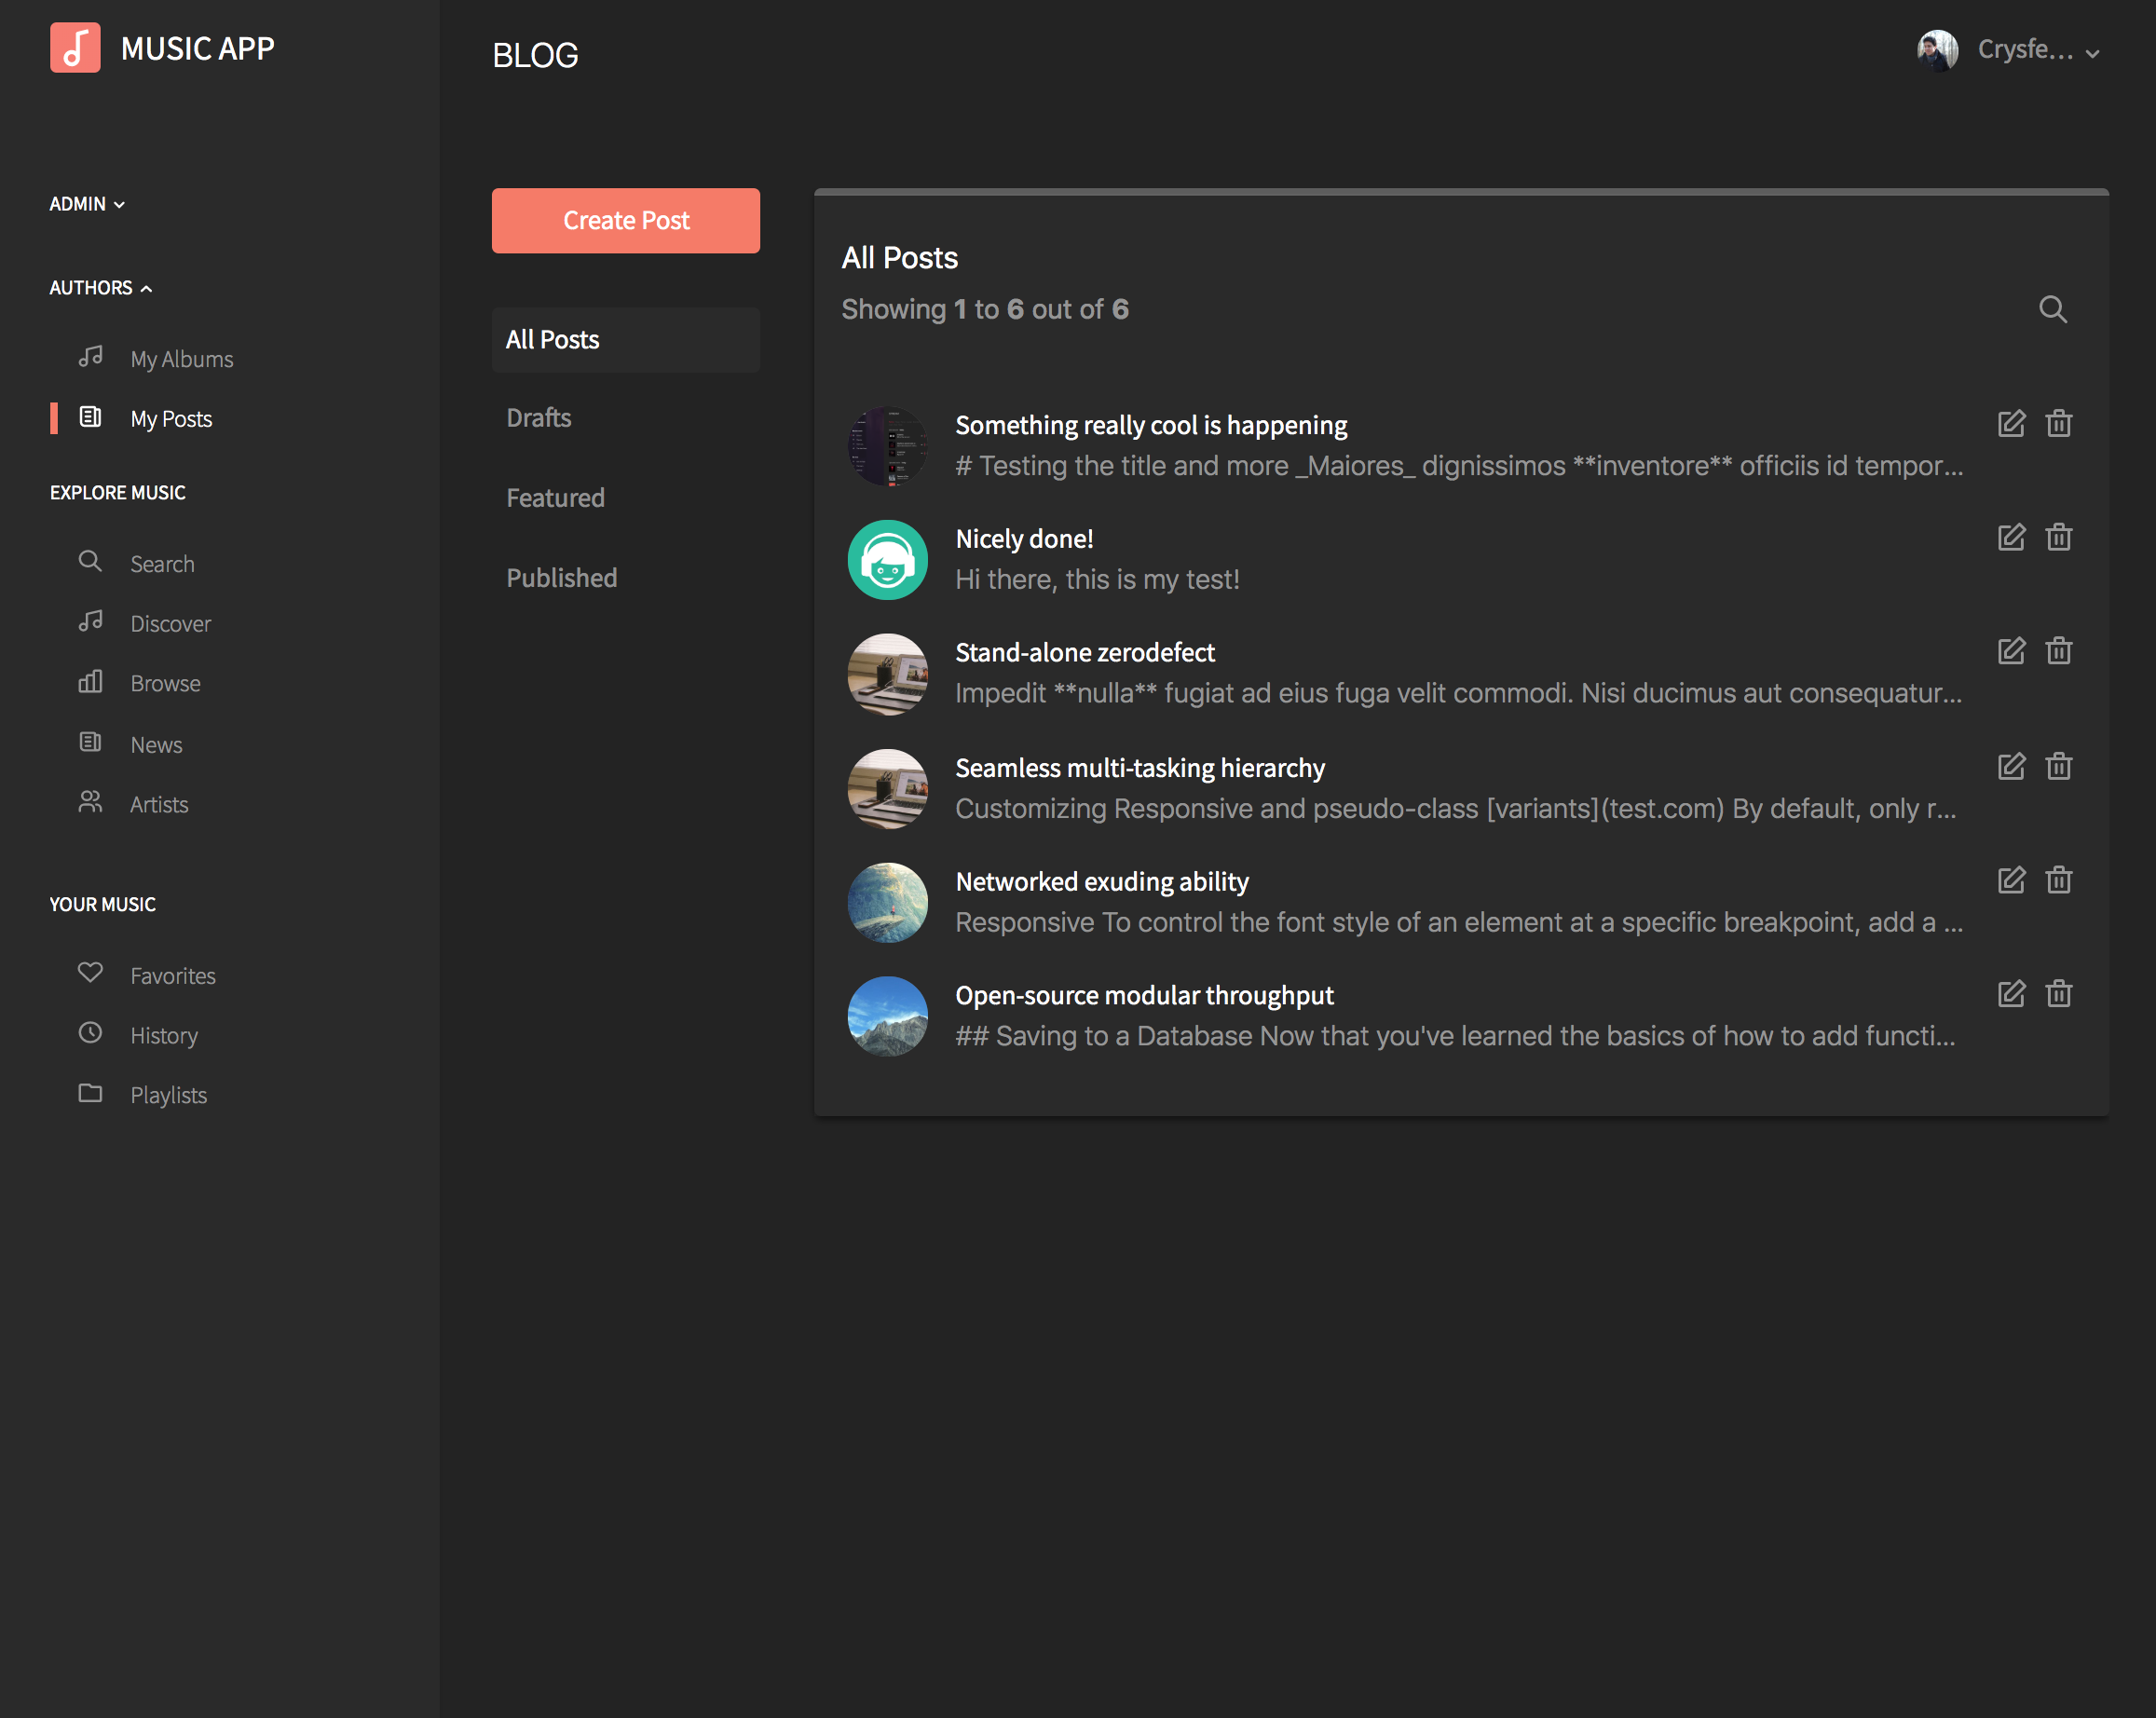
Blog List
Authors can publish content to the blog if allowed by the admin.
From the list users can remove any of the existing albums.
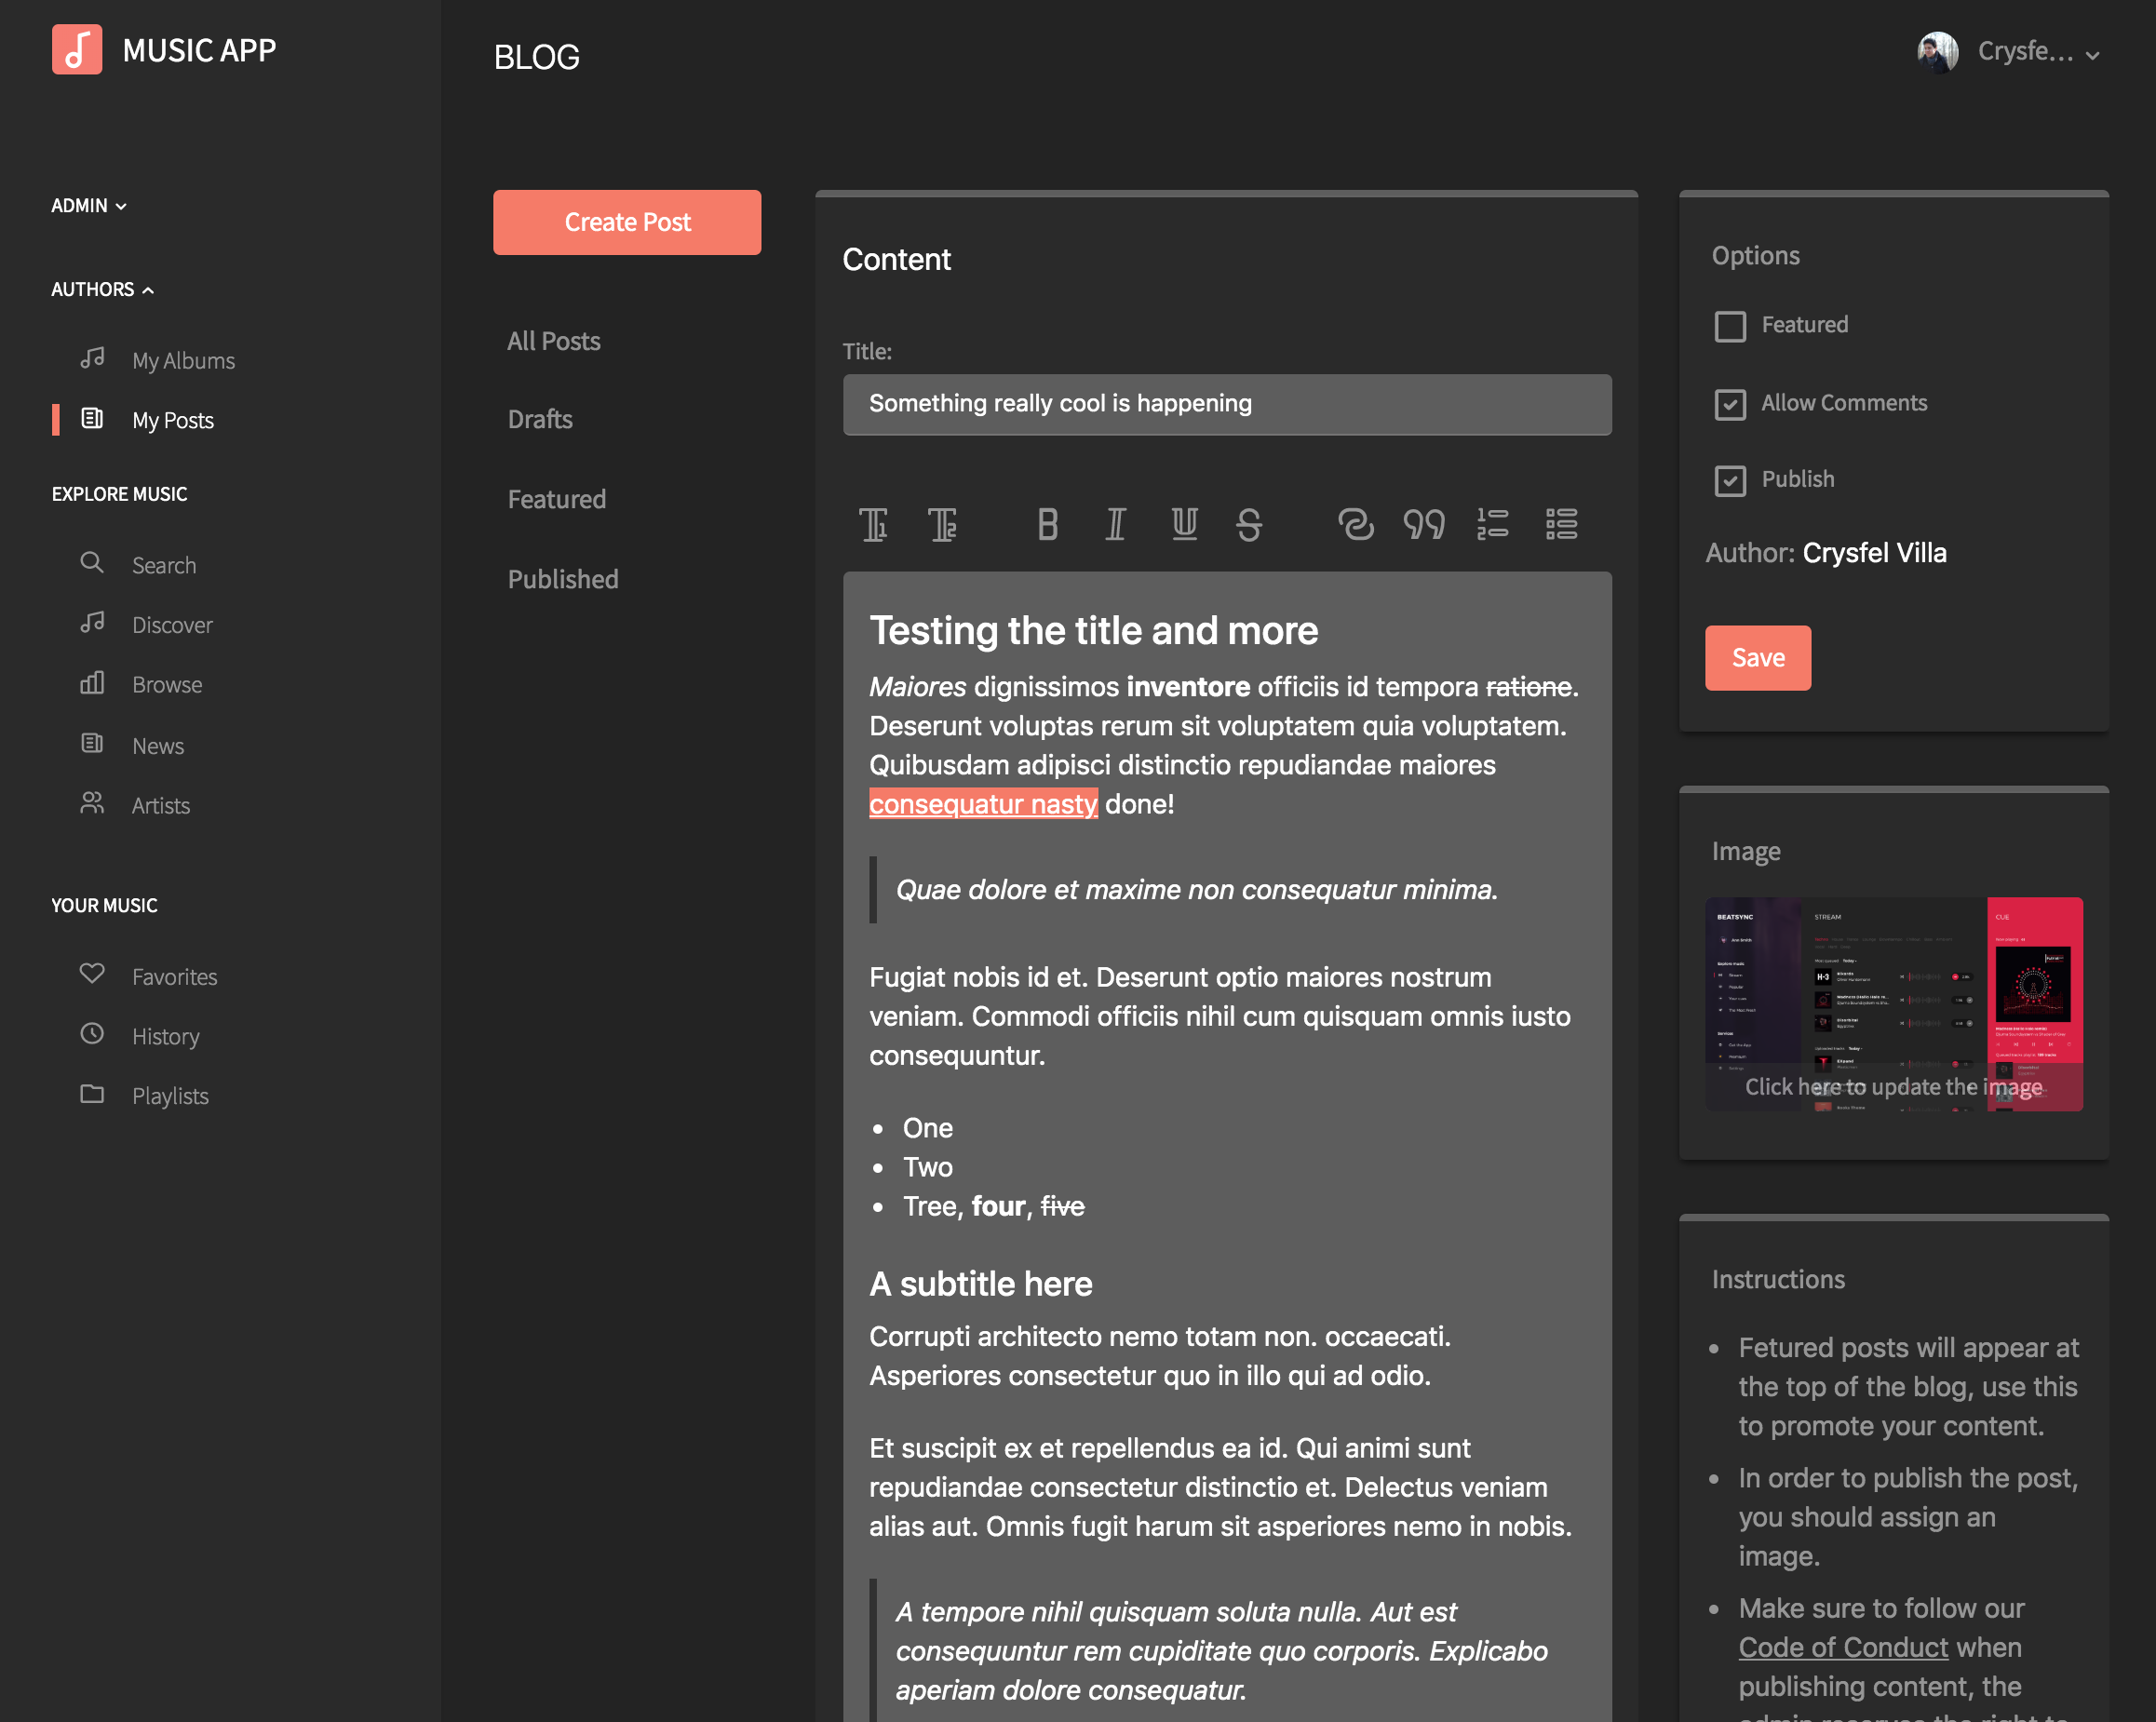
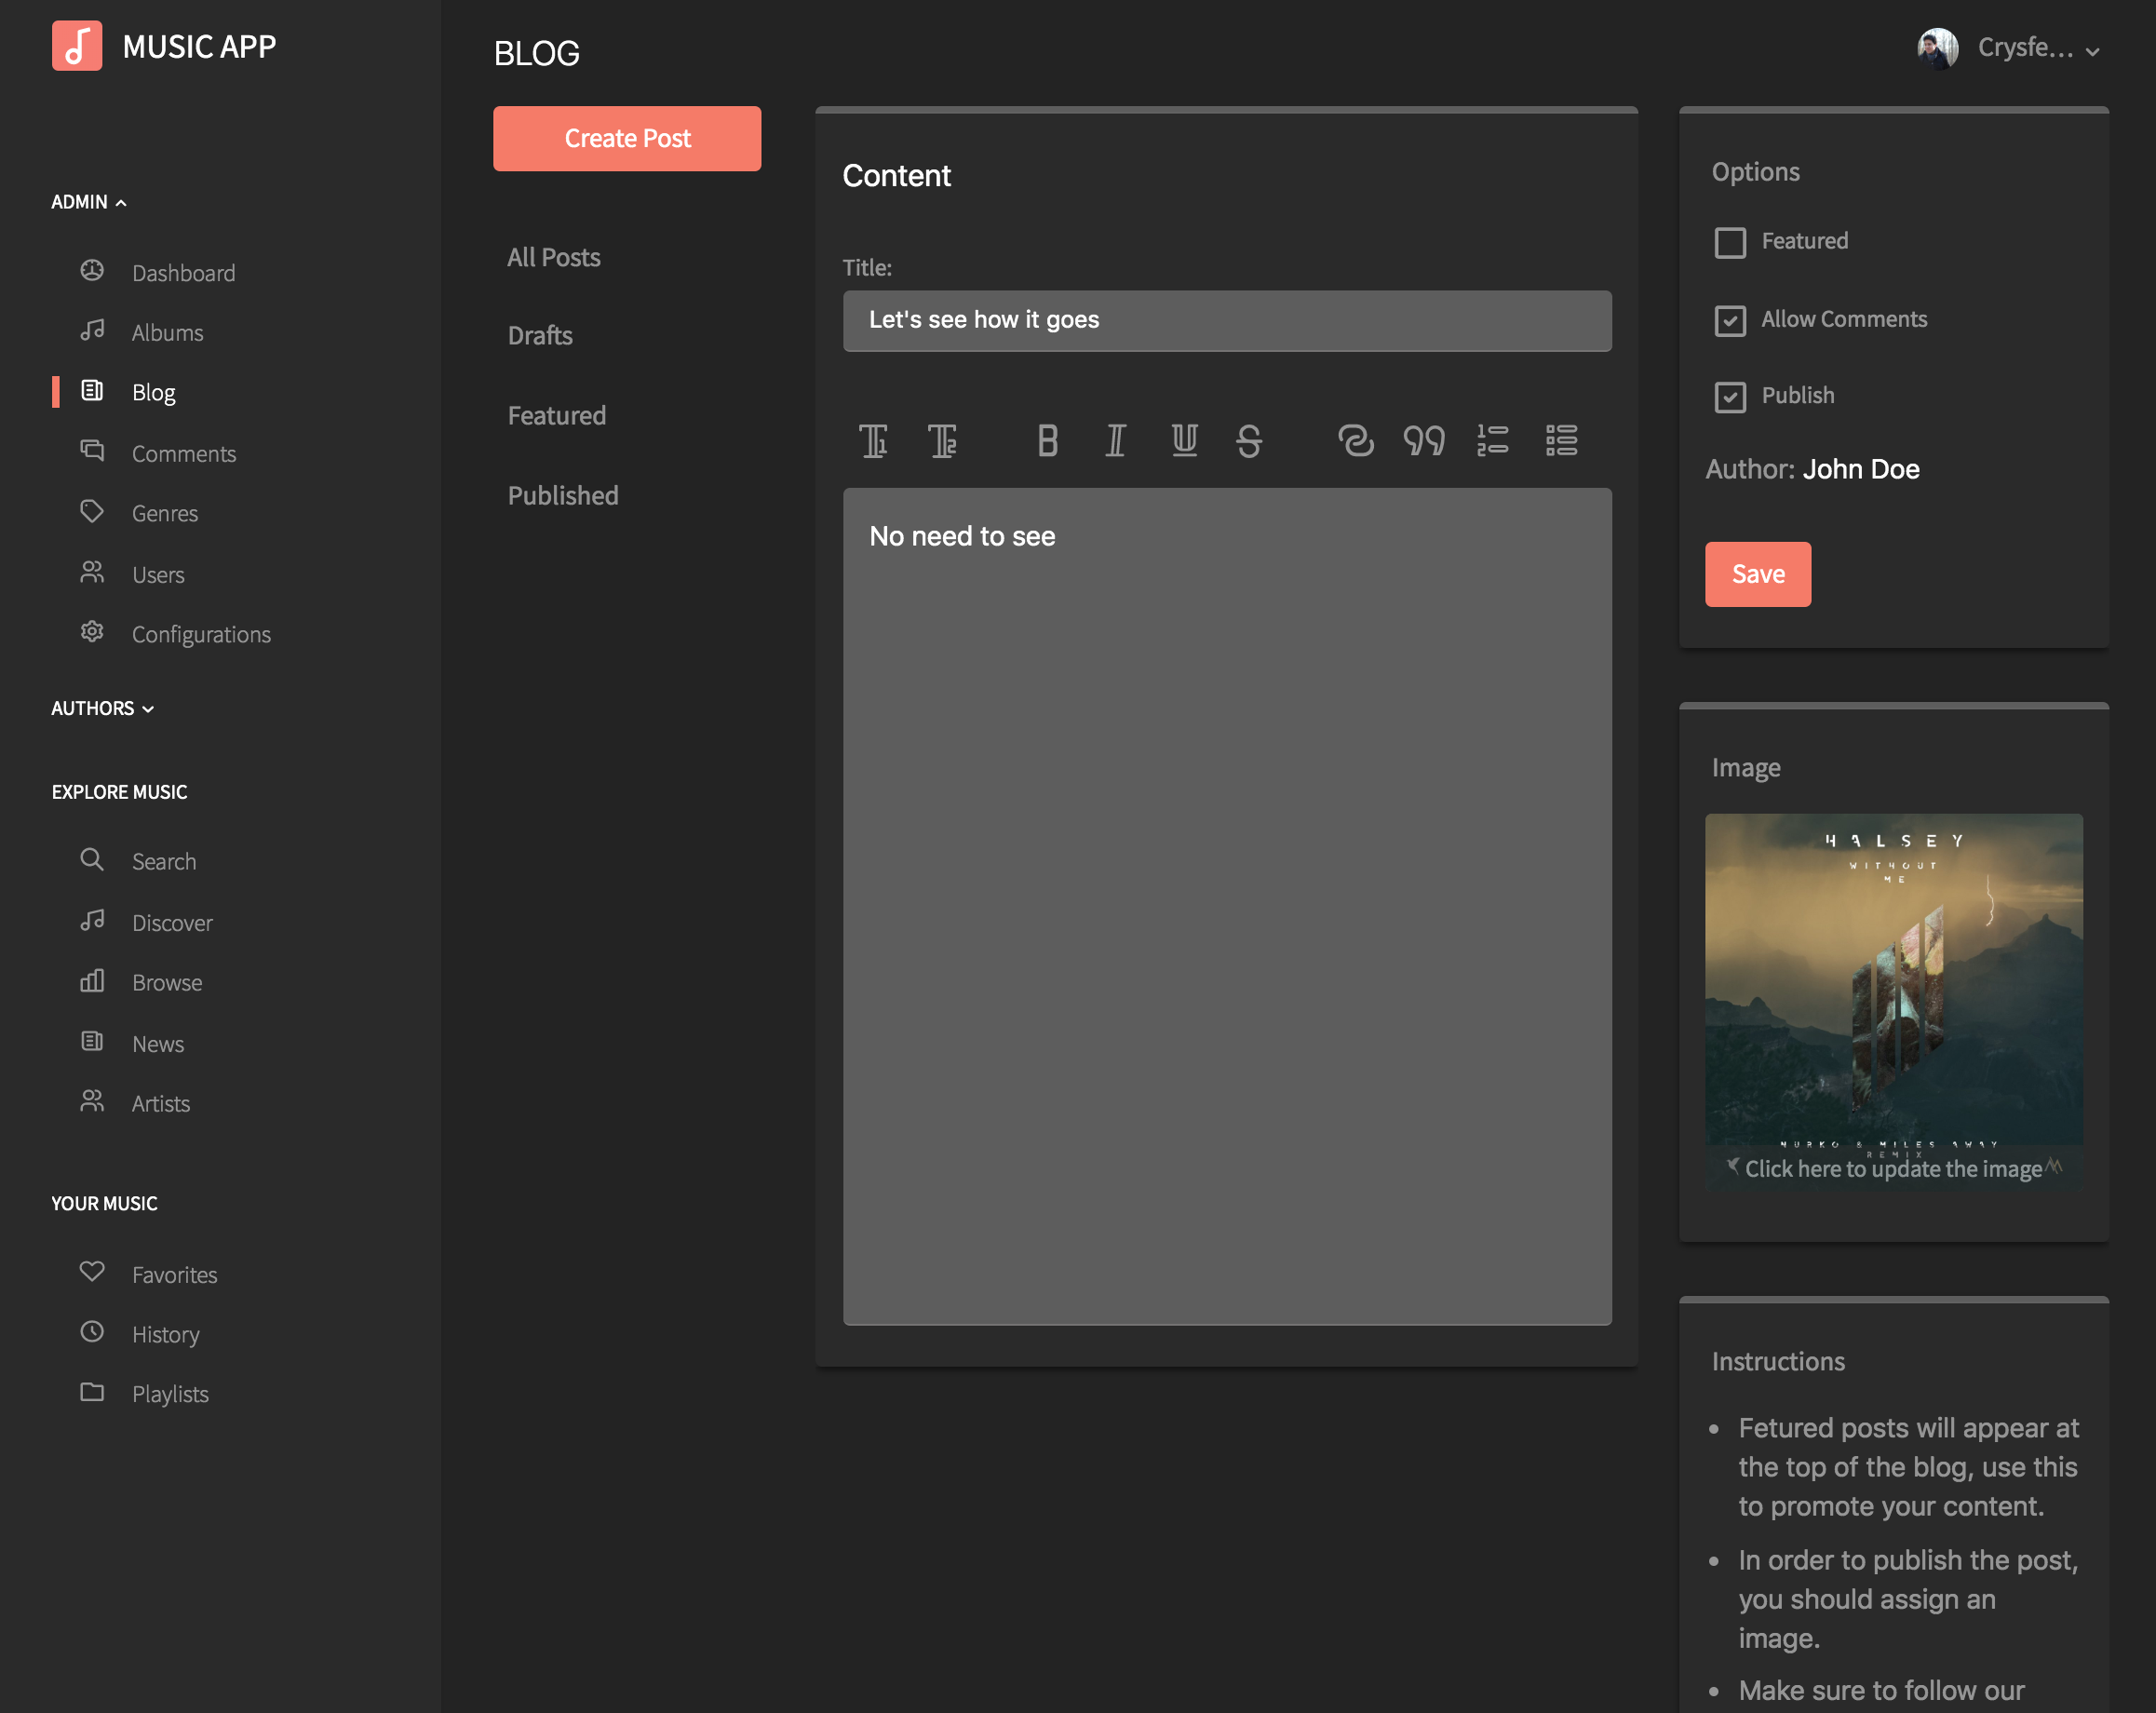
Blog Detail
There's an editor for reach text content.
Admins only can set a post as featured.
Administrators
In addition to members and authors, administrators have full access to the platform. The admin can add, update and remove music, comments, blog posts, genres created by other users.
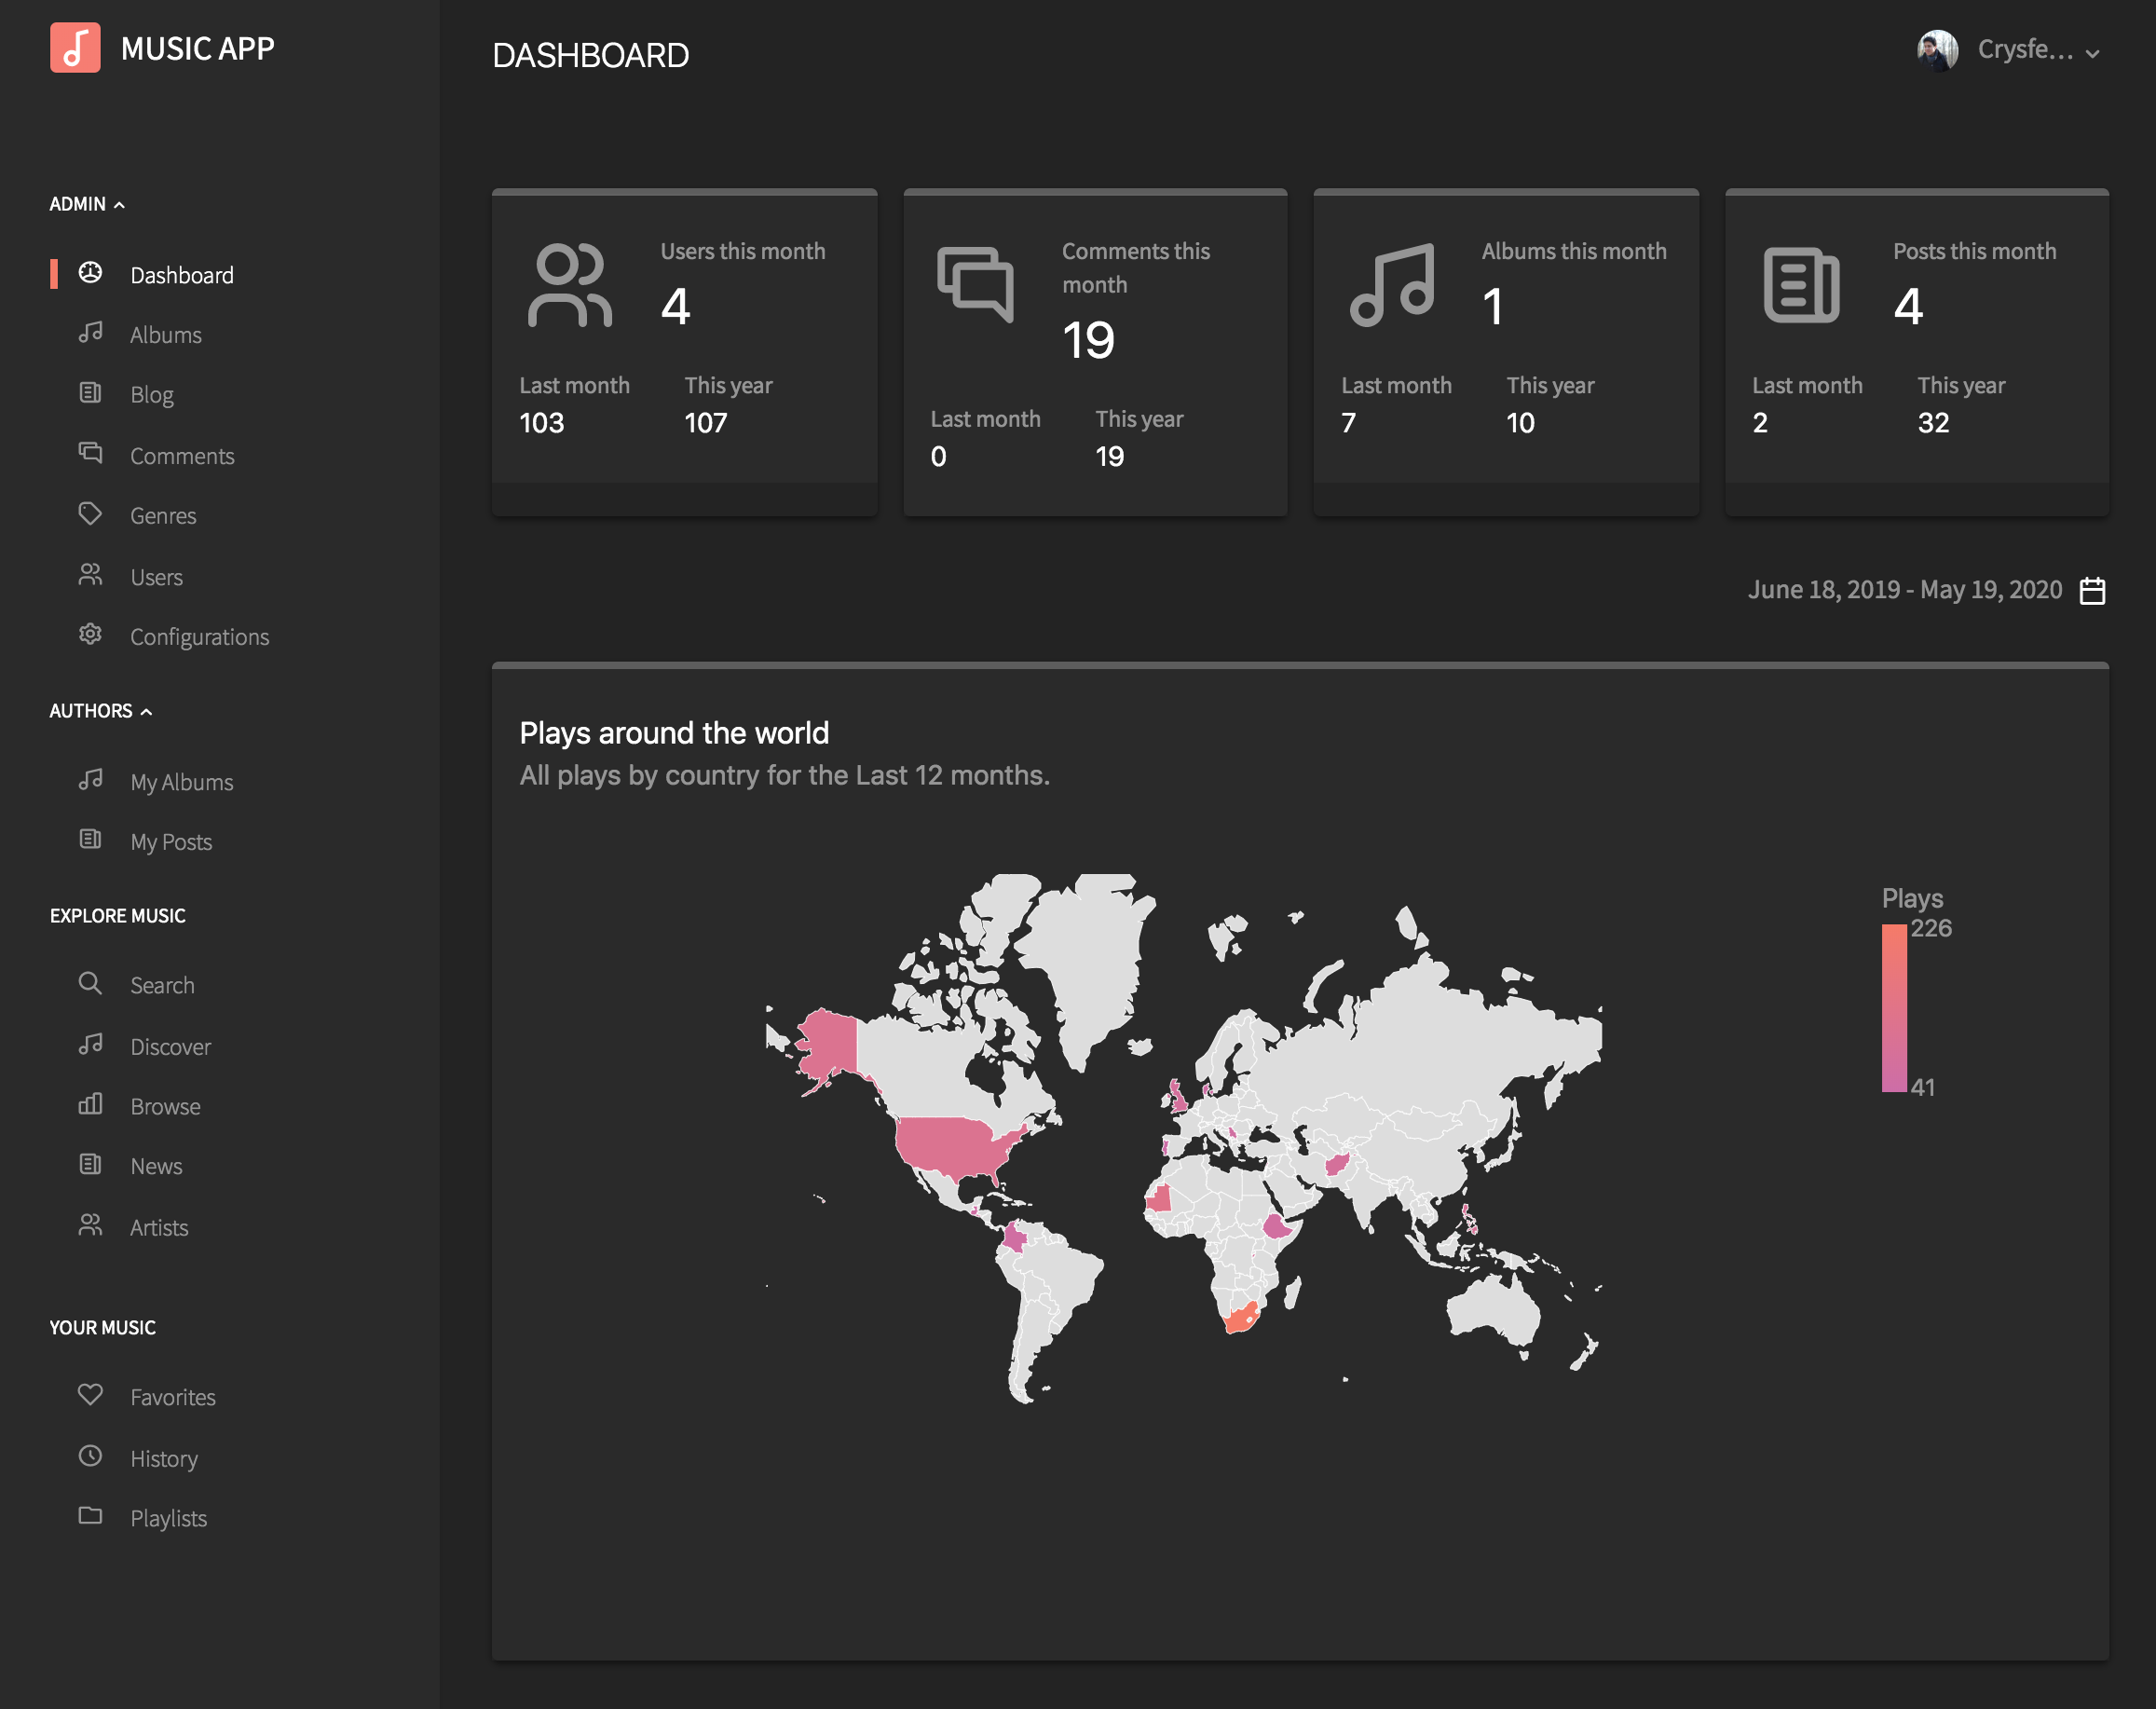
Dashboard
Admins have access to a dashboard to see new users, comments, albums and posts on the current month and year.
There's a beautiful map where admins can see from where people is listening to the music in the platform.
There's a chart to see the number of plays and likes songs are receving over time.
Admins can select the range of the analytics from a dropdown.
Album list
The admin can see a list of all albumns in the platform, from here the admin can see the detail of each album, update anything or completely remove the album and all songs.
The admin can see a list of published and unpublished albumns by selecting the filters on the left sidebar.
There's a search toolbar where the admin can search albums by title. By default is hidden, but it will show up once the user click the search icon at the top.
Album detail
Inside of each album, the admin (or the author) can edit the details of the album, play the songs, remove or edit them, create a new one
Each album contains a list of songs, the admin can edit any given song as well as remove them.
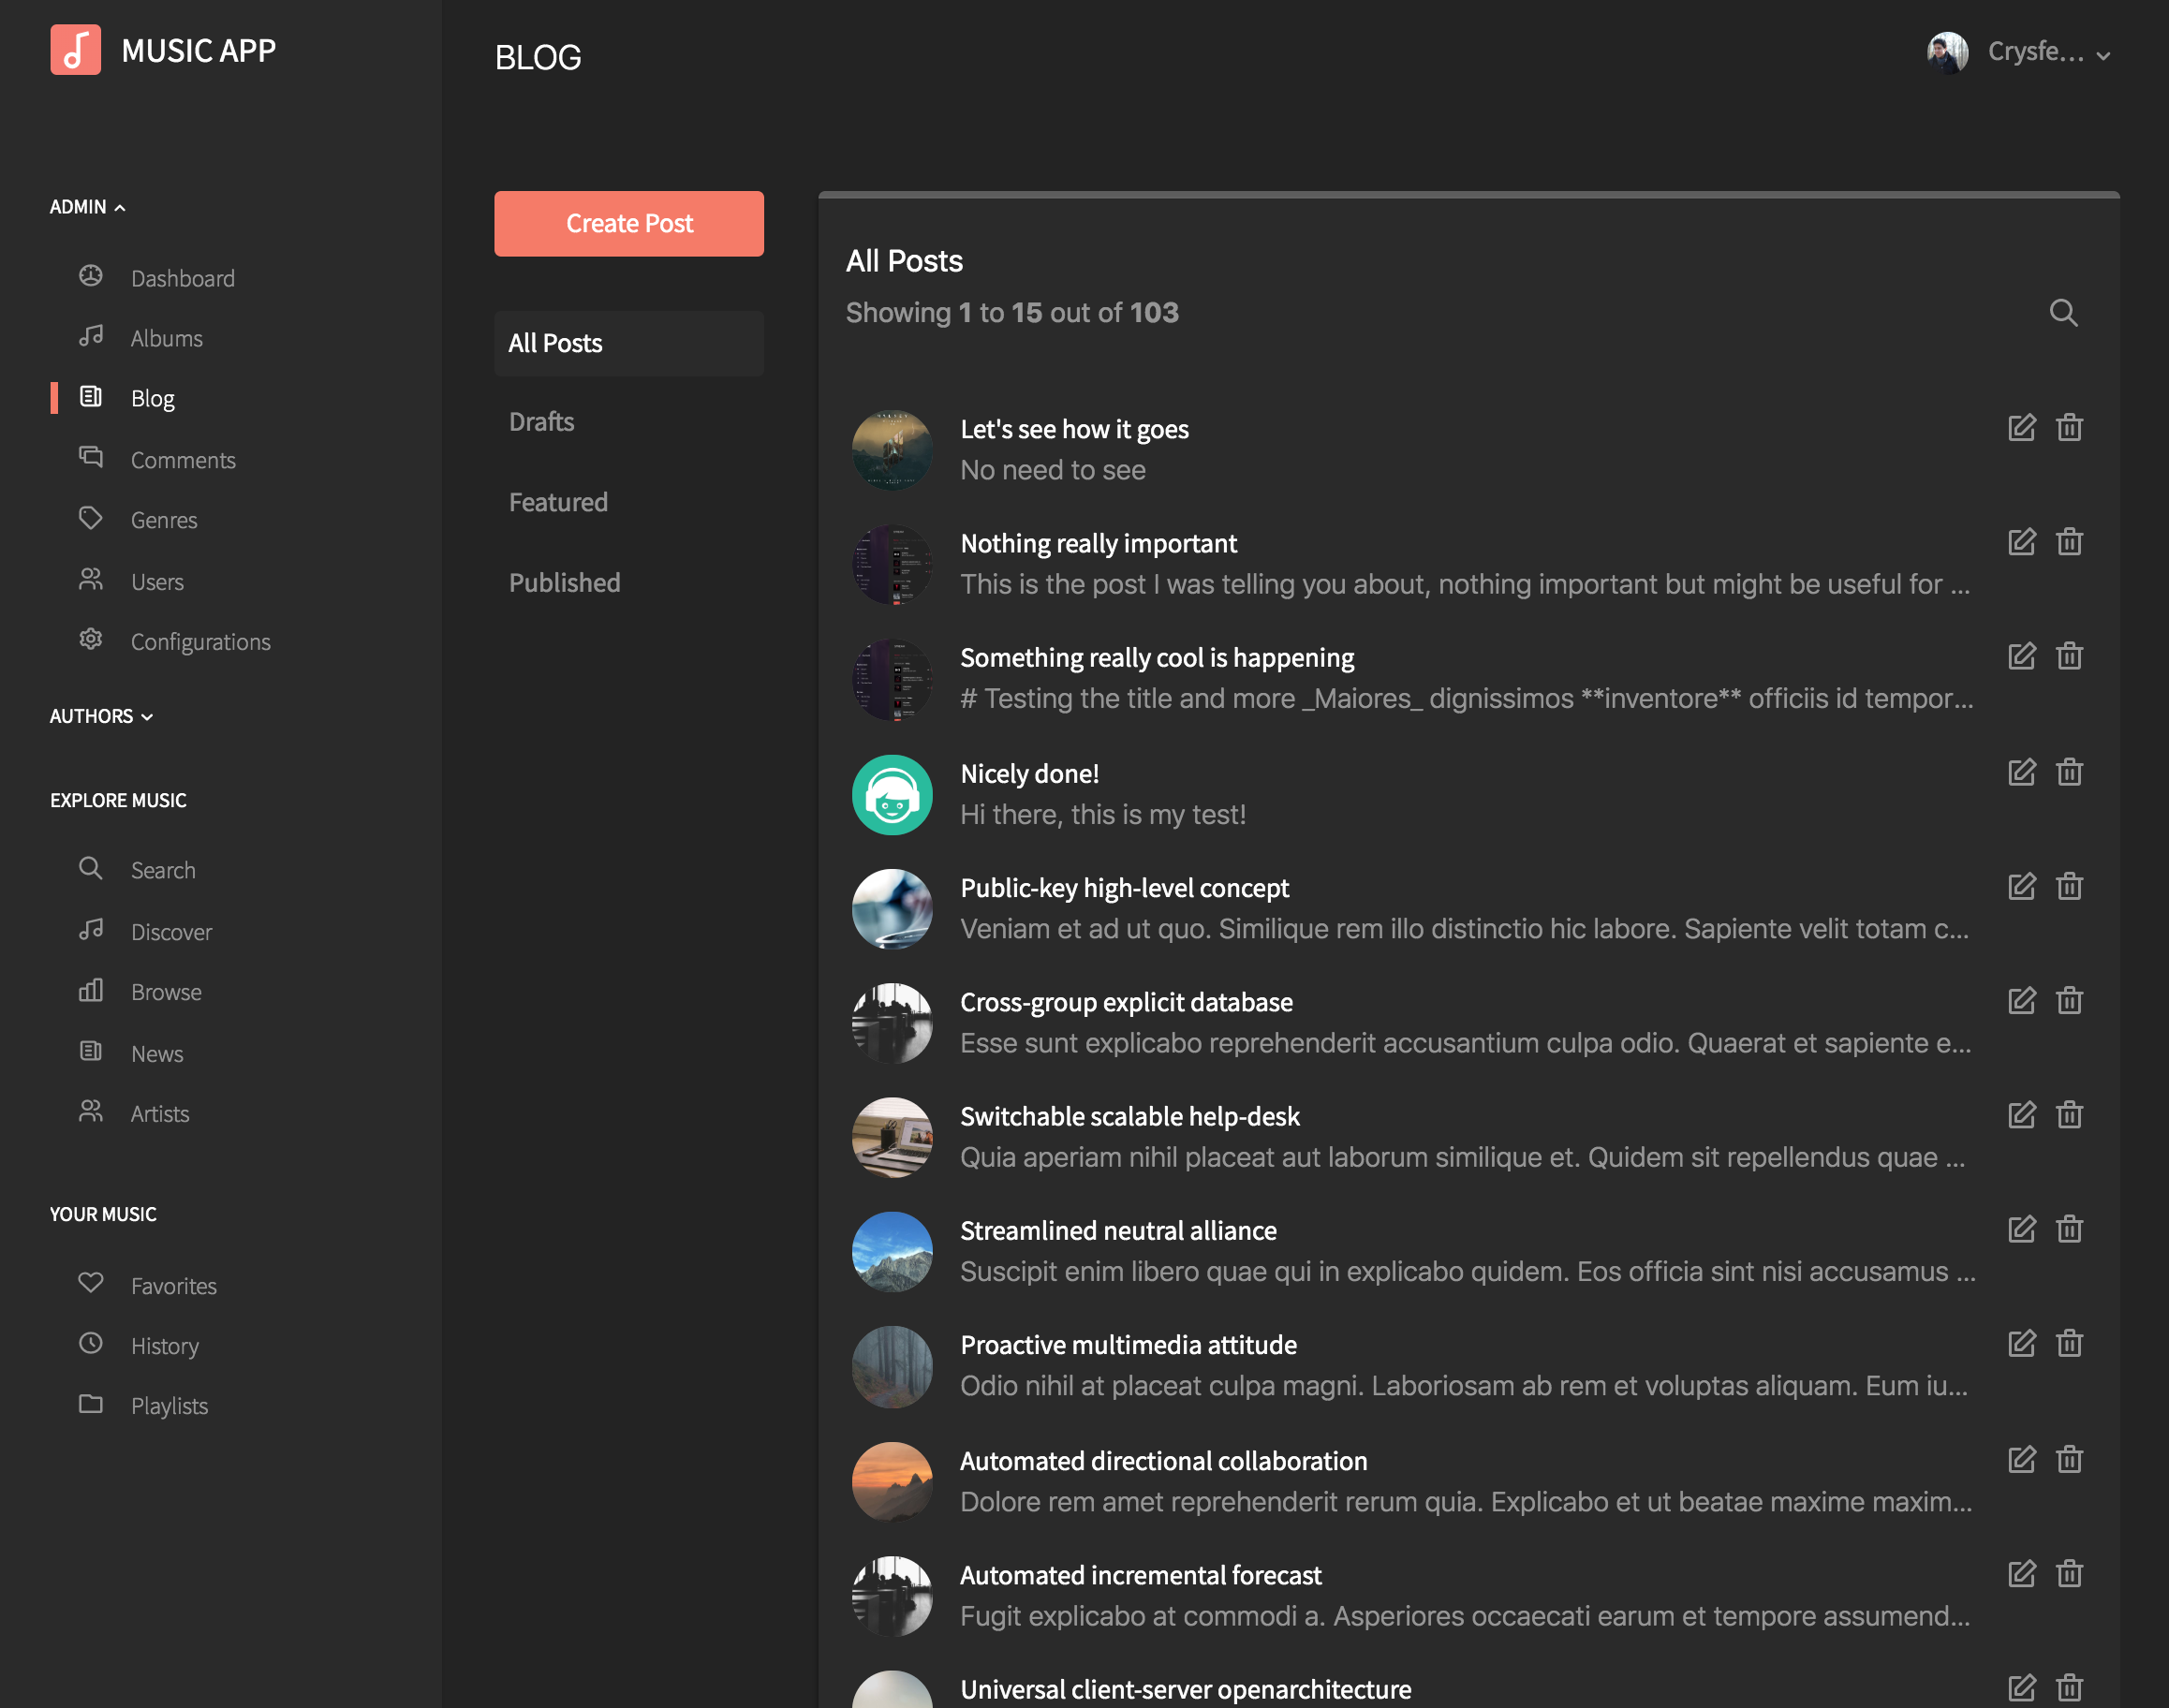
Blog list
Admins can see the list of blog post, from there it's possible to edit or remove an existing post.
There's a search panel at the top, by default is hidden but shows up when the user clicks the search icon.
The admins can see the current drafts if any.
Blog detail
When adding or editing a post, the users can upload an image to attach to the post. User can disable comments and publish/unpublish.
It comes with a WYSIWYG editor to format the content to your needs.
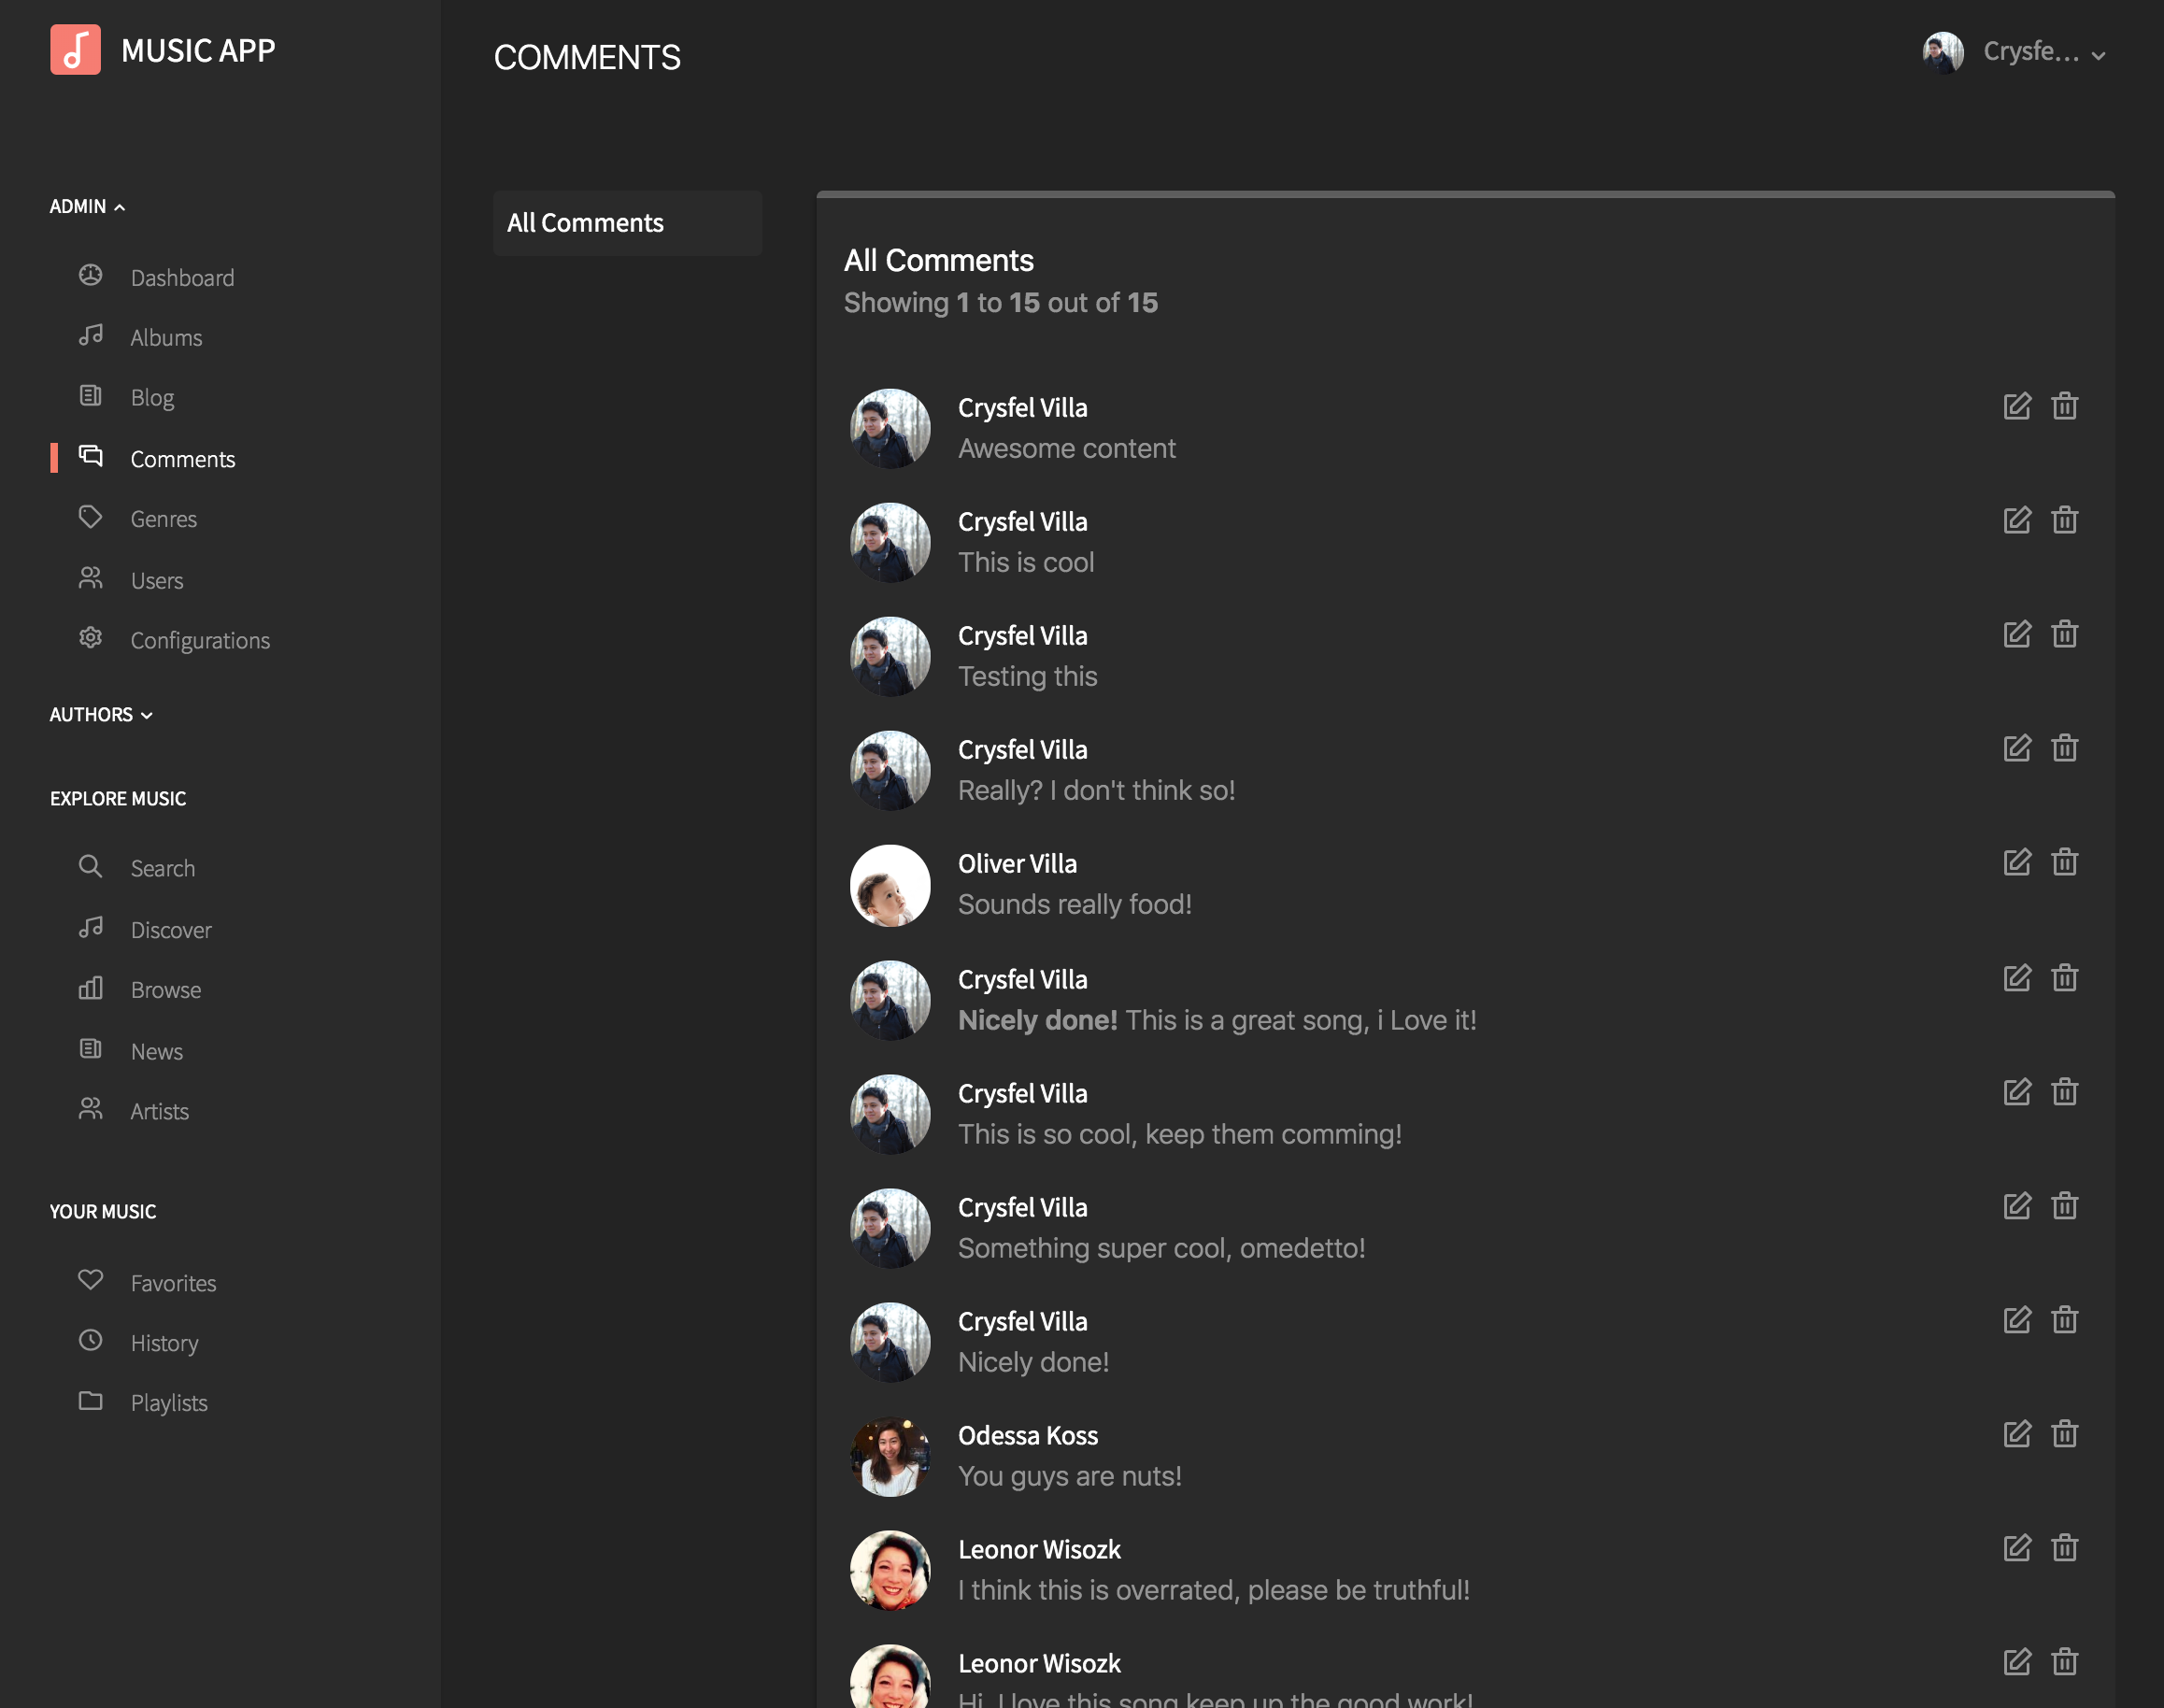
Comment list
As an admin, you can see the list of comment accross all songs and blog posts. The latest comment are displayed first.
From here the admin can remove or edit a giving comment.
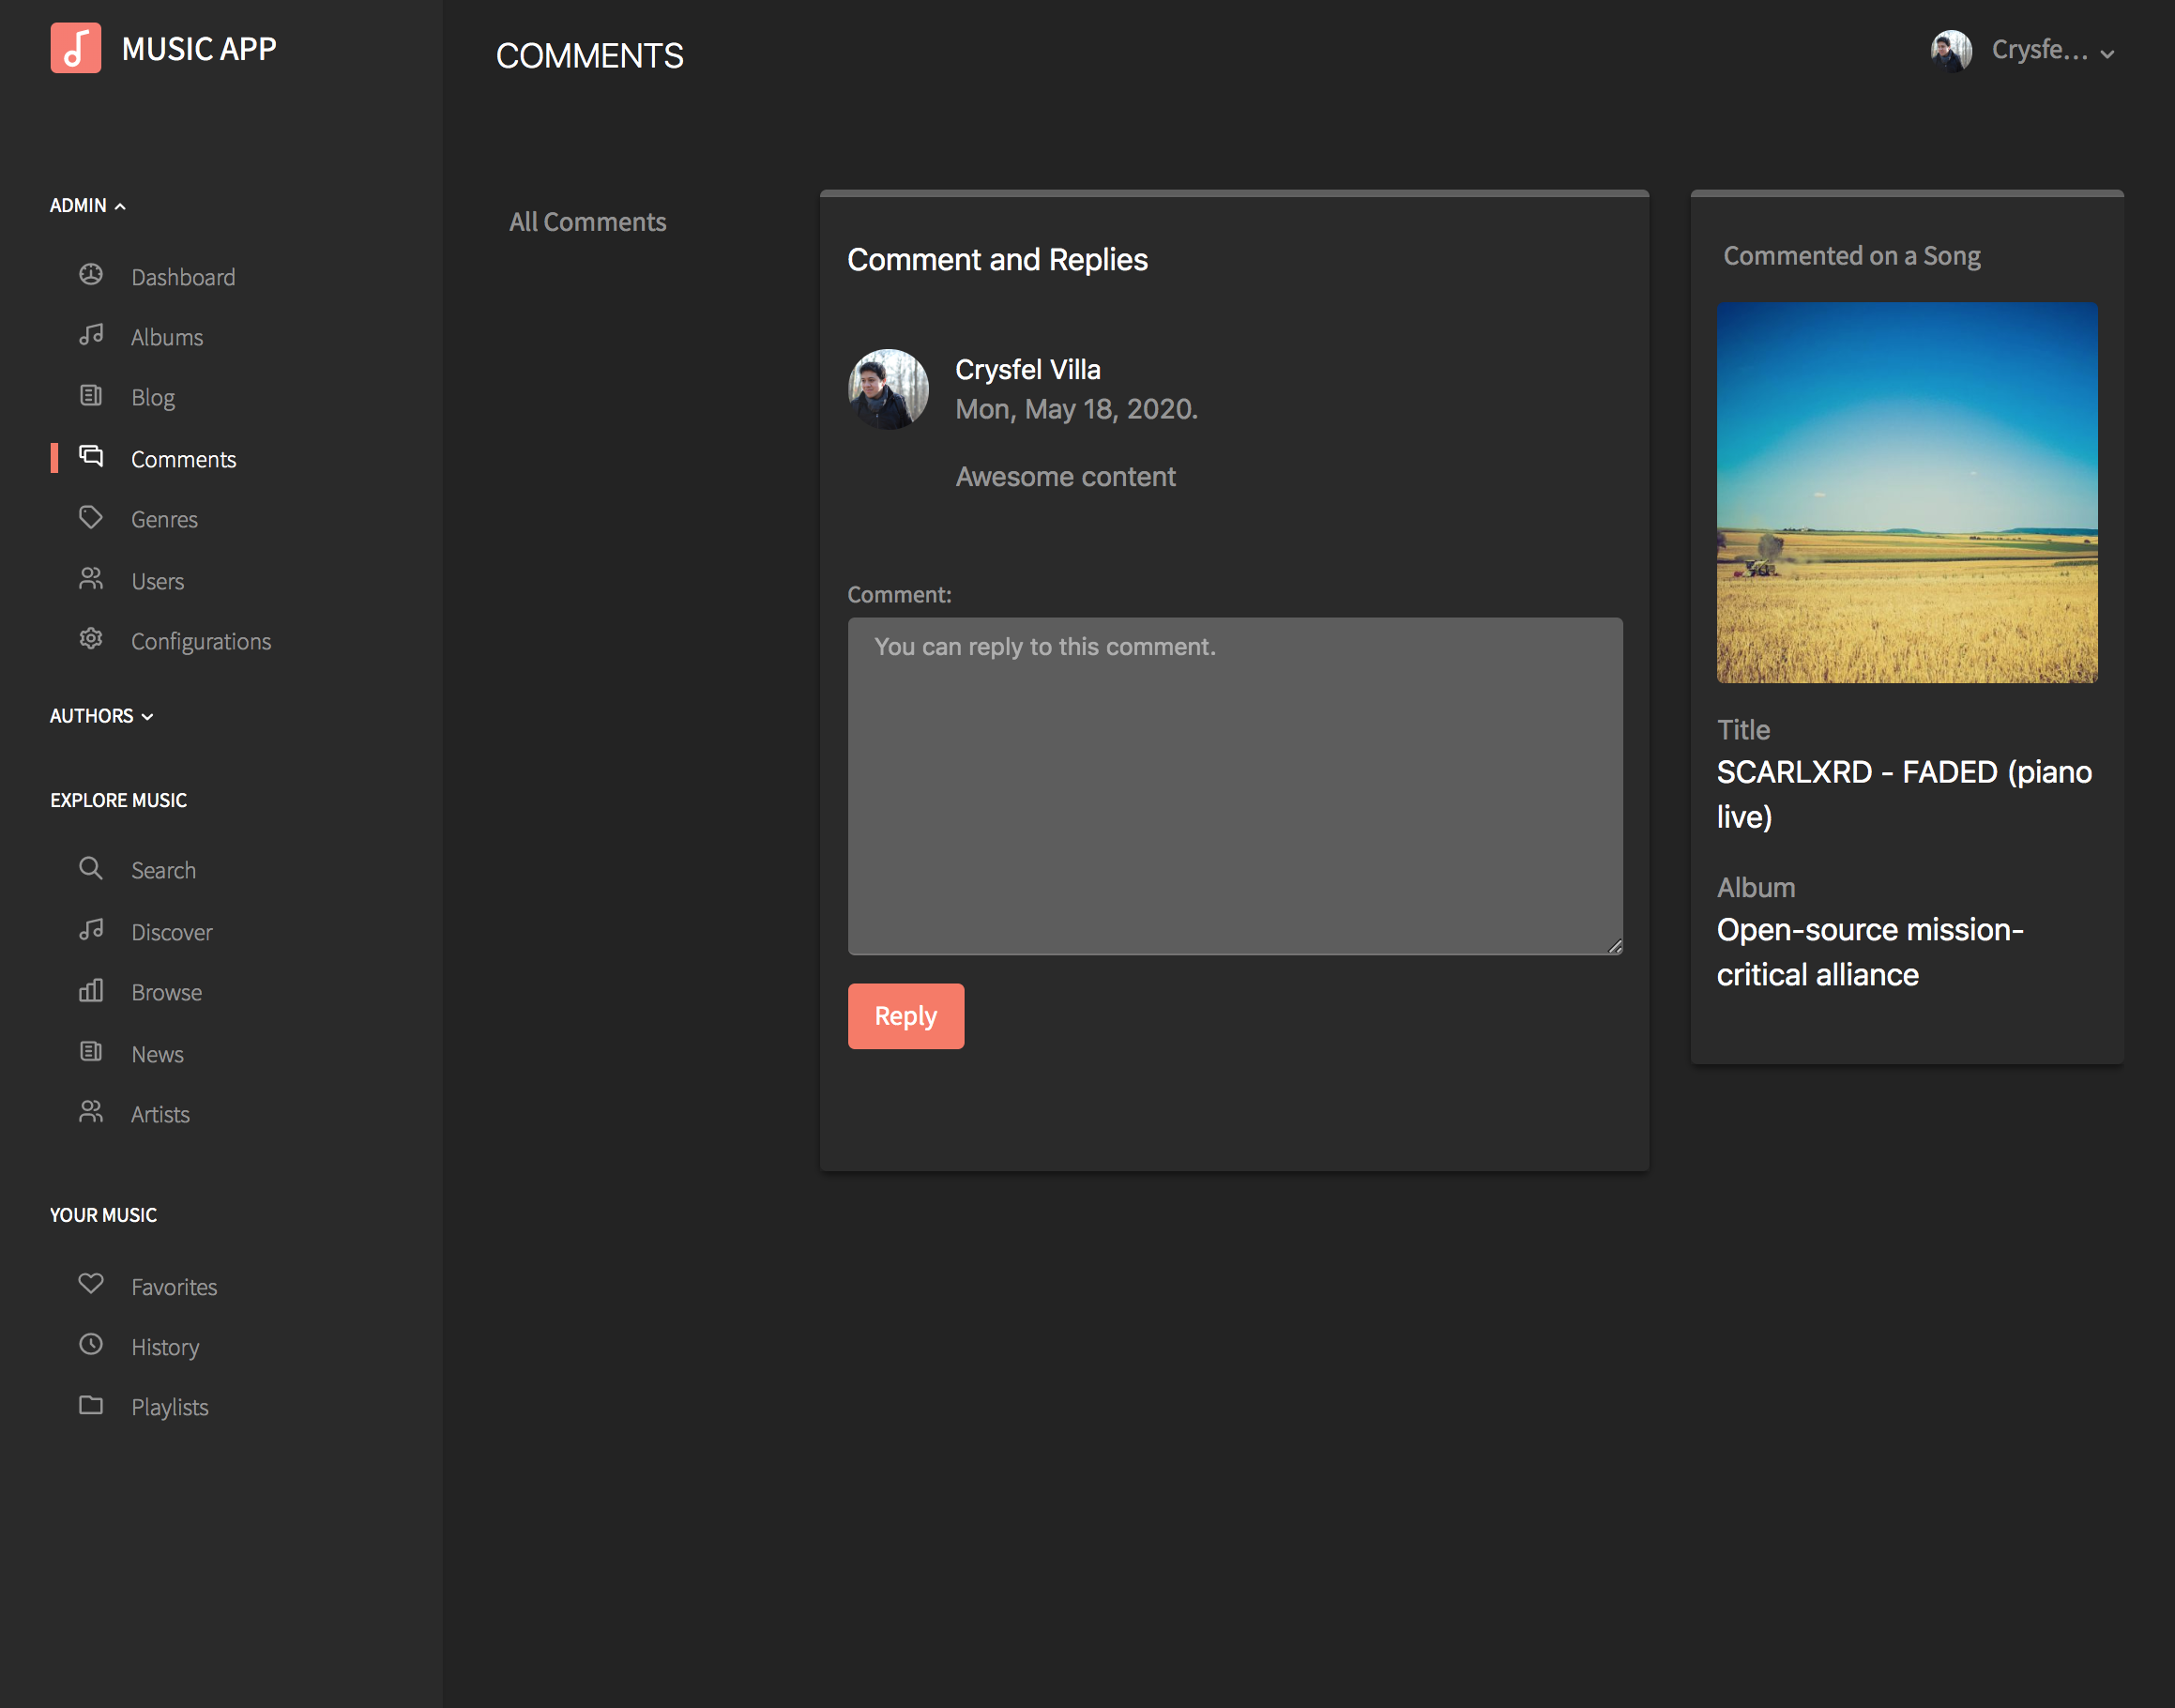
Comment detail
Admins can see the comment along with the content where the comment was left (Song or Post).
Admins can reply to a comment directly from here.
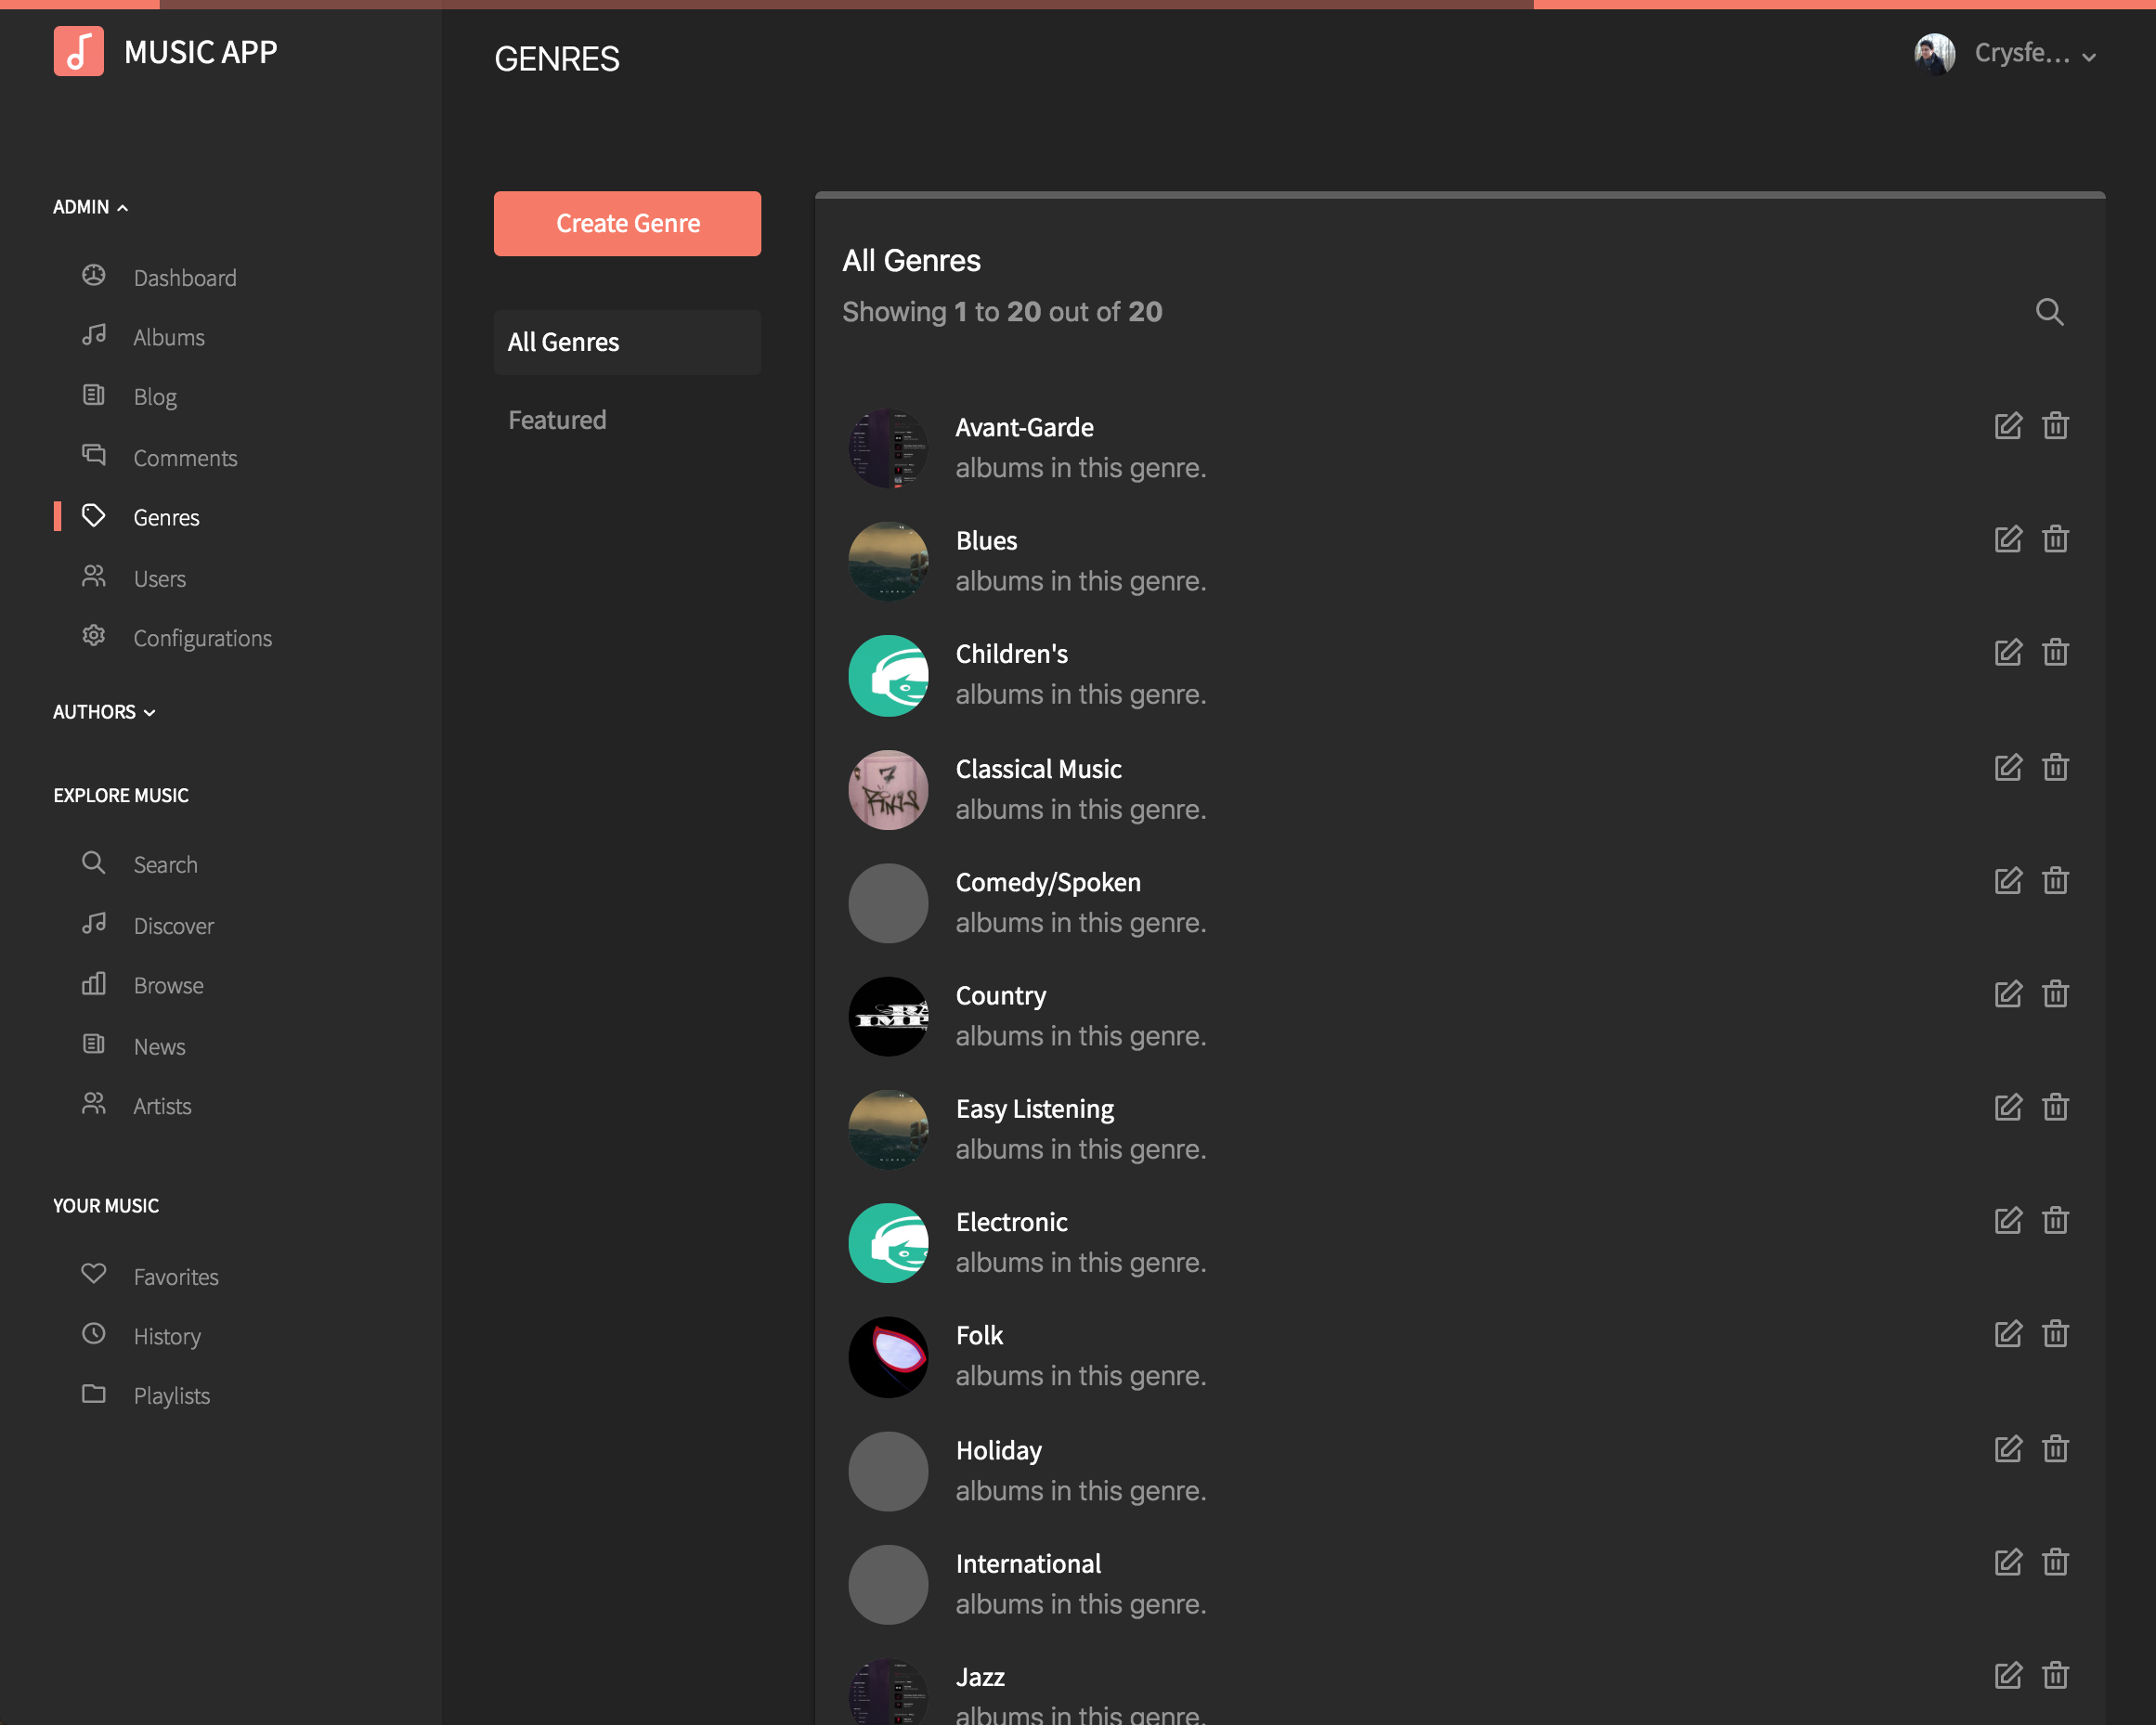
Genres
As an admin, you can list all genres available in the platform. From here you can remove, edit or add new genres.
If remove a genre, the songs and albums attached to that genre will not be removed.
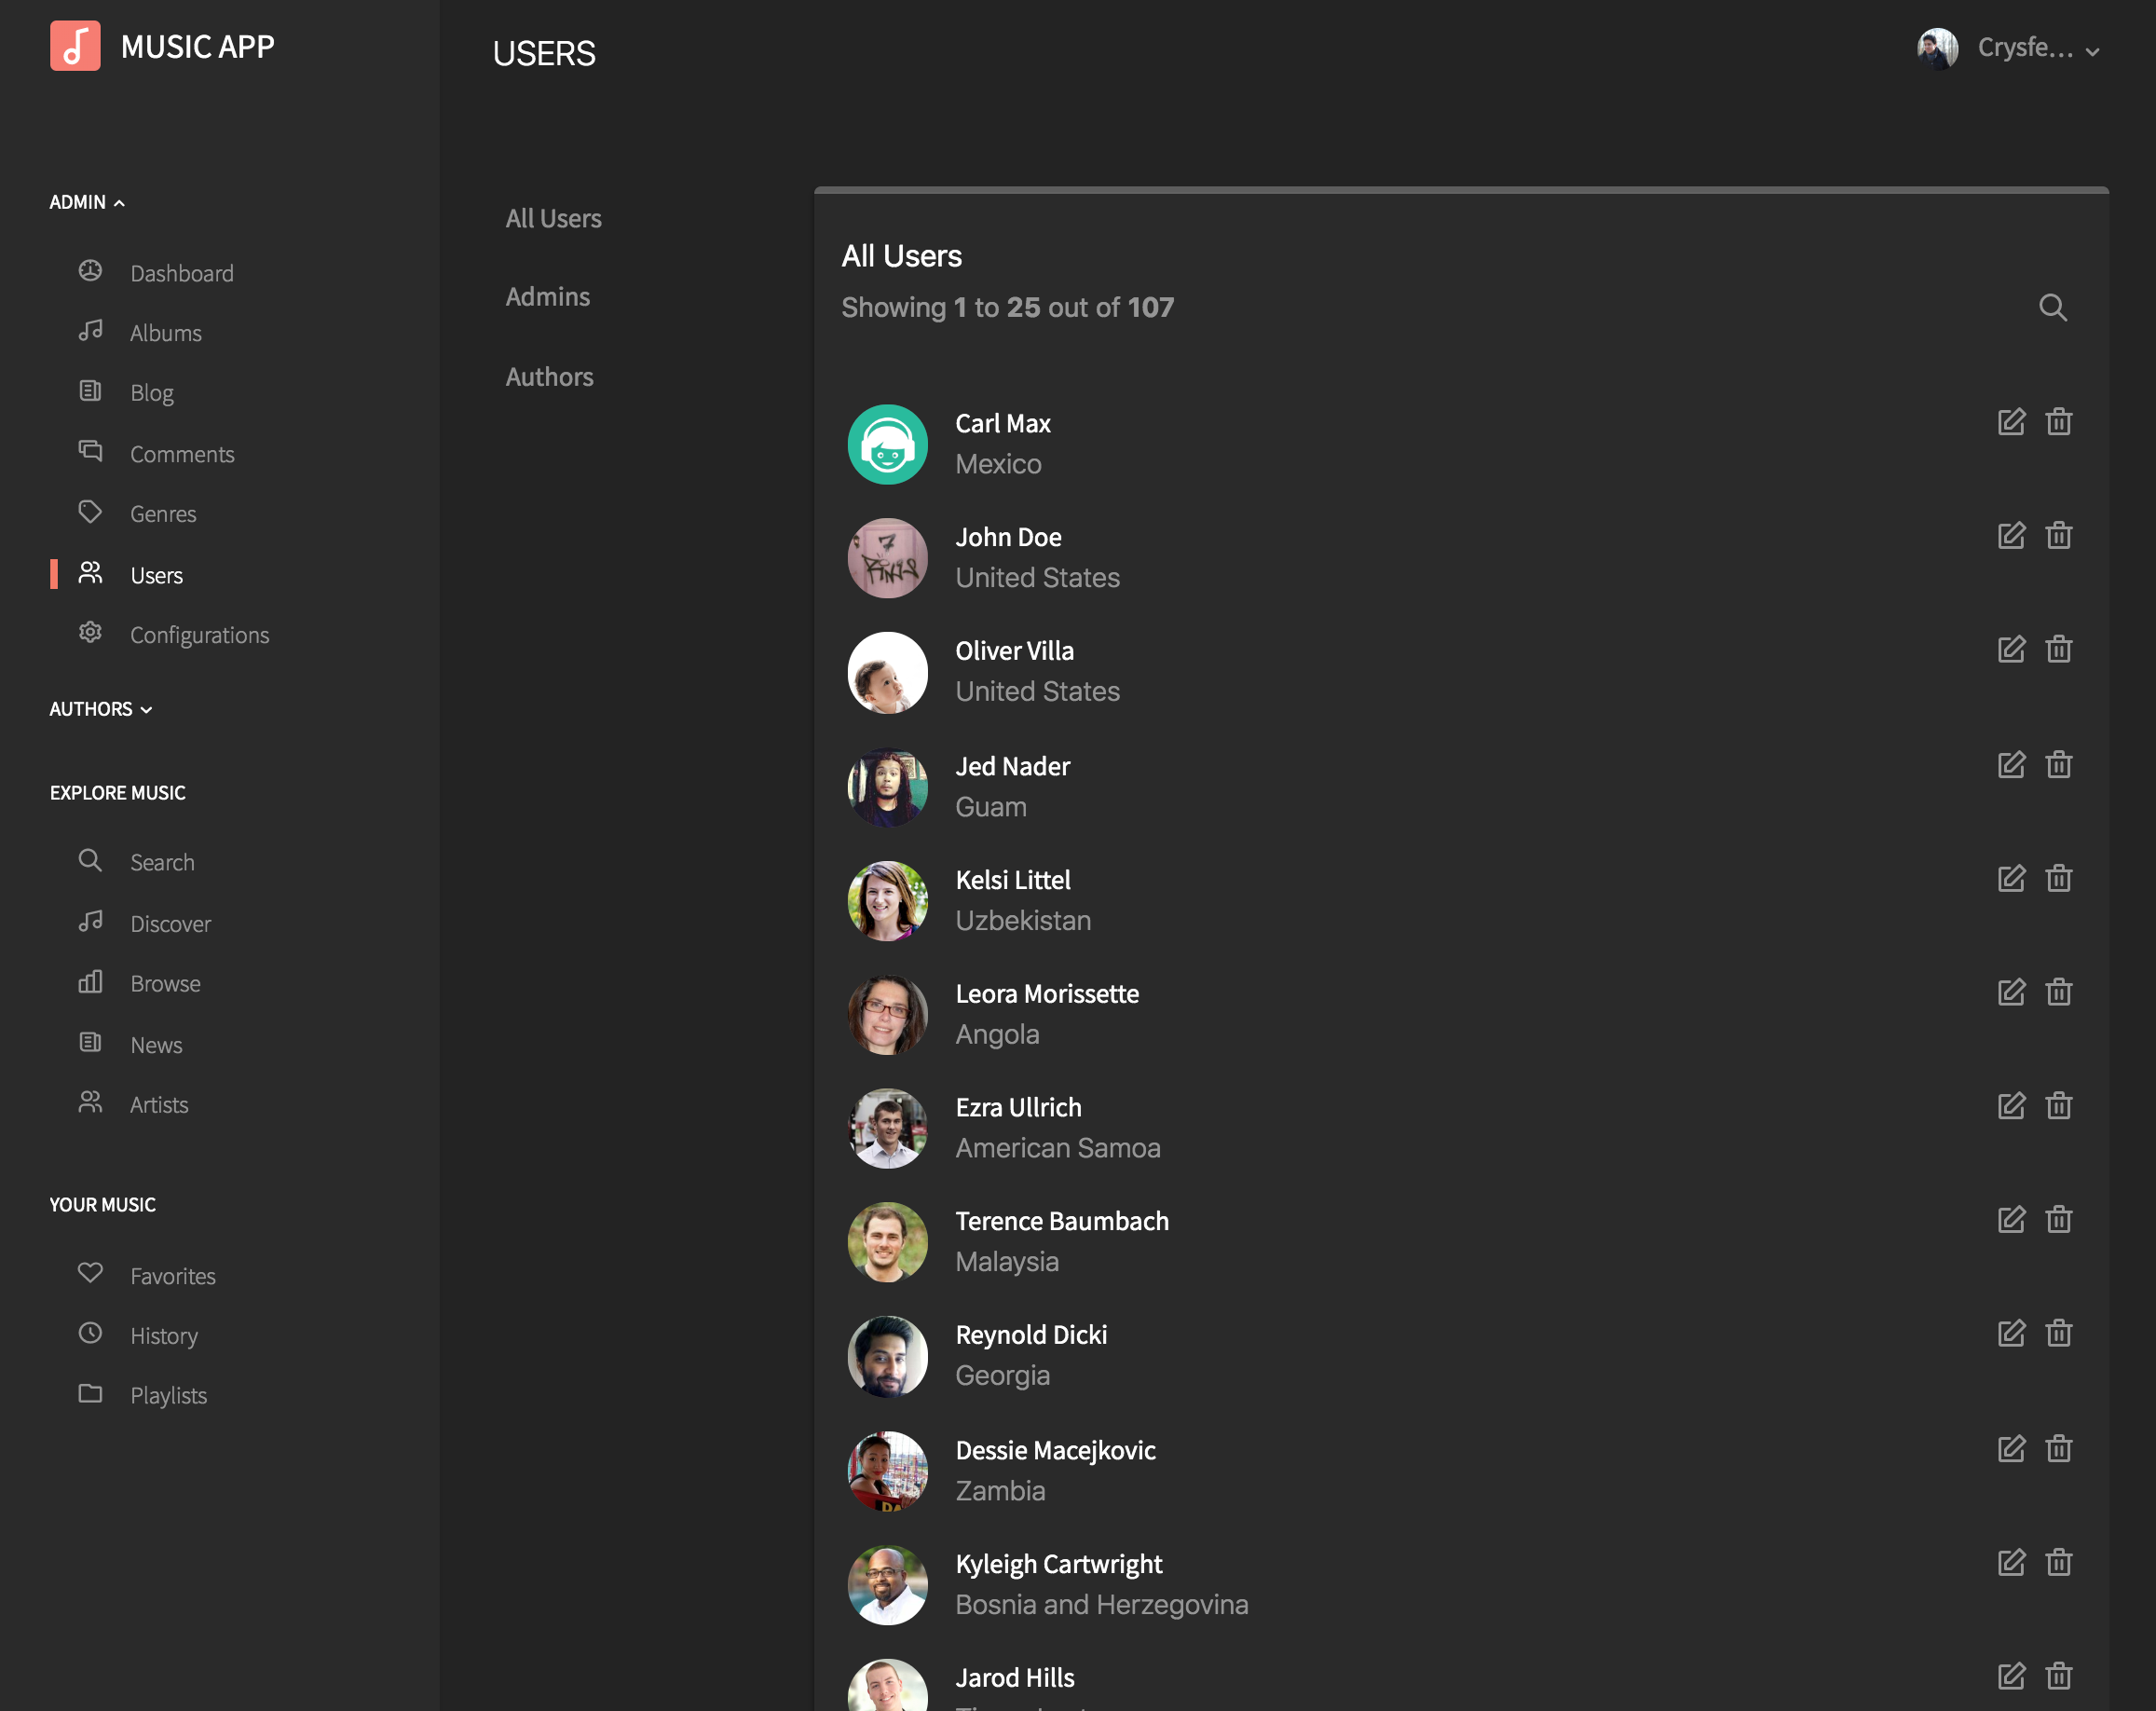
Users
As an admin, you can see all users register in the platform. From here, you can remove a user or edit their information as well as allow them to be authors or not.
If an author is removed, all his albums and songs will deseapear from the paltform as well. Be careful when you decide to remove users.
You can search users by name, clicking in the search icon will show a search field where you can type the name of the user.
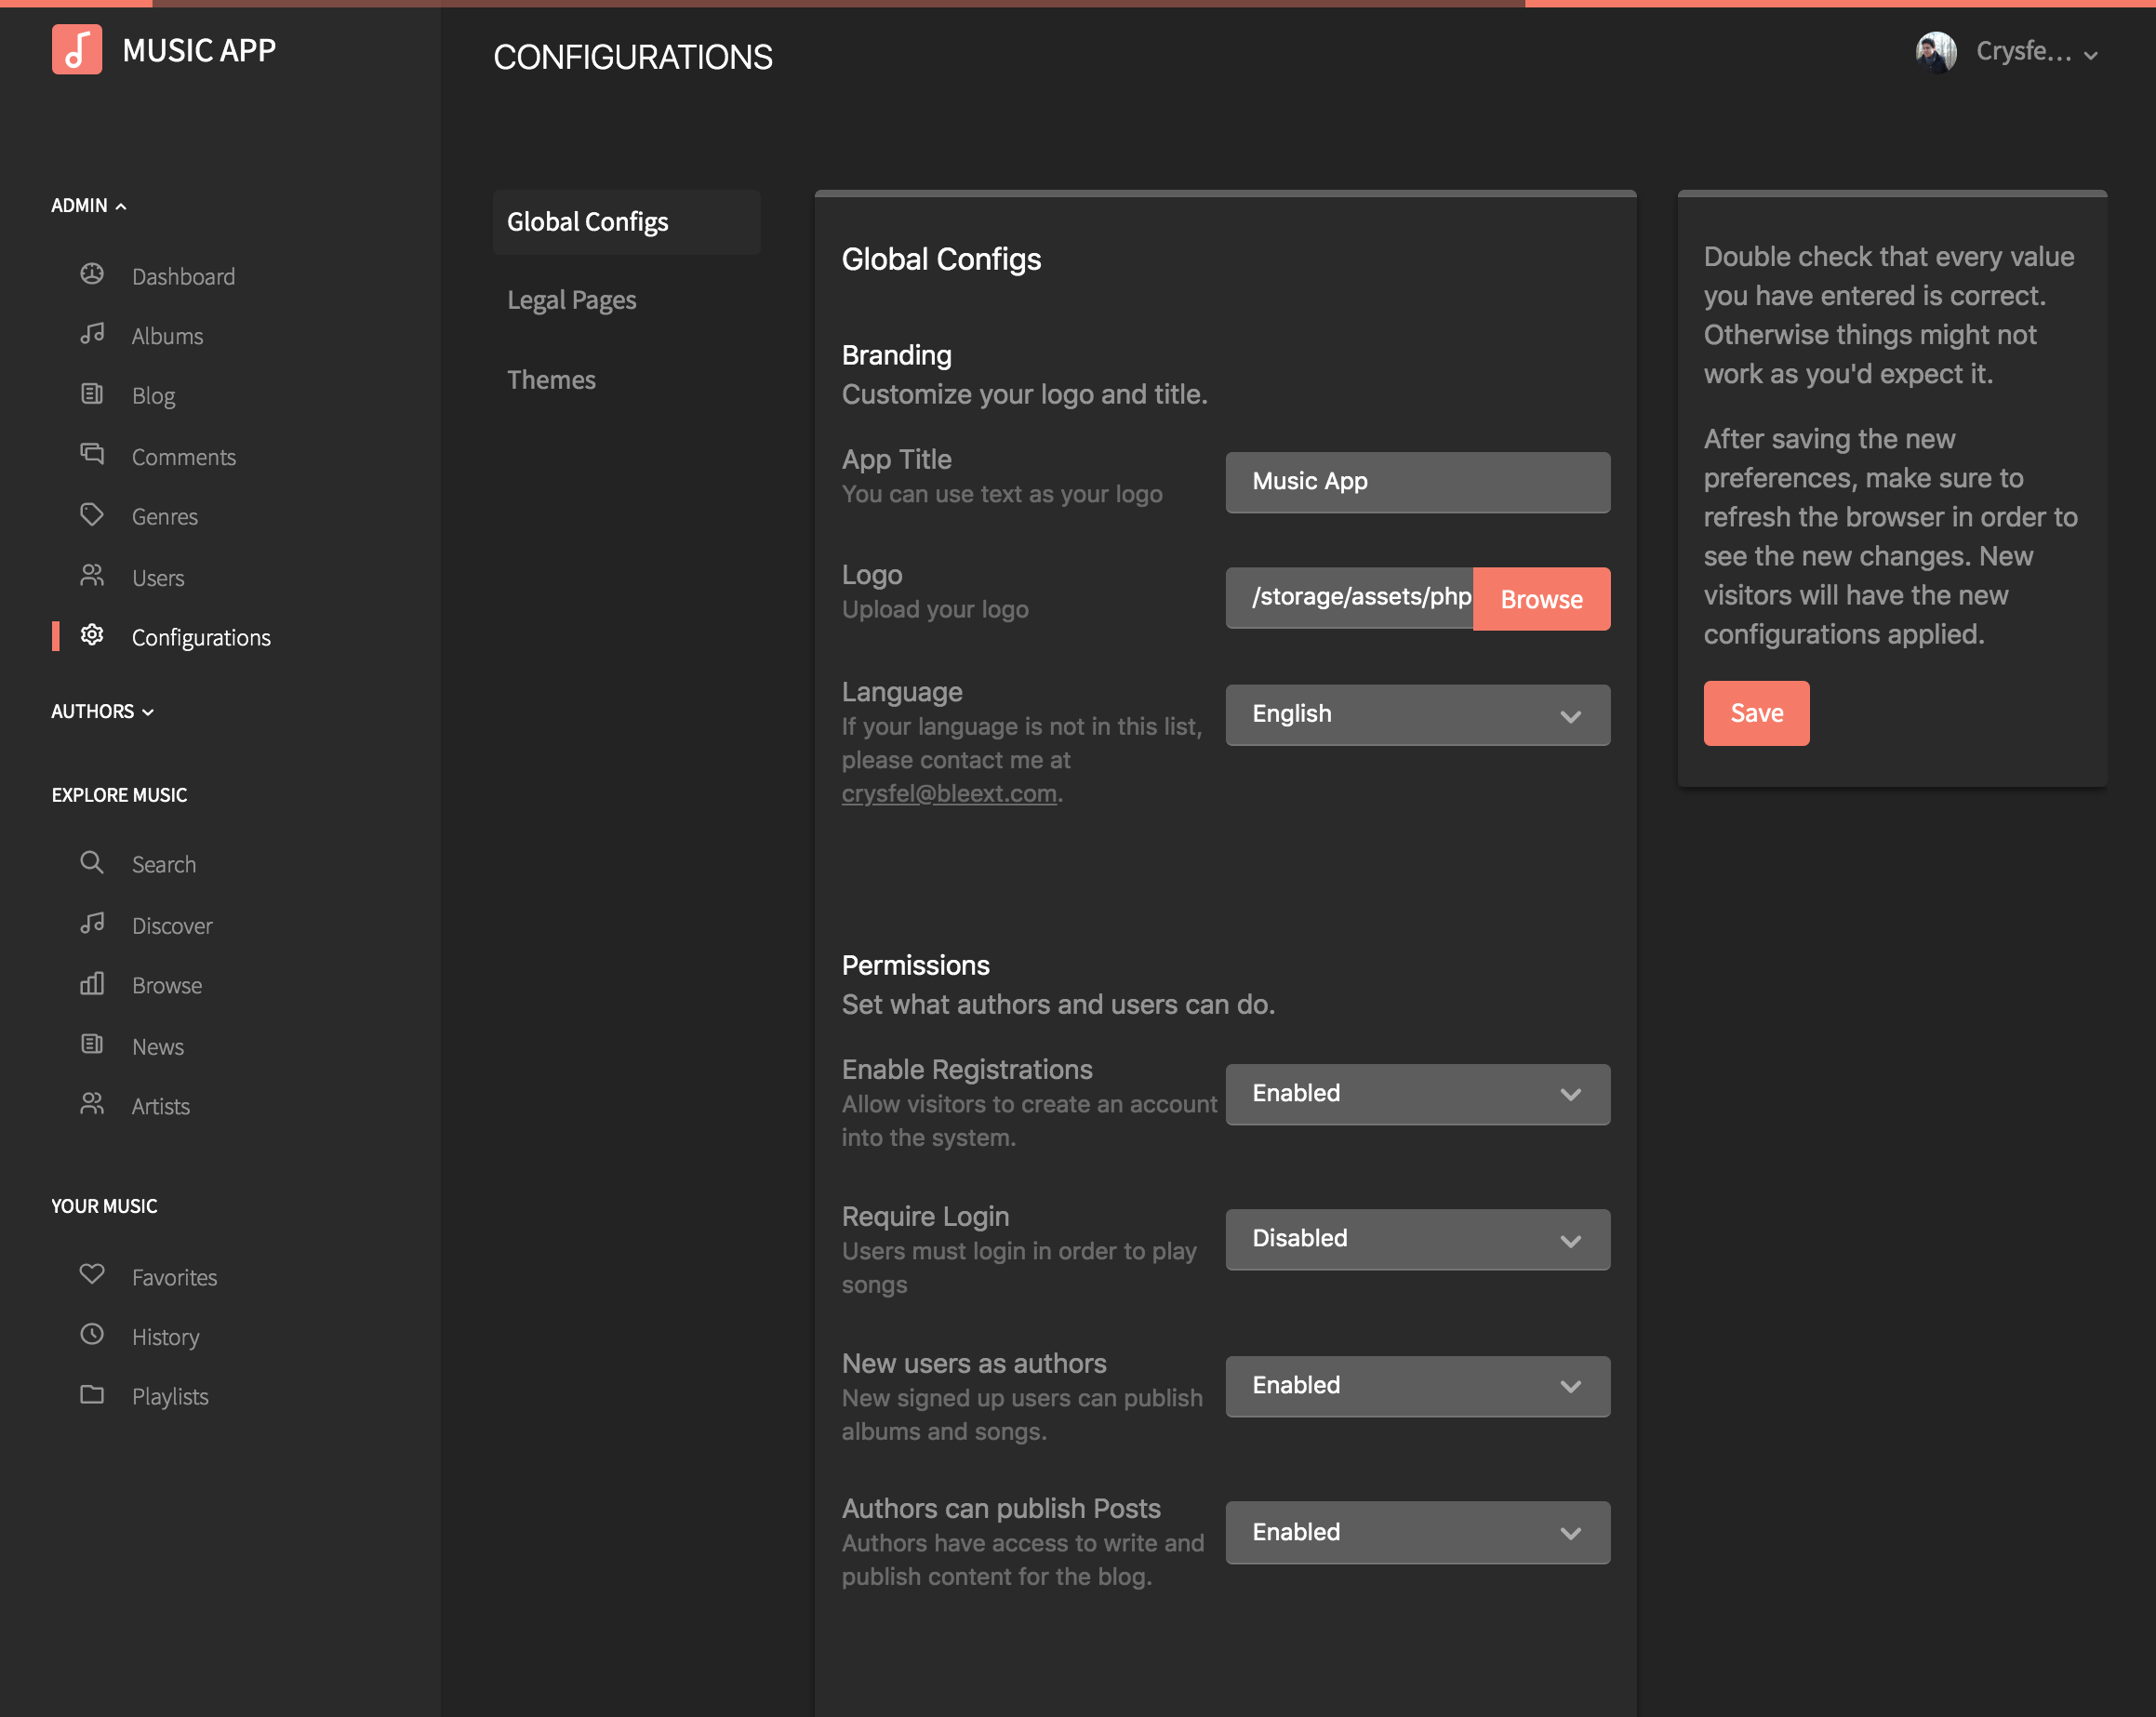
Configurations
As an admin, you can configure the app settings, such as name of the app, upload a logo, set the language, permissions and google analytics.
From here you can require users to login in order to listen the music.
You can also allow users to be authors by just registering and allow them to publish content in the blog or not.
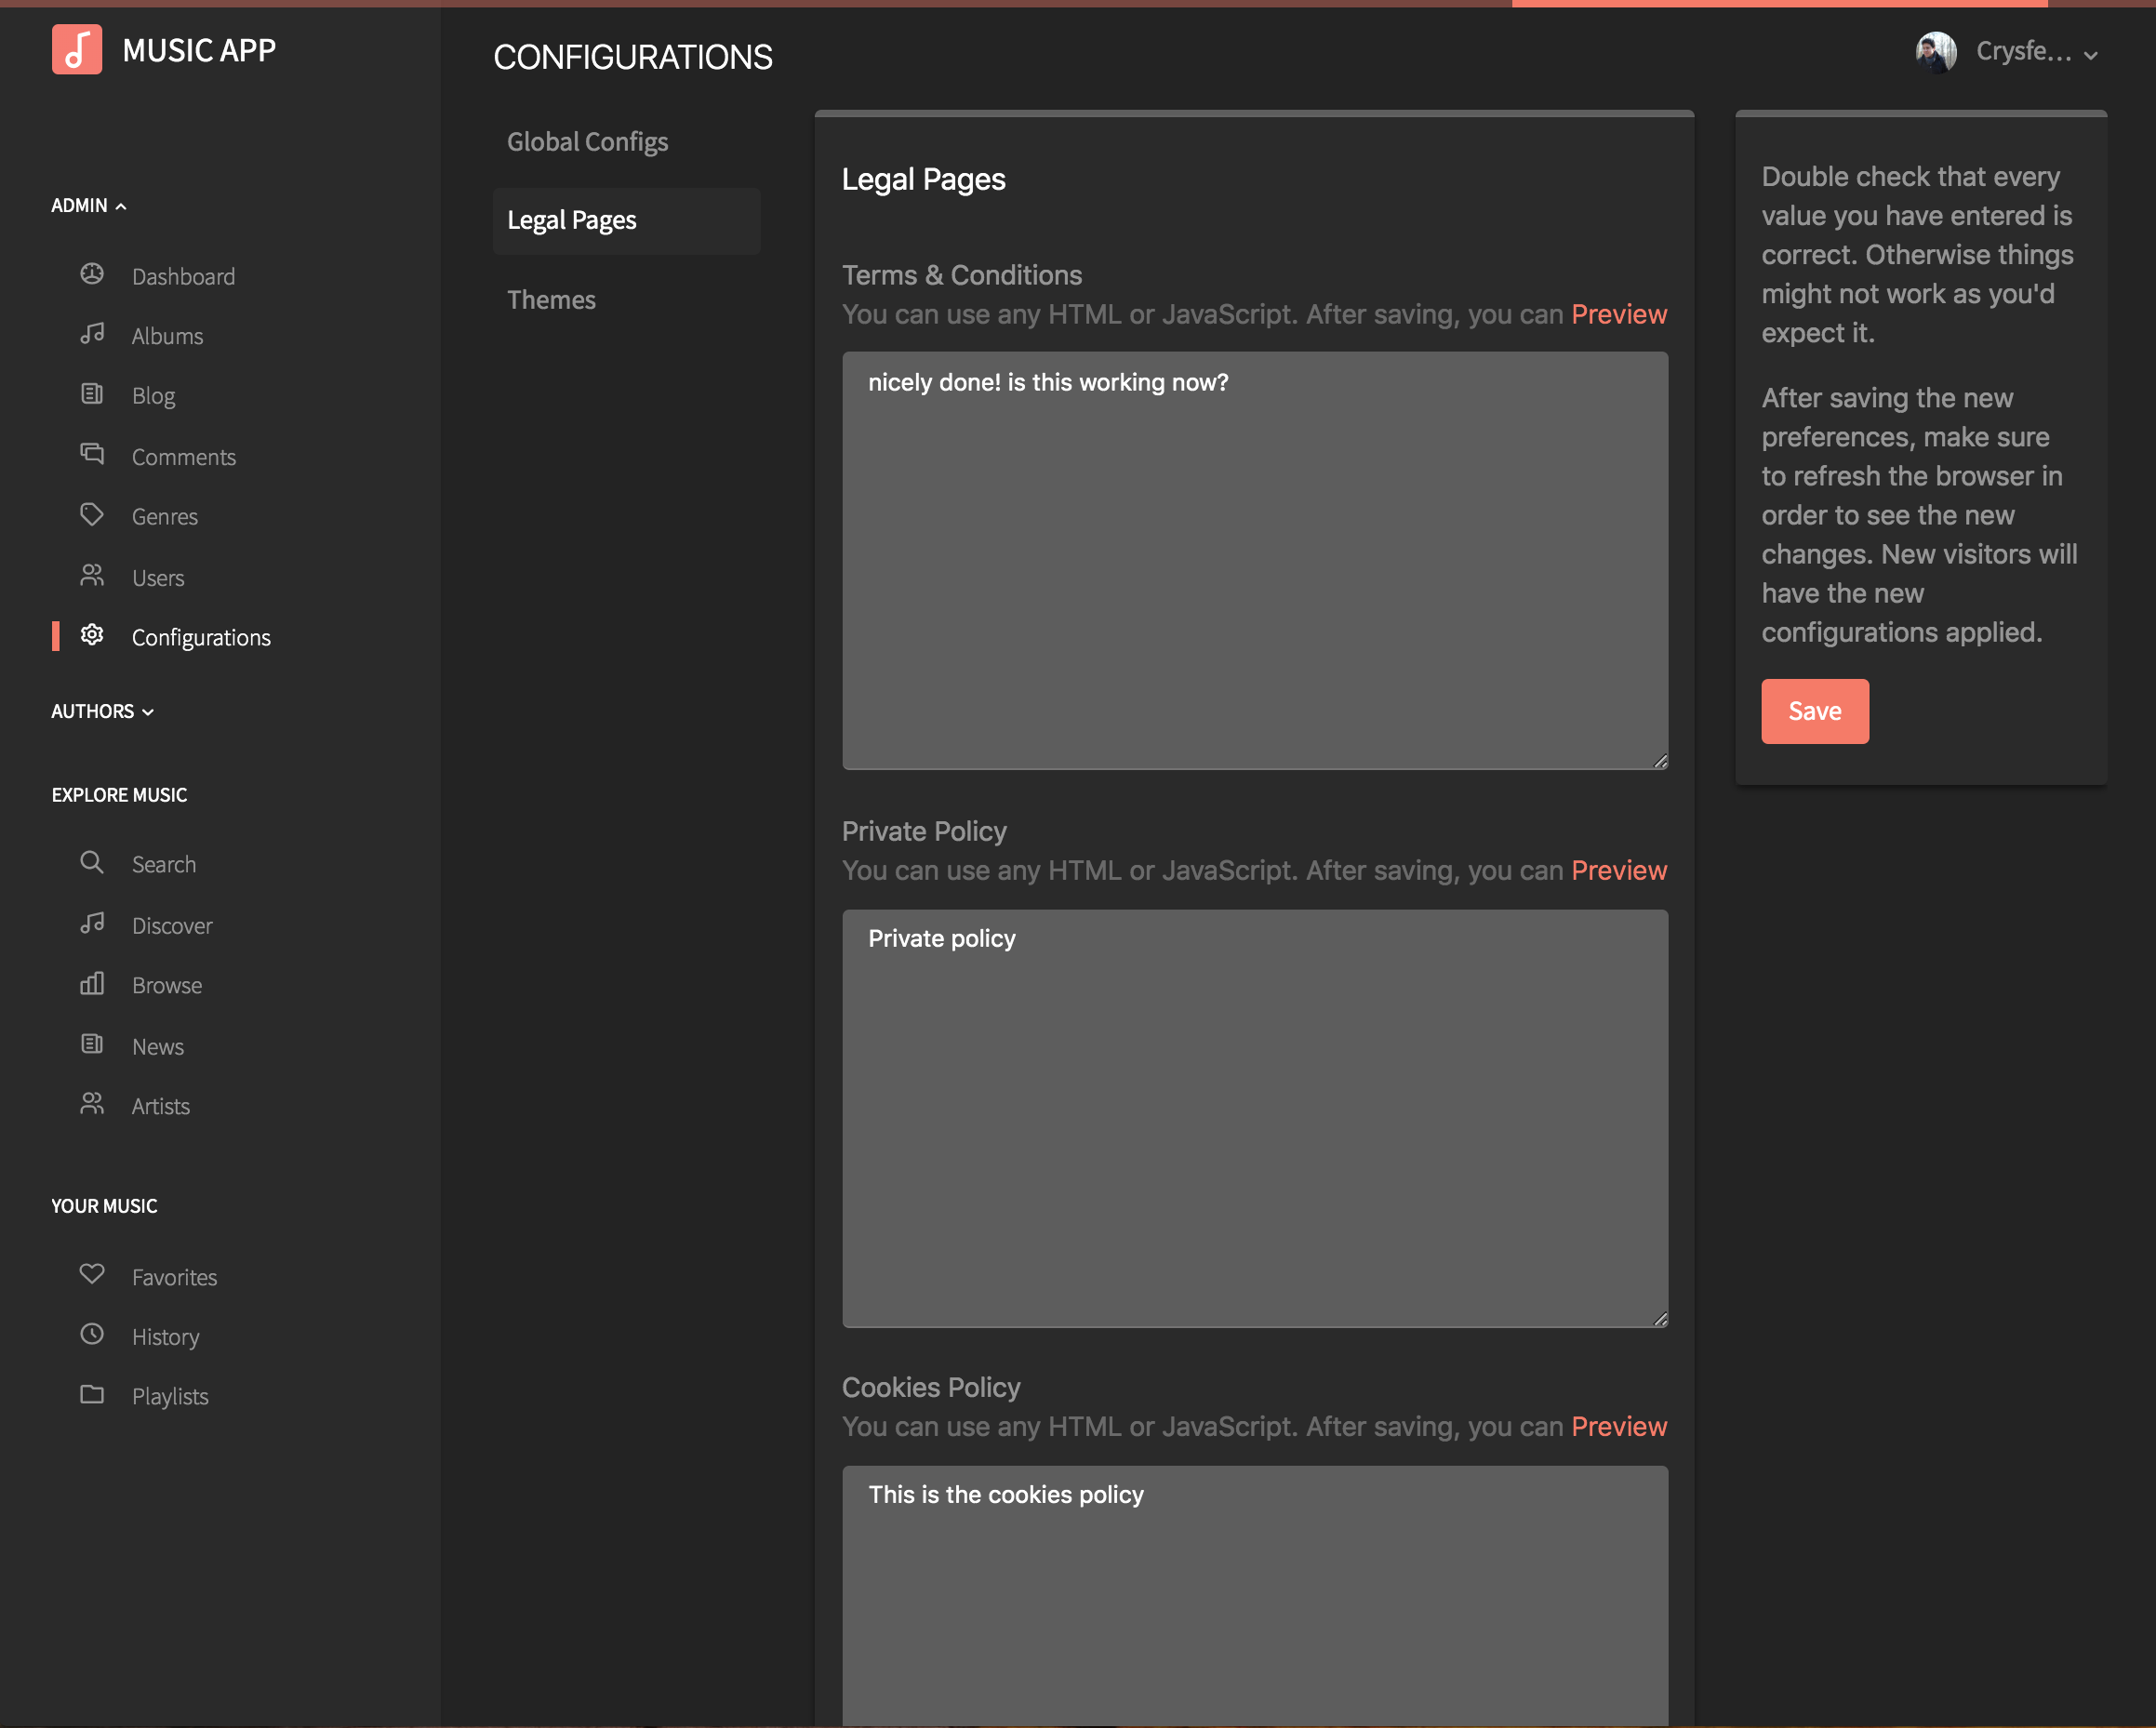
Legal Pages
There are several legal pages you need to setup as an admin. Terms and Conditions, Cookies policy, Privacy Policy and a code of conduct.
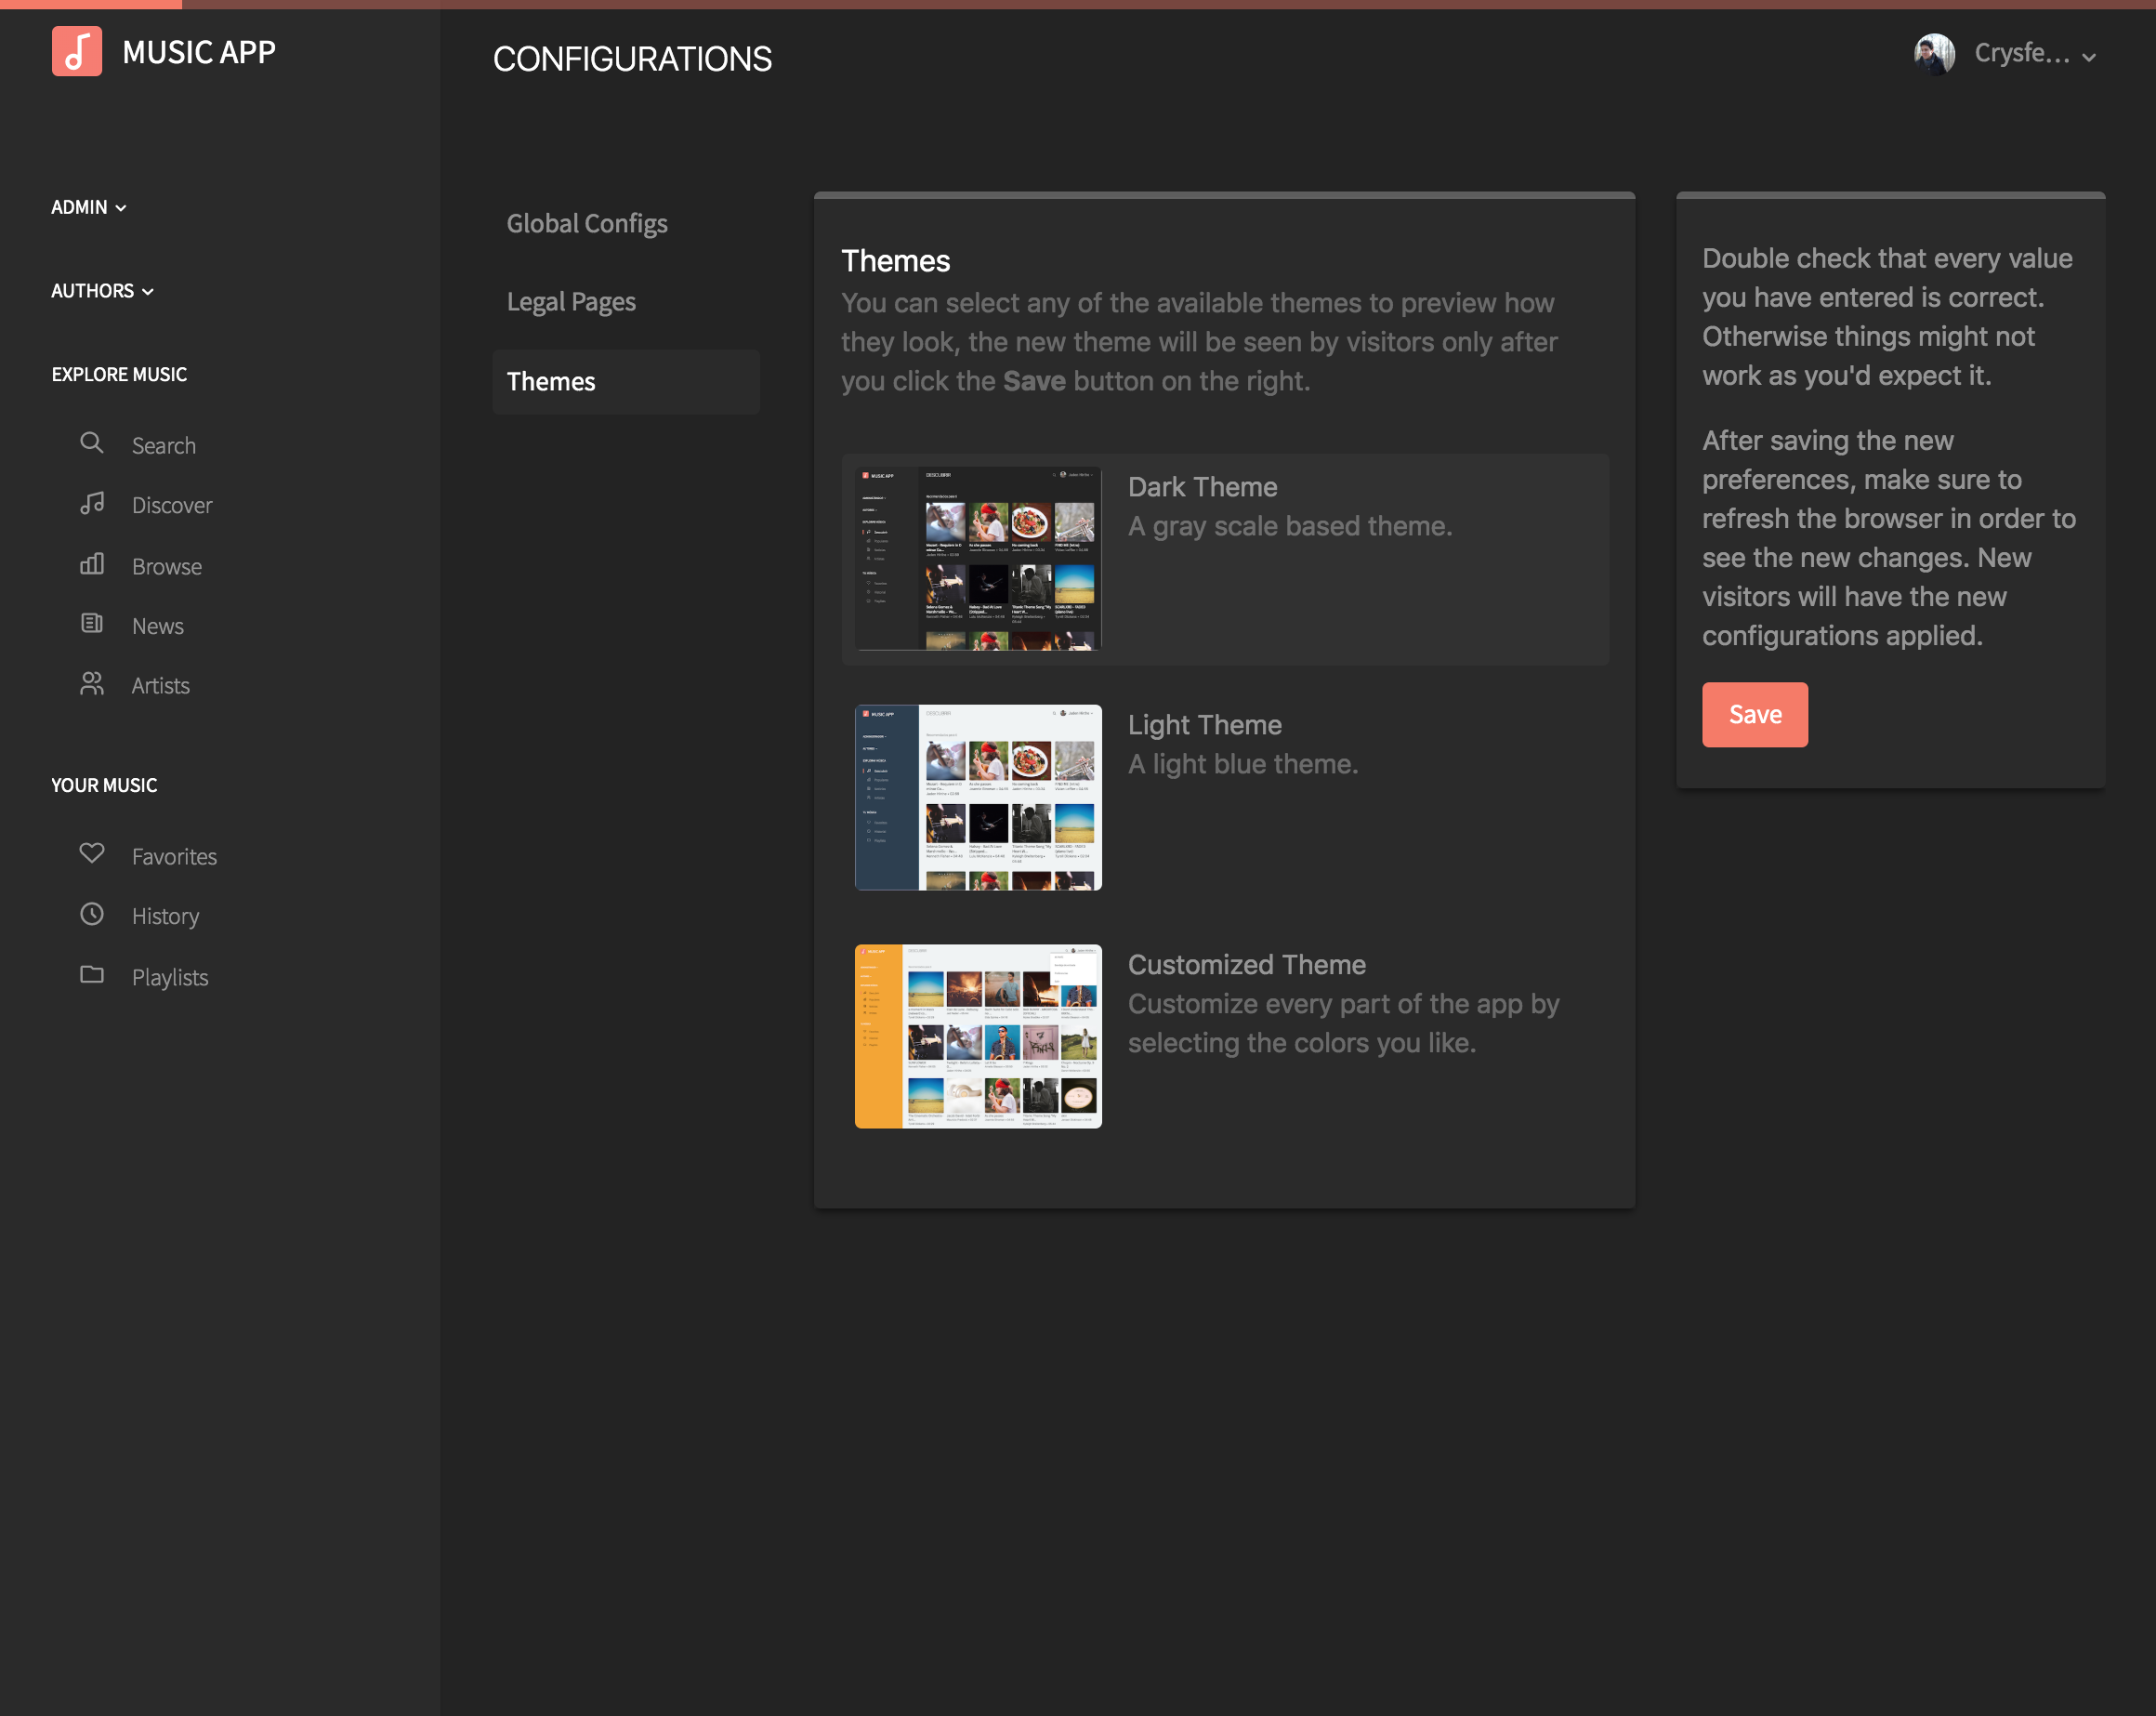
Theaming
Admins can select one of the two available themes that come with the app.
You can select the color of every single component in the app or even write your own css to style the app to your needs.
Common Errors
This error means there's something wrong with the database configurations. Open the .env file and make sure the host, port and credentials are correct.
SQLSTATE[HY000] [2002] Connection refused
In order to fix this error you need to update your mysql database server to version 5.7.13 or above.
If updagrading your mysql server is not possible, you will need to disable support for emojis. In order to do that, you need to open the config/database.php file and update the following values insde the mysql configuration:
'charset' => 'utf8',
'collation' => 'utf8_unicode_ci',
SQLSTATE[42000]: Syntax error or access violation: 1071 Specified key was too long; max key length is 767 bytes
This usually happens when the .env file contains an error, make sure there are not blank spaces in the strings, if that's the case use quotes.
PHP Fatal error: Uncaught ReflectionException: Class config does not exist in /var/www/ YOUR_APP/vendor/laravel/ framework/src/Illuminate/ Container/Container.php:767
This error will appear because you are trying to upload a larger file then the size allowed. In order to fix this, you need to update your php.ini with the following values:
upload_max_filesize = 50M
post_max_size = 50M
memory_limit = 50M
In addition if using NGinx, you might want to increase the value of `client_max_body_size` in `/etc/nginx/nginx.conf` to a higher number.
client_max_body_size 50M;
413 Request Entity Too Large
This error will appear because you didn't set the `APP_KEY`, in order to fix this issue you need to run the following command in your terminal.
$ php artisan key:generate
The only supported ciphers are AES-128-CBC and AES-256-CBC with the correct key lengths.
FAQs
Do you recommend a hosting provider?
Yes, I'd recommend you to use Digital Ocean! For $5 a month you can have a server up and running in minutes, they have one click install LAMP or LEMP stacks. And if you use my link, they will give you (and also me) $10 dollars if you use my referal link :)
Can you host my website in your servers?
Yes I can! I can admin your website, create the virtual host, update it, backup your databases, do all the required maintenance and all what you need to keep your app running in the cloud. Please contact me through the evanto contact form and we can discuss your needs, then I can give you a quote.
I'm getting an error when installing the app, can you help me?
Yes, please contact me through the Envato contact form.
Somethign is not working correctly, can you help?
Yes, please contact me through the Envato contact form.
I have a unique requirement, can you add it for me?
Yes, please contact me through the Envato contact form. We can discuss the requirements and give you a quote. Or maybe that feature is already in the works and it might be included in the next release.
Can you help me to deploy the project to my servers?
Yes, please contact me through the Envato contact form to give you a quote.
How can I customize the email template and content?
You will need to update the views resources/views/emails.